


Water-damaged materials should be dried within 24–48 hours to prevent mold growth, and if that window is missed or swelling occurs, replacement is usually required rather than repair. Drywall that remains sound, shows no swelling, and has intact seams may sometimes be dried in place, but a stained surface alone doesn't prove the wall is safe.
You notice a brown mark spreading across the ceiling in your Portland home, or a soft patch appears beside a bathroom supply line in Beaverton. The first reaction is usually to reach for primer or call someone to patch the stain. That can be the wrong first move. The leak must be stopped, the assembly must be dried, and the drywall must be checked beyond its exposed face.
Gypsum board is porous. Water can enter the paper facing and core, then migrate behind the panel into insulation, framing, and the wall cavity. A successful repair isn't just a clean patch. It means correcting the source, proving the assembly is dry, removing material that can't be restored, and rebuilding the finish so the repaired area doesn't telegraph through fresh paint.
Table of Contents
- Recognizing the 24-48 Hour Response Window
- Inspecting Drywall for Hidden Moisture and Structural Issues
- Deciding Between Drying in Place and Full Replacement
- The Repair Process From Demolition to Level 5 Finish
- When to Call a Professional Contractor in Portland
- Cost Estimation and Insurance Documentation Tips
- Frequently Asked Questions About Water Damage Repair
Recognizing the 24-48 Hour Response Window
A ceiling stain discovered after a rainy morning in Beaverton, or bubbling paint found during a Portland rental turnover, needs attention before anyone reaches for primer. The clock starts when drywall gets wet, not when discoloration becomes visible. EPA guidance recommends drying wet building materials and furnishings within 24–48 hours because prompt drying usually helps prevent mold growth. The EPA mold guidance describes this as a practical response benchmark, not a guaranteed cutoff. Conditions still depend on the leak, the affected assembly, and how quickly the water source is controlled.
Start with source control. Shut off an affected plumbing supply if you can do so safely. Place a container under an active drip, and stay clear of a sagging ceiling. A roof leak, failed bathroom seal, overflowing appliance, or broken pipe may need another trade to correct the cause before drywall work begins. Patching or painting while water continues entering the assembly only conceals the problem.
What to do during the first few hours
- Protect people first: Keep occupants away from sagging ceilings, wet electrical fixtures, and areas where water may have reached wiring.
- Stop the leak: Use the appropriate shutoff, or contact the responsible trade if the source is unsafe or inaccessible.
- Remove surface water: Blot or extract standing water without adding more moisture to the drywall.
- Begin controlled drying: Use air movement and dehumidification where safe. Avoid spreading air through an area with visible mold.
- Document the condition: Photograph staining, bubbling, damaged trim, flooring, and the leak source before demolition.
- Record the timeline: Note when the leak began, when it stopped, and when drying started.
Portland's damp weather can slow the work, particularly when moisture is trapped in a wall or ceiling cavity. Keep the focus on the assembly, not only the exposed face. Water can remain behind baseboards, inside insulation, or around framing after the paper surface feels dry.
The first hours also determine how much material can potentially be preserved. Quick source control and access for drying may limit removal, while a delayed response can leave fewer sound materials to save.
Practical rule: Fast drying gives drywall a chance. It does not prove that the panel is salvageable.
For an insured loss, retain receipts, photographs, contractor notes, and moisture readings. Water damage can extend beyond one stained panel to insulation, flooring, ceilings, and reconstruction, so document the full affected area before cleanup changes its appearance.
Inspecting Drywall for Hidden Moisture and Structural Issues
A stain tells you where water became visible. It doesn't tell you how far the moisture traveled. Check the drywall face, seams, corners, baseboard line, accessible opposite side, insulation, and cavity whenever conditions allow. A moisture meter can help identify damp areas that feel normal to the touch, but readings should be interpreted alongside the material's condition and the meter's limitations.
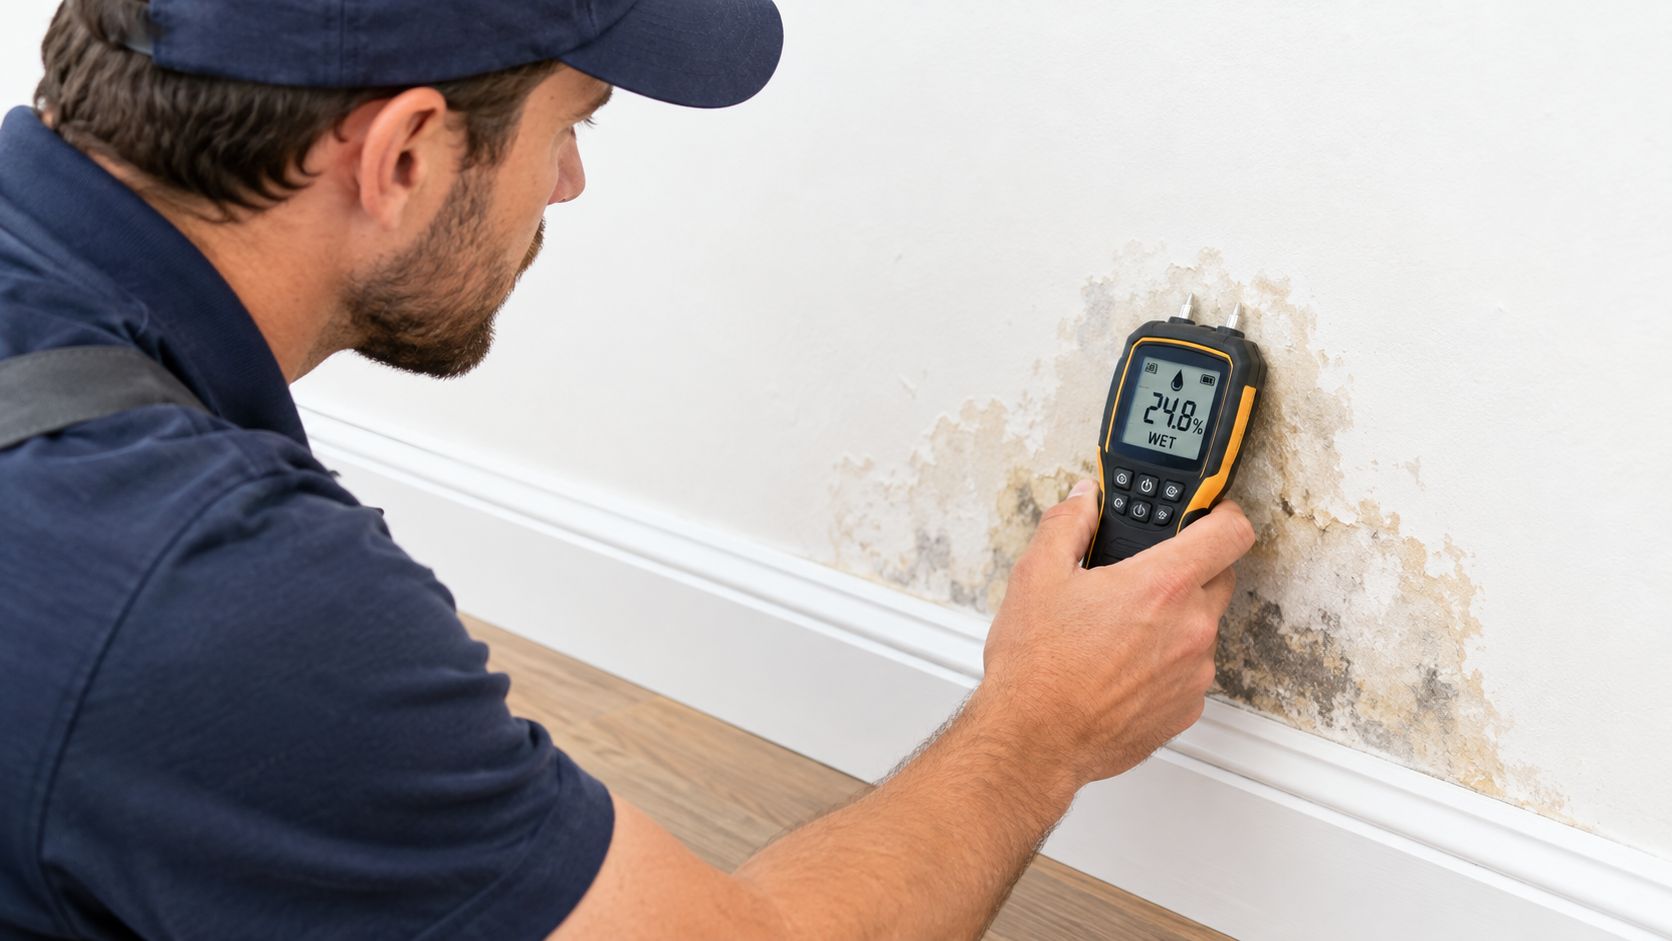
A practical inspection sequence
- Map the visible area. Mark the edge of staining, bubbling, peeling paint, or texture failure. Recheck the perimeter rather than assuming the darkest spot is the full damage zone.
- Check firmness carefully. A gentle touch can identify soft drywall, but don't push hard on a ceiling or damaged panel.
- Examine the paper facing. Look for delamination, lifted paper, blisters, crumbling edges, or a surface that has lost its bond to the core.
- Inspect the joints. Open seams, cracked tape, or separated corners indicate that the panel may no longer have reliable rigidity.
- Measure moisture beyond the stain. Check adjacent areas, the lower wall, framing where accessible, and insulation. Surface dryness isn't proof that the core or cavity is dry.
- Look for odor and recurrence. A musty smell or a stain that returns after drying usually means moisture remains or the source hasn't been corrected.
The University System of Georgia states that wallboard may be dried in place when there is no obvious swelling and the seams remain intact. If the board swells or the seams fail, the affected material should be removed and replaced, and the cavity should be ventilated when possible. USG mold prevention and remediation guidelines provide the same practical distinction contractors use in the field.
Water from a clean plumbing supply line is a different problem from sewage or floodwater. If the source may involve contaminated water, don't disturb the area casually. For help understanding an unpleasant odor before opening a wall, you can find the source of sewer gas and then have the affected assembly assessed.
A professional estimate should include the source, affected dimensions, moisture readings, drywall condition, insulation condition, cavity access, and finish requirements. That information is more useful than saying the wall “looks wet.”
Deciding Between Drying in Place and Full Replacement
The right question is not just whether drywall got wet. Ask three things: what kind of water entered the assembly, how long the material stayed wet, and whether complete drying can be demonstrated. A clean, promptly discovered leak may leave structurally sound drywall that can be monitored. Floodwater, sewage, mold, swelling, or persistent dampness changes the decision.
| Condition | Action Required |
|---|---|
| Clean water, discovered promptly, no swelling, intact seams, and drying can be verified | Dry in place when the cavity and adjacent materials are also assessed and ventilated where possible |
| Clean water with soft spots, bubbling, delamination, or returning stains | Open and selectively replace compromised material after the source is corrected |
| Damp drywall that remains wet beyond 48 hours | Arrange a deliberate assessment and expect removal where complete drying can't be demonstrated |
| Floodwater or sewage exposure | Remove saturated porous drywall using appropriate containment and protective practices |
| Visible mold on porous wallboard or insulation | Remove material that can't be thoroughly cleaned and dried, then dry the cavity before rebuilding |
| Swelling, crumbling gypsum, sagging, or failed seams | Remove and replace the affected section |
| Dry face with suspected cavity moisture | Inspect behind the board, baseboards, framing, and insulation before closing the wall |
The 24–48-hour benchmark matters because prompt drying reduces the likelihood of mold, but it doesn't make every panel safe to keep. EPA guidance for homeowners recommends indoor relative humidity below 60%, ideally 30–50%, while affected materials dry. It also notes that porous gypsum board may need removal when it has remained wet beyond the initial period or visible mold has developed.
Fans alone aren't a restoration plan when mold is present. Uncontrolled air movement can distribute spores, and drying the painted surface won't remove contamination inside porous board. CDC mold guidance advises removing porous materials that remain wet beyond 24–48 hours and can't be thoroughly cleaned and dried. The same guidance supports moisture detection in structural materials instead of relying on appearance.
The trade-off is straightforward. Drying in place avoids unnecessary demolition, but it requires confidence that the board, cavity, insulation, and framing are dry and sound. Selective replacement creates dust and reconstruction work, but it removes material that has lost strength or cannot be reliably cleaned.
The Repair Process From Demolition to Level 5 Finish
Once replacement is necessary, the quality of the result depends on what happens before the first piece of new board goes up. A contractor should isolate the work area as appropriate, remove damaged material cleanly, inspect framing and insulation, and ventilate the cavity. The cut line should reach sound drywall, not stop at the edge of a stain.
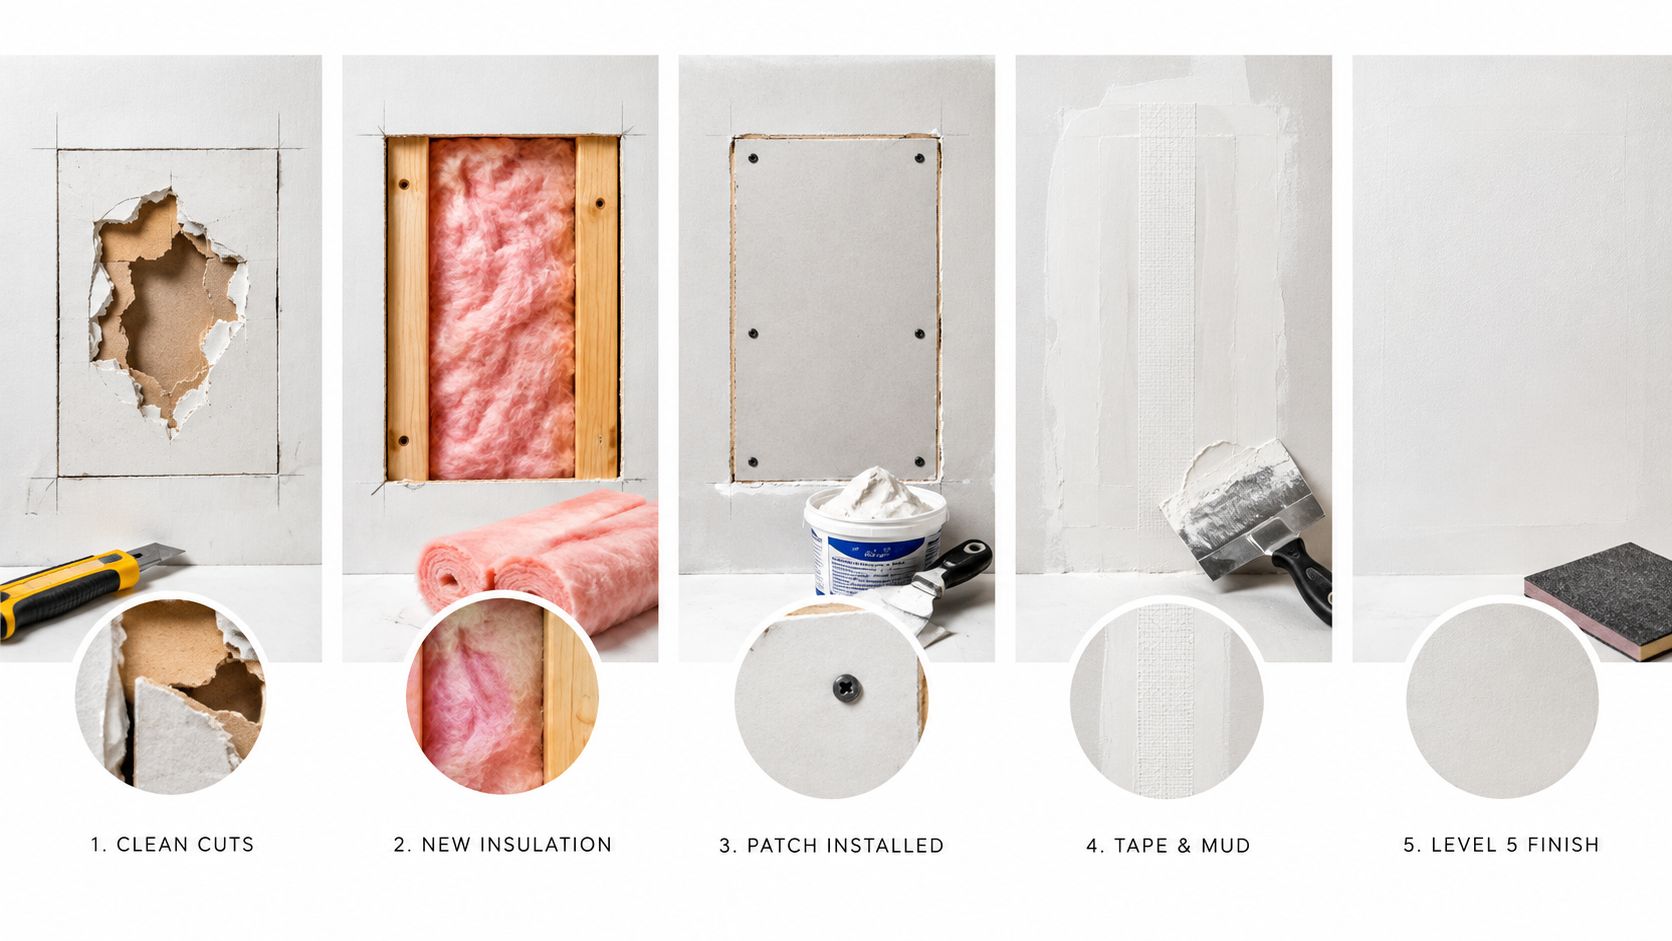
What happens behind the finished surface
- Source correction: The roof, plumbing, condensation, or exterior entry point must be corrected before closing the wall.
- Controlled demolition: Damaged drywall is removed to a practical boundary, with debris handled to limit contamination and dust.
- Cavity inspection: Framing, insulation, wiring conditions, and concealed moisture are checked before the opening is rebuilt.
- Drying and preparation: Air movement and dehumidification continue until the assembly is demonstrably dry.
- Board installation: New drywall is fastened securely, with joints placed to support a stable repair rather than a weak patch.
- Taping and compound: Joint tape and compound are applied in successive coats, allowing proper drying between applications.
- Texture or skim finish: The repaired surface is matched to the surrounding wall or ceiling.
- Primer and paint: The completed substrate is sealed and painted only after the repair is dry and ready.
The distinction between finish levels matters. Level 4 is a standard finish for many painted walls and ceilings. It includes properly taped joints and a smooth, even surface suitable for typical applications. Level 5 adds a skim coat across the surface, reducing subtle texture and absorption differences that can become visible under direct lighting or glossy paint.
A Level 5 finish won't correct a damp substrate or poor framing. It can, however, provide the uniform surface expected in modern remodels, high-visibility rooms, and spaces with strong side lighting. Texture matching requires the finisher to study the existing pattern, reproduce its density and movement, and blend the transition instead of creating a visible rectangle.
A clean patch is not the same as a finished repair. The surrounding texture, primer absorption, sheen, and lighting all affect whether the work disappears.
For Portland remodels, tenant improvements, and rental turnovers, CS1 Real Interiors drywall repair services can address damaged board, insulation, interior painting, texture matching, and paint-ready finishing after the moisture source has been corrected. The company also provides drywall installation and metal stud framing for broader interior work.
When to Call a Professional Contractor in Portland
A small clean-water mark on a sound wall may be manageable after proper drying and inspection. A ceiling, a hidden cavity, contaminated water, or a spreading area deserves professional assessment because the risks aren't limited to appearance. Cutting into a wall can expose wet insulation, hidden mold, electrical hazards, and debris that should be contained.
Situations that justify a contractor
Call for an assessment when:
- The ceiling is sagging or soft: Gravity makes overhead drywall a safety concern.
- The source is hidden: Roof and plumbing leaks can continue behind the finished surface.
- Mold is visible or odor persists: Porous board and insulation may not be cleanable in place.
- Water came from flooding or sewage: Contamination changes demolition and containment requirements.
- The damage crosses seams or rooms: Larger areas need consistent removal, support, and finishing.
- Insurance documentation matters: Photos and a professional scope can help explain what was damaged and why replacement is necessary.
- The finish must match: Knockdown, orange peel, smooth walls, and Level 5 surfaces require more than basic patching.
- The property is occupied: A contractor can plan work around residents, tenants, customers, and business operations.
OSHA guidance treats drywall and insulation as porous materials that may need disposal when they are visibly mold-coated and can't be properly cleaned, or when they have remained wet for more than 48 hours. OSHA mold-remediation guidance also recommends sealing discarded water-damaged material in plastic sheeting or bags to reduce spore spread during removal.
DIY work often fails at the inspection stage. Homeowners may remove the visibly stained section but miss moisture lower in the cavity, leave saturated insulation in place, or close the opening before the framing has dried. Painting over a stain can make the room look finished while the original leak continues.
For homes and small commercial spaces in Portland, Beaverton, Hillsboro, Tigard, Lake Oswego, Gresham, and Vancouver, WA, a contractor should explain the scope before demolition begins. CS1 Real Interiors works with homeowners, property managers, builders, restaurants, clinics, and retail spaces on drywall repair, installation, insulation, painting, metal stud framing, and interior finishing.
Cost Estimation and Insurance Documentation Tips
There is no responsible universal price for drywall water damage. A minor repair may involve only board, tape, compound, and paint. A larger loss can require selective demolition, insulation work, cavity drying, texture matching, and reconstruction. Access, ceiling height, finish level, affected materials, and source correction all change the scope.
Build the estimate in separate categories:
- Drywall scope: Removal, disposal, replacement board, fasteners, taping, compound, and sanding.
- Cavity scope: Insulation assessment or replacement, framing inspection, drying equipment, and access openings.
- Finish scope: Texture matching, Level 4 or Level 5 finishing, primer, and paint.
- Source scope: Plumbing, roofing, exterior sealing, or ventilation work by the appropriate trade.
- Protection scope: Containment, floor and surface protection, cleanup, and safe handling of damaged material.
Water losses are common enough to justify careful records. Across 2018–2022, approximately 1 in 60 insured homes filed a water-damage or freezing claim in an average year, equivalent to about 1.61 claims per 100 house-years, according to the insurance-loss summary. That figure does not set a drywall repair price. It does show why the event should be documented as property damage rather than treated as a cosmetic stain.
Build a clear claim file
Take wide photos showing the room, close photos of the damaged surfaces, and source photos when safe. Record when the damage was discovered, when the leak stopped, what drying work began, and which areas produced high moisture readings. Keep receipts, written scopes, equipment records, and contractor communications together.
Do not discard damaged material before photographing it unless contamination or a safety hazard requires immediate removal. If removal is necessary, retain samples or clear documentation of the affected assembly when practical.
Ask the contractor to separate confirmed damage from concealed conditions that may appear after the wall or ceiling is opened. The estimate should explain what can be dried, what requires removal, and why. Review the policy for the covered cause, exclusions, deductible, and reporting requirements. Coverage depends on the event and the policy language.
A sound sequence is source correction, documentation, drying, cavity testing, removal of unsalvageable material, rebuilding, finishing, and painting. Skipping moisture testing can leave wet insulation or framing behind a finished wall, turning a limited repair into recurring work.
Frequently Asked Questions About Water Damage Repair
Can I paint over a water stain?
Not until the source is corrected and the substrate is fully dry. Paint can conceal discoloration temporarily, but it won't restore weakened gypsum or remove contamination. CDC guidance states that painting or caulking over mold doesn't prevent regrowth. CDC homeowner guidance recommends correcting the moisture source and cleaning or removing affected material first.
How do I know whether moisture is trapped inside the wall?
A dry surface doesn't answer that question. Use moisture readings around the stain, baseboards, framing, and accessible cavity, and look for returning discoloration, odor, soft spots, or insulation that remains damp. If the wall has been opened, the cavity should be assessed before it's closed.
Does every wet drywall panel need replacement?
No. Clean-water exposure that was discovered promptly may allow drying in place when the drywall has no swelling or distortion, the seams remain intact, and complete drying can be verified. Swelling, crumbling, delamination, failed joints, visible mold, contaminated water, or persistent dampness generally favors selective removal and replacement.
What happens to insulation after a leak?
Insulation can hold moisture after the drywall face feels dry. It should be inspected and dried or replaced based on its condition, contamination, and whether complete drying is possible. Leaving wet insulation inside a closed cavity can undermine an otherwise good drywall repair.
CS1 Real Interiors provides drywall repair, drywall installation, insulation, metal stud framing, interior painting, texture matching, and Level 4 and Level 5 finishing for Portland-area homes and small commercial spaces. Contact CS1 Real Interiors through the free estimate form to discuss your water-damaged drywall, document the scope, and get professional help with the repair.