A wall crack usually starts as a small annoyance. Then you notice a ceiling stain getting darker, a soft spot near a shower, or a dent from moving furniture that catches light every time you walk by. In Portland homes, drywall damage is rarely just about the surface. The visible mark matters, but the main question is whether the problem is cosmetic, structural, or moisture-related.
Homeowners in Portland, Beaverton, Hillsboro, Tigard, Lake Oswego, Gresham, and Vancouver, WA often need the same straight answer. Can this be patched cleanly, or does the wall need more than a patch? The right repair depends on what caused the damage, what finish you expect, and whether you want the repair to disappear after paint or at least look better than it does now.
Table of Contents
- Your Guide to Flawless Walls in the Rose City
- Reading the Signs Common Drywall Problems and What They Mean
- The Professional Drywall Repair Process From Damage to Done
- DIY vs Hiring a Pro A Decision Guide for Portland Homeowners
- Choosing the Best Drywall Contractor in the Portland Area
- Frequently Asked Questions About Your Drywall Project
Your Guide to Flawless Walls in the Rose City
Seeking drywall repair in Portland, you probably want more than mud over a hole. You want the stain gone, the crack handled correctly, the texture blended, and the wall ready for paint without obvious patch marks showing in side light.
That matters in older Portland neighborhoods, newer suburban homes in Beaverton and Hillsboro, and rental or turnover work in places like Tigard and Gresham. Different homes move differently, hold moisture differently, and show finish defects differently. A repair that looks acceptable in flat afternoon light can stand out badly once the room is repainted.
Practical rule: The visible damage tells you where to look, not always what to fix.
A good repair starts with diagnosis. After that comes containment, removal if needed, backing or replacement, taping, finishing, texture work, priming, and a realistic conversation about whether spot painting will blend or whether the entire wall should be painted. That last part is where many patch jobs fail.
Portland homeowners also need a contractor who understands more than patching. Drywall work often connects to painting, insulation, framing changes, access cuts after plumbing repairs, and prep for remodels or listings. When the repair is handled correctly from the start, you avoid rework, repeat cracking, and patches that stay visible long after the job is done.
Reading the Signs Common Drywall Problems and What They Mean
Some drywall damage is straightforward. Some isn't. The mistake homeowners make most often is treating every problem like the same patch.
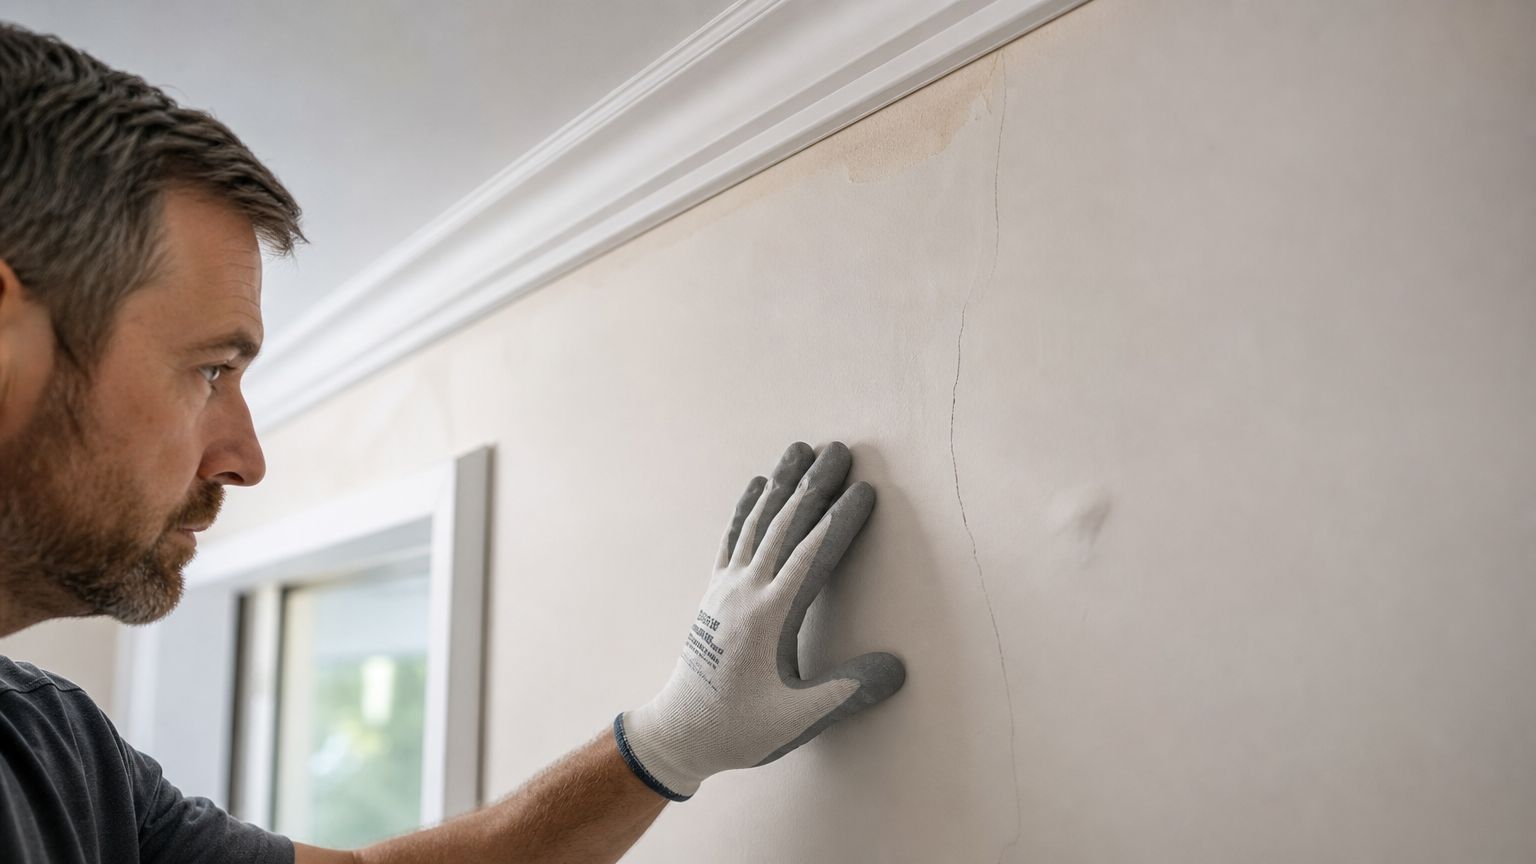
Cracks stains and soft spots are not the same problem
A hairline crack near a door or window often points to movement or stress. That might come from normal settling, seasonal expansion, or framing movement. If the crack keeps returning in the same line after repainting, the issue usually goes deeper than surface compound.
Holes and impact damage are easier to read. A doorknob hit, furniture scrape, or accidental opening from electrical or plumbing work is usually a localized repair. The challenge isn't identifying the cause. It's making the patch flat enough and smooth enough that it won't flash after paint.
Water stains and bubbling are different. So are soft spots, swollen board, sagging ceiling sections, and tape joints that start to separate. Those signs often mean the drywall has been affected by active or past moisture. A moisture-source-first approach matters here. Recurring cracks, ceiling stains, and soft spots are warning signs that often require inspection beyond the surface because drywall problems can come back if the underlying moisture source remains active, as noted in this guidance on warning signs behind drywall damage.
Common signs and what they usually suggest:
- Straight recurring crack: Framing movement, settling, or a joint that was never reinforced well.
- Random dent or puncture: Isolated impact damage.
- Brown or yellow ceiling stain: Roof leak, plumbing issue, or older water event.
- Soft drywall around tubs, sinks, or windows: Ongoing moisture exposure.
- Visible seam lines under paint: Poor finish work, movement, or previous patching that wasn't feathered wide enough.
Why moisture has to be handled first
In Portland's wet season, the temptation is to dry the visible spot and patch fast. That doesn't work if the source is still active. Roof intrusion, plumbing leaks, failed caulk lines, or ventilation problems can keep feeding the same area from behind the wall or ceiling.
When moisture is involved, the right sequence is simple:
- Find the source
- Stop the source
- Confirm the area is dry
- Repair or replace the damaged drywall
- Restore texture and paint finish
Patch first and diagnose later usually leads to the same call twice.
Experience is key. A small stain can hide a larger affected area. A tiny seam split can signal repeated moisture cycling. A cosmetic repair only makes sense when the substrate is dry, stable, and worth saving. If it isn't, replacement is safer and cleaner than trying to preserve damaged board.
The Professional Drywall Repair Process From Damage to Done
A professional repair looks simple when it's finished. It isn't simple while it's happening. Most of the work is in prep, control, and finish quality.
What a proper repair actually includes
The first step is protecting the space. Floors, trim, and nearby furniture need protection, and the work area should be isolated as much as practical. Drywall dust travels. Homeowners usually notice the patch. Contractors notice the cleanup plan first.
Then the damaged section is evaluated. If the board is still sound, a surface repair may be enough. If the drywall is broken, soft, stained through, sagging, or cut open from plumbing or electrical access, the damaged section gets removed back to stable material. The replacement patch has to be supported properly so the new seams don't crack.
After the new piece is installed, the finish process begins:
- Tape the joints: This controls cracking at the seam.
- Apply joint compound in stages: One heavy coat usually shrinks, cracks, or leaves ridges.
- Feather wider than the patch: The goal is to hide the repair in the plane of the wall.
- Sand carefully: Too little leaves edges. Too much burns through the surface.
- Match the texture: Smooth wall, orange peel, knockdown, and hand textures all need different handling.
- Prime before paint: Raw compound and existing paint absorb differently.
A good repair is built in layers. That's why timeline expectations matter. The patch may be physically installed quickly, but drying time between finish coats affects when the surface is ready for paint.
Where technical details matter
Not every wall is standard. Portland contractor guidance notes that standard residential drywall is typically 1/2-inch thick, while walls adjacent to living spaces in garages often require 5/8-inch thick, fire-rated board. Using the wrong thickness in a repair can affect code compliance and fire safety, which is why matching the existing assembly matters in garage and similar locations according to this Portland drywall thickness guidance.
That detail gets missed all the time in nonprofessional patch work. A wall isn't just a surface. It may be part of a fire separation, an acoustic assembly, or a high-visibility finish area that needs a much flatter result than a casual patch can deliver.
A repair should restore the wall system, not just cover the opening.
The finish standard also matters. If you're repainting a bedroom in Hillsboro, getting a patch to "look fine" might be enough. If you're preparing a Lake Oswego home for sale or doing a tenant improvement with smooth painted walls, the repair has to disappear under fresh paint and side lighting. That requires wider feathering, better surface flatness, and stricter texture control.
DIY vs Hiring a Pro A Decision Guide for Portland Homeowners
You patch a hole on Saturday, sand it Sunday, roll paint Monday, and by Tuesday the repair still flashes in the window light. That is the decision point for most Portland homeowners. The question is not whether you can fill a hole. The question is whether the wall will stay sound and look right after primer, paint, and normal daylight hit it.
DIY repair makes sense in some cases. I usually tell homeowners to look at two things first. Is the cause of the damage fully solved, and does the finished wall need to disappear under paint?
When DIY makes sense
A small doorknob hole, minor dent, or shallow scrape in a low-visibility area is often a fair DIY job. Closets, utility rooms, and walls with flat paint give you more margin for error. If the drywall is dry, firm, and free of staining, a basic patch can turn out well enough.
DIY starts to break down when finish quality matters or the damage suggests a deeper problem.
- The area has any sign of moisture: Stains, soft gypsum, swelling, or peeling paint usually mean the wall needs more than filler.
- The repair is on a ceiling: Overhead patches show ridges and poor texture fast.
- The wall gets strong side light: Long hallways, living rooms with big windows, and stairwells expose every hump and edge.
- The paint has sheen: Satin and semi-gloss make small surface flaws stand out.
- The crack keeps coming back: That points to movement, not a simple cosmetic defect.
- The room is being painted for sale or turnover: Fresh paint makes weak patch work easier to spot, not harder.
That last point surprises people. New paint often highlights a repair if the surface is not flat enough or the patch absorbed primer differently than the surrounding wall.
What a pro usually handles better
A professional repair earns its cost in diagnosis and finish control.
The first part is finding out why the drywall failed. In Portland homes, I see plenty of repairs tied to old leaks, seasonal moisture, plumbing access cuts, and small framing movement. If the source is still active, the patch is temporary.
The second part is getting the wall paint-ready. That means setting the patch flat, building finish coats wide enough to hide the transition, matching texture as closely as the room allows, and leaving a surface that does not telegraph through paint. Homeowners can absolutely learn those steps. The trade-off is time, dust, repeat sanding, and the chance that you still end up calling someone after the paint goes on.
DIY vs Professional Drywall Repair
| Factor | DIY Repair | Professional Repair (CS1 Real Interiors) |
|---|---|---|
| Best fit | Small cosmetic damage in a low-visibility area | Water damage, ceilings, recurring cracks, visible walls, listing prep |
| Problem diagnosis | Limited to visible surface issues | Better at identifying moisture, movement, and failed prior repairs |
| Finish quality | Can be acceptable, but often shows after paint | Better chance of a flat, paint-ready result |
| Texture matching | Hard to duplicate without practice | More consistent on smooth walls and textured ceilings |
| Time | Usually spread over evenings, drying cycles, and extra sanding | Scheduled work with a defined scope and finish target |
| Risk of rework | Higher if the cause was missed | Lower when the underlying issue is handled first |
A simple way to decide
Do it yourself if the repair is small, dry, out of the spotlight, and you can live with a result that looks good from across the room instead of perfect up close.
Hire a pro if the area has water history, repeated cracking, ceiling damage, texture to match, or a wall you see every day in direct light. The same goes for homes being listed, rentals between tenants, and any room where you want the repair to disappear after painting.
If you are unsure, stop before cutting out more drywall or spreading compound over a stain. Get the wall assessed, then decide whether this is a basic patch or a repair that needs moisture correction, replacement, and a higher finish standard.
Choosing the Best Drywall Contractor in the Portland Area
Hiring the right contractor comes down to two things. Can they diagnose the underlying problem, and can they leave the wall paint-ready instead of merely patched.

What to check before you hire
Look for a contractor who can talk clearly about the cause of the damage, not just the finish steps. If they skip questions about leaks, movement, access, existing texture, or final paint expectations, they're probably pricing a patch and not the actual repair.
Use this checklist when comparing options:
- Clear scope: They should explain whether they're patching, replacing, texturing, priming, or also painting.
- Local experience: Portland-area homes vary from older plaster-adjacent remodels to newer smooth-wall interiors in suburbs like Beaverton and Tualatin.
- Assembly awareness: Garage walls, shared walls, and utility areas may need material matching beyond appearance.
- Clean work habits: Dust control and floor protection matter in occupied homes and active businesses.
- Related trades available: If your project also needs paint, insulation, or framing changes, one interior contractor can simplify the job.
For homeowners and property managers who want one contractor for more than patching, drywall repair services are often easiest to coordinate when they connect cleanly with painting and other interior work. That matters for remodels, unit turns, and pre-listing improvements where delays usually come from trade handoffs.
What clear pricing and scope should look like
In Portland, drywall repair labor is often billed at $50 to $100 per hour, and a lot of that time goes into taping, feathering, sanding, and matching the existing finish rather than installing a patch alone, based on this Portland drywall repair labor guidance. That's why the cheapest estimate isn't always the most complete one.
A detailed estimate should separate visible patch size from finish complexity. A small opening in a smooth wall with difficult lighting can take more care than a larger patch in a textured utility room. The contractor should also explain whether primer is included and whether spot paint or full-wall paint is the more realistic finish option.
If you'd like to see how repair work fits into the broader service area, review the service area in Portland.
For a quick look at the kind of work involved in wall and ceiling repair, this video is useful context:
One practical option for Portland-area homeowners, builders, and small commercial clients is CS1 Real Interiors, which handles drywall repair, drywall installation, interior painting, insulation, and metal stud framing for projects across the metro area. That broader scope helps when a "simple drywall issue" turns out to involve access cuts, repainting, remodel prep, or finish upgrades.
The right contractor should make the wall look finished, not recently repaired.
Frequently Asked Questions About Your Drywall Project
A few questions come up on almost every repair estimate, especially when the damage affects a visible room or involves possible water intrusion.

Will insurance cover drywall repair
Sometimes. Coverage often depends on the cause of the damage. A sudden event such as a burst pipe may be treated differently than long-term neglect or an old leak. The contractor's role is usually to document the visible damage, the repair scope, and what needs to be restored.
Portland cost context can help when you're reviewing scope. The average drywall installation cost in Portland is $2,204, with typical project spending ranging from $1,029 to $3,380. For smaller room-sized work, estimates can fall around $400 to $650, according to this Portland drywall cost guide. Repair pricing still depends on finish work, access, and whether the area needs replacement rather than patching.
How should you prepare for the work
Clear the immediate area before the crew arrives. Move small furniture, wall décor, and fragile items away from the repair zone. If the work is in a bedroom or office, make sure there's a clean path from the entry to the room.
A few simple steps help the job go smoother:
- Remove valuables: Keep breakables and electronics out of the dust zone.
- Make space around the wall: Crews need room for tools, ladders, and lighting.
- Plan for paint decisions: Decide early whether you're spot painting or repainting the full wall.
- Mention any leak history: Even if the area feels dry now, past moisture matters.
What paint ready really means
Paint-ready doesn't mean "the hole is filled." It means the surface is repaired, sanded, blended into the surrounding plane, texture-matched as closely as the wall allows, and primed so the finish coat goes on evenly.
For homeowners in Portland, Beaverton, and nearby cities, that's usually the difference between a repair that disappears and one that keeps catching your eye after the room is painted. If you care about visual consistency, ask directly whether the estimate includes texture matching and primer, and whether a full-wall repaint is recommended.
If your wall or ceiling needs attention, request a free estimate from CS1 Real Interiors or learn more at CS1 Real Interiors. Whether you're dealing with cracks, holes, water damage, listing prep, or a larger interior project in Portland, Beaverton, Hillsboro, Tigard, Lake Oswego, Gresham, or Vancouver, WA, professional help can save time, reduce rework, and leave you with a cleaner result.