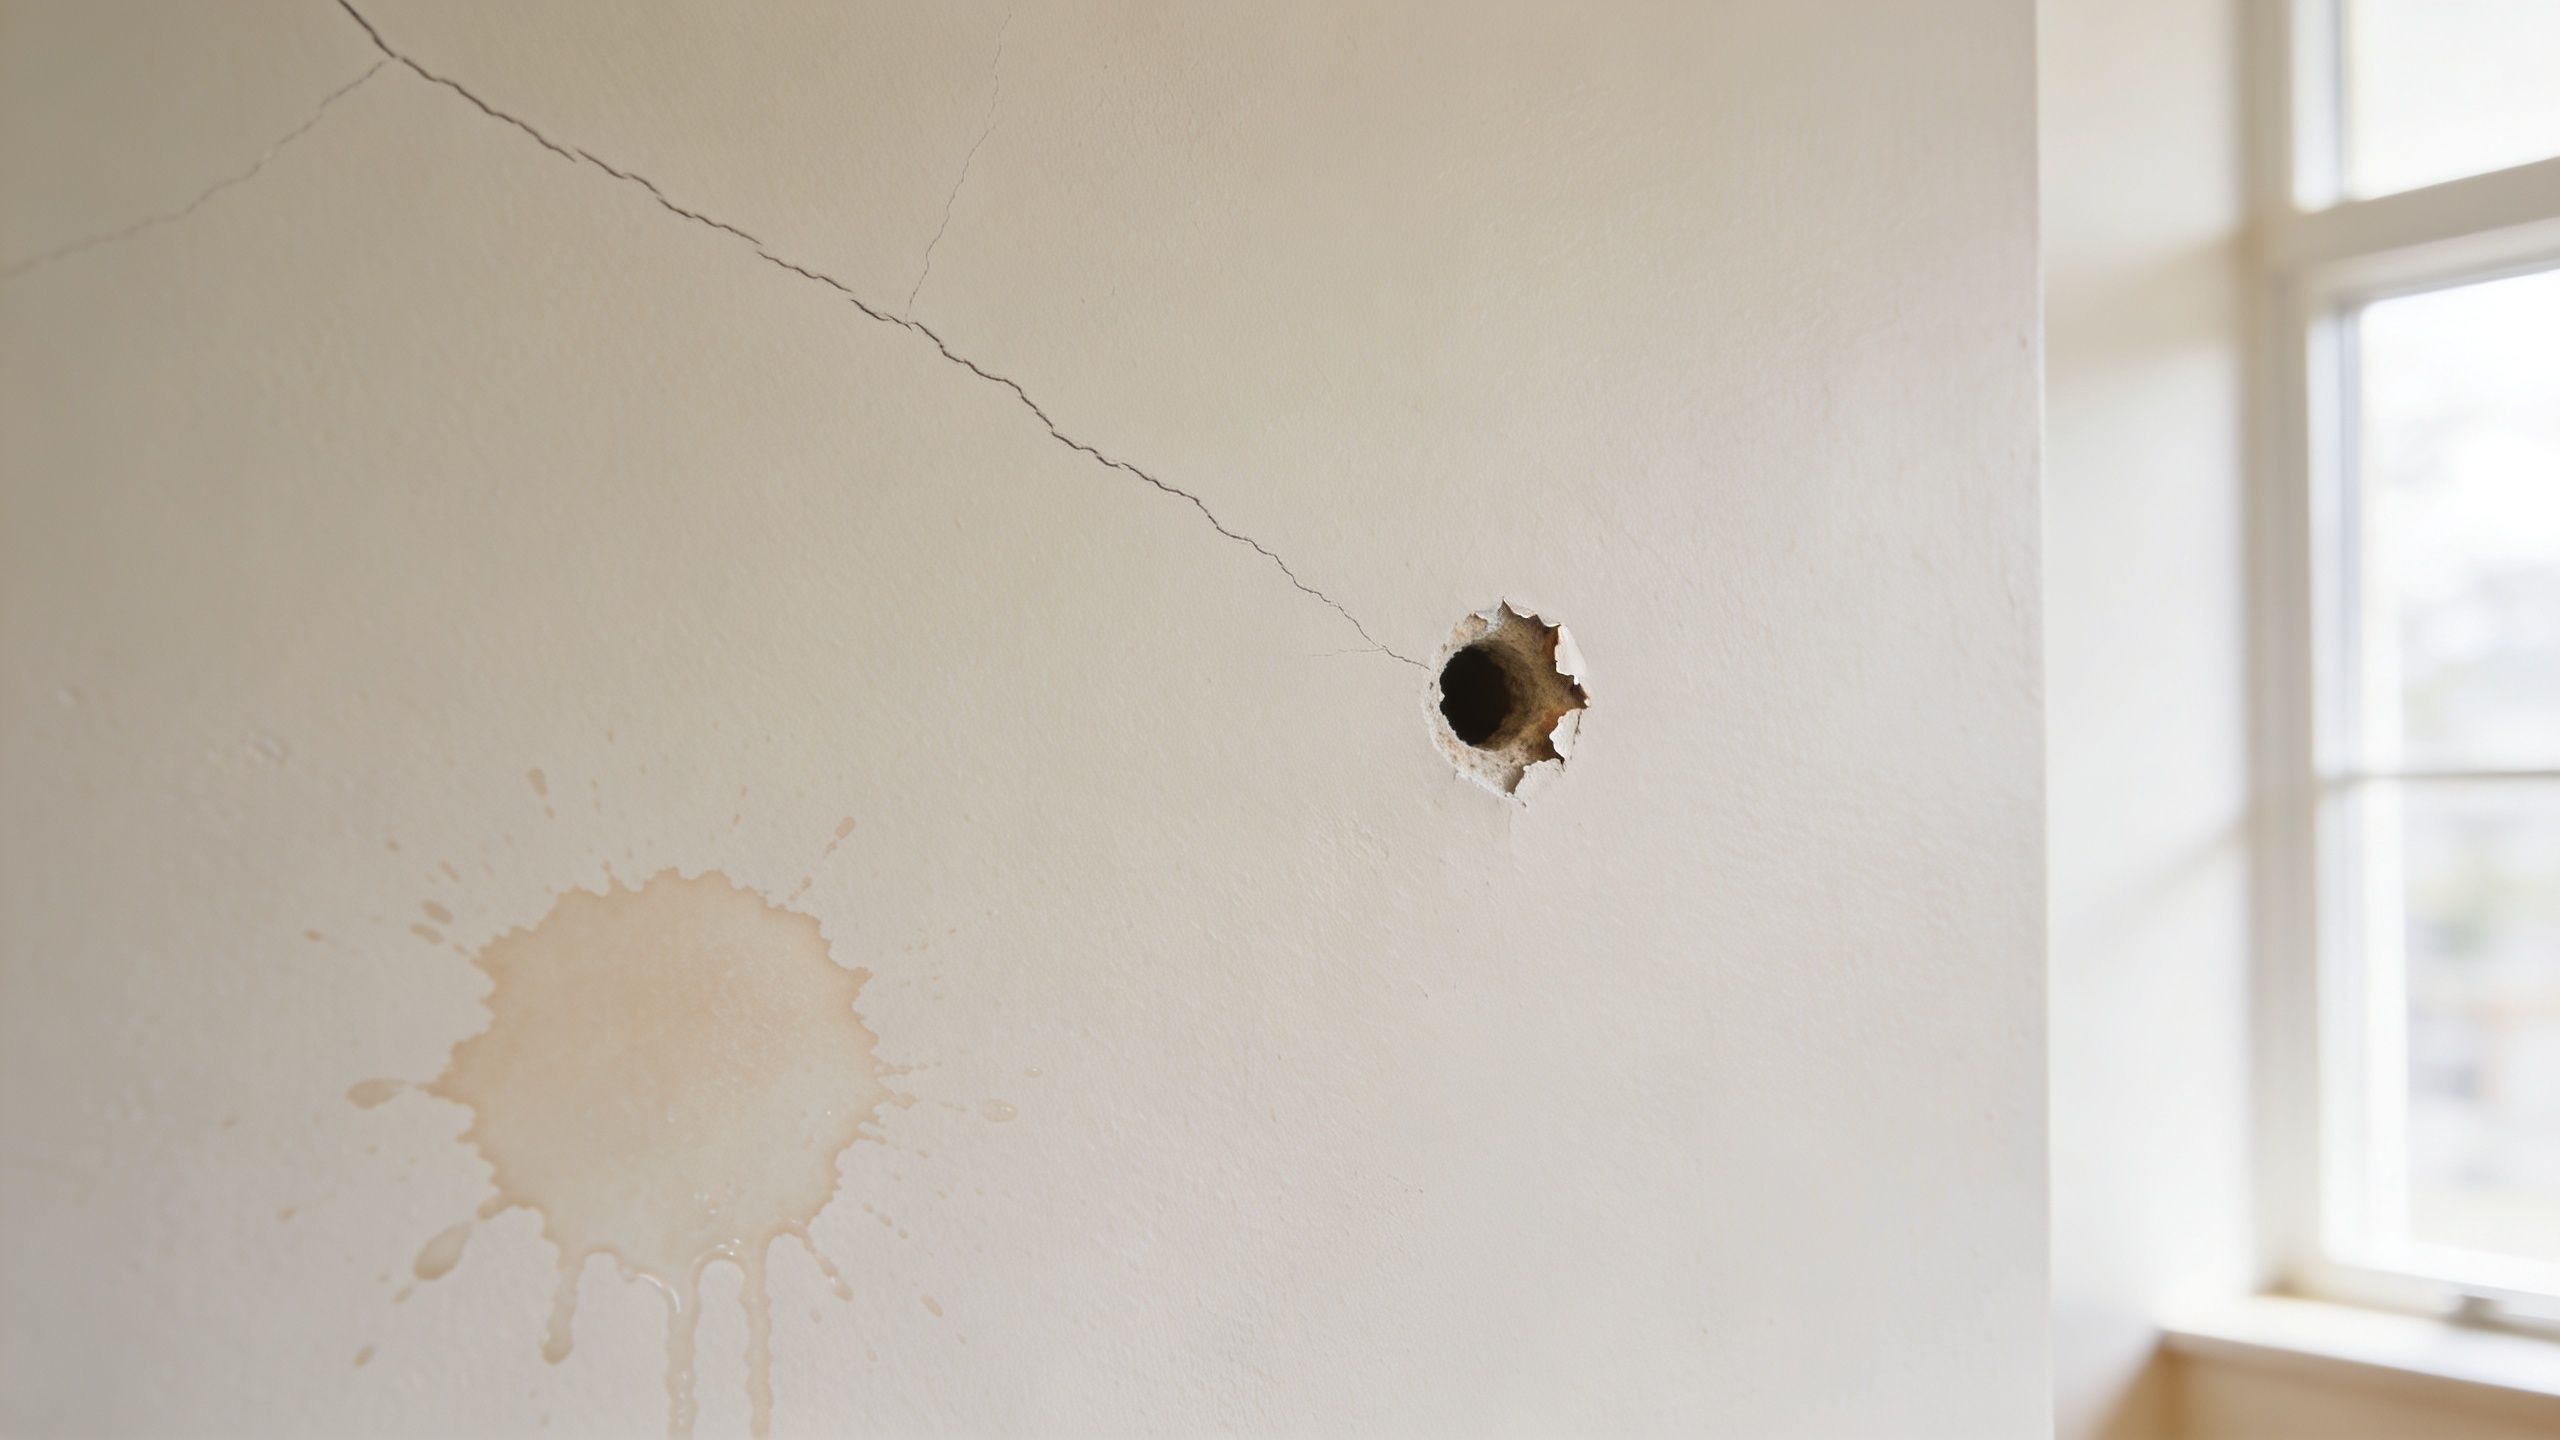
You notice it at the worst time. A doorknob punched a hole near the hallway. A ceiling stain showed up after a roof leak. A crack above the doorway seems bigger than it was last month. Then the search starts: drywall repair near me.
Customers don't just want a patch. They want the wall to stop bothering them every time they walk past it. They want to know whether the damage is cosmetic or a sign of something bigger. They want a repair that won't flash through fresh paint or crack again after one season of Portland rain and indoor humidity changes.
That concern is valid. Homeowners who try a quick DIY fix or hire the cheapest option often end up with visible cracking and seams within 6 to 12 months, and the remediation can cost 40 to 60 percent more than doing it right the first time, according to drywall repair guidance on hidden costs of cheap fixes.
Table of Contents
- That Sudden Crack or Hole in Your Wall What to Do Next
- Identifying Common Drywall Damage in Portland Homes
- How Professionals Restore Your Walls to Perfection
- Ready for Flawless Walls Get Your Free Estimate Today
- Understanding Drywall Repair Costs and Timelines
- The CS1 Advantage for Portland Area Homeowners
- Your Drywall Repair Questions Answered
That Sudden Crack or Hole in Your Wall What to Do Next
A lot of drywall problems start with a small moment. Someone moves furniture and clips the corner. A plumber opens a wall for access. A leak leaves a stain that keeps drawing your eye. In older homes around Portland, Beaverton, and Lake Oswego, the first question is usually simple: is this just ugly, or is it serious?
The right first step is to slow down and look at the type of damage, not just the size. A tiny crack can be mostly cosmetic. A larger stain can mean the drywall has already lost strength. A patch in a highly visible living room wall may need a completely different finish standard than a repair hidden behind a door.
Three questions help right away:
- Did moisture cause it: If yes, fix the source before anyone starts patching.
- Is the surface soft or crumbling: If it is, patching over it usually won't last.
- Will light hit this wall directly: If sunlight or overhead lighting rakes across the area, poor finishing will show.
Practical rule: If you're already thinking, "I can probably live with it," you'll probably notice a bad repair every day after it's painted.
That's where many cheap repairs go wrong. The wall gets filled, sanded, and painted, but the repair wasn't properly supported, dried, or blended. It may look acceptable for a short time, then the seam prints through, the patch sinks, or the crack returns.
A professional approach isn't about making drywall complicated. It's about fixing the cause, using the right repair method for that damage, and finishing it to the standard the room requires.
Identifying Common Drywall Damage in Portland Homes
Portland-area homes see a mix of everyday wear, settling, remodel cuts, and moisture-related damage. The fix depends on what caused the problem. Treating every issue like a simple patch is one of the fastest ways to get a repair that stands out later.
Hairline cracks and corner stress
Small cracks often show up above doors, near windows, or at inside corners. Sometimes they're just seasonal movement. Sometimes they point to poor tape adhesion or earlier repair work that wasn't done well.
If the crack is recurring, smearing compound over it usually doesn't solve much. The movement needs to be managed with proper prep, clean cutting if needed, tape, and enough finish work to blend the repair into the surrounding wall.
Holes dents and torn paper
These are common in hallways, kids' rooms, stairwells, garages, and rental properties. Some are very minor. Others look small but have crushed gypsum around the impact point, which makes the repair less stable than it appears.
Torn drywall paper is another issue people underestimate. If the paper face is damaged, the surface can bubble or fuzz under compound and paint unless it's sealed and prepared correctly. That's why a repair can fail even when the hole itself wasn't very big.
Water damage needs a different response
Water-damaged drywall is in its own category. If the wall or ceiling got wet from a roof leak, plumbing issue, or exterior intrusion, the key question isn't just how to patch it. It's whether the material should still be there at all.
Drywall that has swelled, softened, sagged, or stained significantly often needs removal and replacement instead of a cosmetic skim. The moisture source has to be corrected first. Then the area needs to dry adequately before repair begins.
Water damage repairs fail when someone treats staining as a paint problem instead of a substrate problem.
Here's a practical guide for deciding what usually makes sense.
| Damage Type | Description | Recommended Action |
|---|---|---|
| Hairline crack | Thin crack near doors, windows, or ceiling lines | DIY only if it appears stable and in a low-visibility area. Call a pro if it keeps returning. |
| Small nail or screw hole | Minor puncture from hanging décor | DIY is often reasonable if the surrounding surface is solid and the finish doesn't need to disappear under critical light. |
| Medium impact hole | Damage from a knob, furniture, or accidental hit | Professional repair is usually the safer choice if the area needs backing, tape, blending, or texture matching. |
| Torn drywall paper | Surface paper peeled or damaged | Professional recommended because prep matters as much as filling. |
| Ceiling crack or ceiling hole | Damage overhead or near joints | Hire a professional. Ceiling repairs are harder to finish cleanly and safely. |
| Water stain with soft drywall | Discoloration, sagging, swelling, or softness | Call a professional after the leak source is fixed. The material may need replacement, not just patching. |
| Large damaged section | Broken edges, loose board, or repeated failed patching | Professional repair is the right move for structure, finish quality, and paint-ready results. |
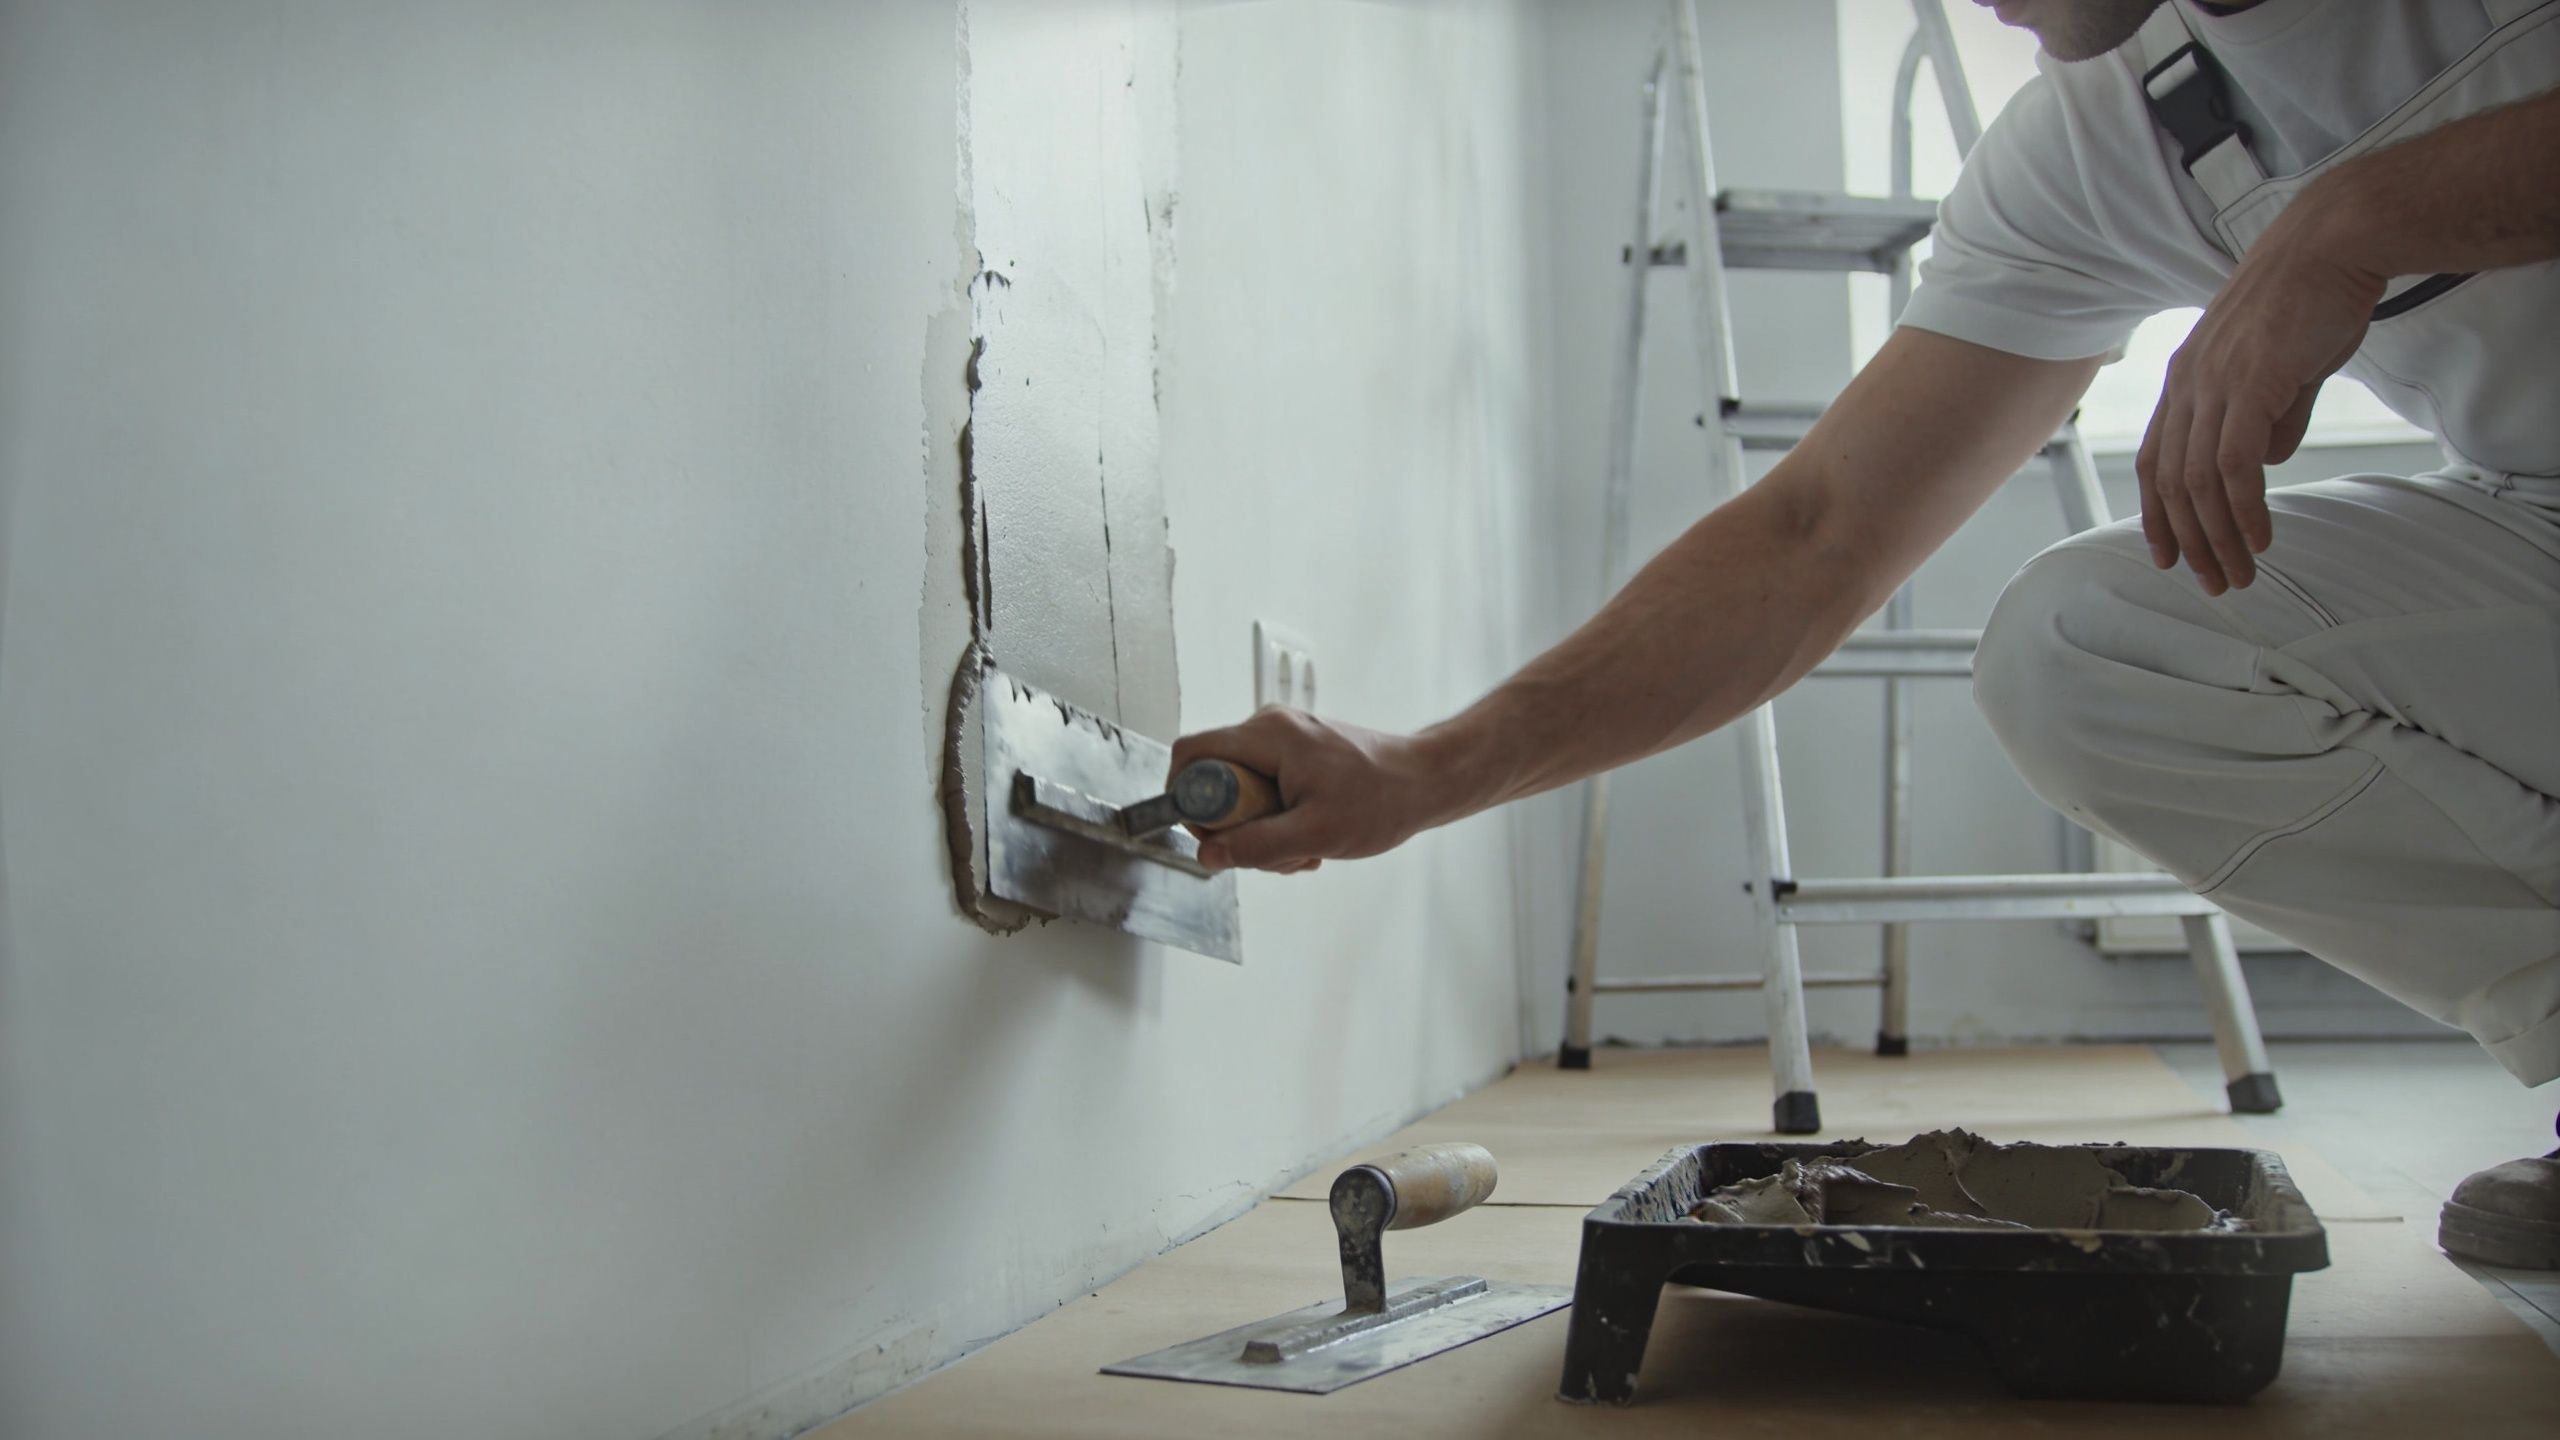
How Professionals Restore Your Walls to Perfection
A repair that looks invisible after paint usually takes more steps than homeowners expect. The patch itself is only part of the job. The ultimate standard is whether the wall stays flat, holds up through seasonal movement, and disappears under Portland's gray daylight and the sharper side light you get from modern fixtures.
The repair starts before the patch
Professional drywall work starts with figuring out why the damage happened and what the wall needs to support a lasting repair. A small hole from a doorknob is one thing. A crack above a doorway, soft drywall from an old leak, or a failed patch that keeps telegraphing through paint is a different problem.
The first step is controlled prep. Floors and nearby finishes get protected, loose material gets removed, and the damaged area gets cut back to something solid. If the opening needs backing, that goes in before any new drywall is installed. Without that support, the patch can flex. Flex leads to cracked seams, visible edges, and callbacks.
From there, the work becomes methodical.
- Cut to clean material: Loose gypsum, frayed paper, and weak edges cause repairs to fail early.
- Add support where needed: Backing or framing support keeps the patch stable over time.
- Tape the joints properly: Joint compound fills. Tape adds strength.
- Build the surface in stages: A repair disappears by widening the blend area, not by leaving a hard patch line.
Why thin coats matter
Homeowners often look at the first coat and assume the repair is close to done. It rarely is. The first pass ties the patch together. The next coats flatten the transition, hide the edge, and correct shrinkage.
Thin coats dry more evenly and sand more cleanly. Thick mud can seem faster, but it tends to shrink, crack, or leave a hump that shows up once primer and paint hit the wall. In Portland homes, indoor humidity and cooler temperatures can slow drying, so pushing the schedule usually creates more sanding, more touch-up, and a weaker result.
I see this all the time after bargain repairs. The wall looks acceptable from ten feet away on day one. Then sunlight hits it the next morning, and every ridge, lap mark, and shallow depression shows up.
A fast patch can cost more than a careful repair once you factor in repainting, repeat visits, and the frustration of still seeing the damage.
A paint-ready repair takes patience between coats, careful sanding, and inspection under the kind of light that will expose flaws later. For homeowners who want a true Level 5 finish, especially in smooth-wall rooms, bright hallways, or homes going on the market, the standard is even higher. The goal is not just to fix the damaged spot. The goal is to leave a uniform surface that does not flash or telegraph after painting.
Texture matching and finish level
Texture matching is where many repairs succeed or fail visually. A solid patch can still stand out if the surrounding wall has orange peel, knockdown, hand texture, or a very flat smooth finish. Matching that surface takes test passes, adjustments in material thickness, and sometimes widening the repair area so the eye does not catch the transition.
Smooth walls are the hardest to fake well. They show every shortcut. Under side lighting, a patch that seemed fine during the day can read like a rectangle on the wall if the finish was rushed or the feathering was too tight.
CS1 Real Interiors handles drywall repair, installation, painting, insulation, and metal stud framing for residential and small commercial interiors. That broader scope matters when drywall damage is tied to a remodel, a repaint, tenant turnover, or water damage that affected more than one trade. It helps keep the finish consistent from repair through final paint, which is usually where cheap fixes start to show.
Ready for Flawless Walls Get Your Free Estimate Today
A lot of homeowners reach this point after trying to live with the damage for a while. The crack keeps catching your eye. The patch from a past repair still shows through paint. A ceiling stain leaves you wondering whether the wall is ready to fix or just ready to fail again.
That is usually the right time to get a professional estimate.
A good estimate does more than put a number on the job. It should clarify what caused the damage, whether the drywall is stable and dry, how far the repair needs to extend for the patch to disappear, and what finish standard makes sense for the room. In Portland homes, that matters because older walls, repaint history, moisture issues, and strong natural light can all change what a proper repair requires.
CS1 Real Interiors provides estimates for drywall repair, interior painting, and larger interior work in Portland and nearby cities. If the goal is a wall that looks paint-ready instead of temporarily patched, clear scope at the start helps you avoid the hidden cost of rework later.
Understanding Drywall Repair Costs and Timelines
A drywall repair can look small and still cost more than a homeowner expects. A fist-sized hole in a bedroom wall is one thing. A similar hole in a ceiling corner, above a stairwell, with smooth walls and afternoon light hitting it, is a different job entirely.
That is why honest pricing starts with conditions, not square footage alone. The final cost usually depends on how the wall was damaged, whether the surrounding material is still solid, how difficult the area is to reach, and what finish standard the room requires. In Portland homes, the finish requirement matters more than many people realize. A patch that looks acceptable in a garage can stand out badly in a living room once primer and paint go on.
Cheap drywall work usually gets cheap by skipping steps. The patch may be undersized, the seams may not be reinforced well, the drying time may be rushed, or the repair may stop at "good enough" before the surface is flat. That lowers the invoice at first, but it often raises the total cost later when the patch flashes through paint, cracks back open, or needs a wider repair to correct the first one.
What affects the price
A quote usually moves up or down based on a few practical factors:
- Type of damage: Nail pops, settlement cracks, doorknob holes, and water-damaged drywall all require different repair methods.
- Location: Ceilings, tall walls, stairwells, and tight corners take more setup and more labor.
- Extent of blending: The damaged spot may be small, but the area that needs to be skimmed and feathered can be much larger.
- Surface finish: Texture matching, smooth-wall work, and Level 5 preparation require more care than a basic utility-room patch.
- Site conditions: Occupied homes, furniture protection, limited parking, and restricted work hours can all affect production time.
- Related work: If paint, trim touch-up, or moisture-related replacement is part of the job, the scope needs to reflect that.
If you already know you need help, our drywall repair service page has more details about the work involved and what to expect during the estimate.
Why timelines vary more than homeowners expect
Drywall repair is a sequence. Cut out failed material. Secure backing if needed. Install the patch. Tape. Apply compound in stages. Let it dry. Sand. Check under light. Skim again if the surface still shows. Prime.
That process is why a repair is not measured by tool time alone. Even a straightforward patch can require multiple visits or a full day with drying time built in between steps. A higher-end finish takes longer because the goal is not just to close the hole. The goal is to leave a wall that disappears after paint.
Moisture-related repairs add another layer. If the drywall got wet, the source of the problem has to be addressed first, and the area has to be dry enough for new materials to hold properly. Portland's damp seasons can slow that part down. Rushing it is how repairs fail early.
My rule is simple. Fast is fine when the wall is ready for fast. If the surface needs more drying, wider skim work, or closer finish correction, taking that extra time is what keeps the repair from showing later.
The CS1 Advantage for Portland Area Homeowners
Homeowners who search for drywall repair near me are usually trying to solve a bigger problem than one dent or crack. A patched wall still has to look right under paint. A ceiling repair may point to earlier moisture damage. A remodel often needs drywall, finish work, and paint to line up cleanly so the room feels finished instead of pieced together.

One contractor for more of the interior work
That is the practical advantage of hiring a contractor who understands the full scope of interior repairs. Drywall does not sit in isolation. The finished result depends on flatness, texture, primer, paint, and how well the repair blends with the rest of the room.
CS1 Real Interiors handles Level 4 and Level 5 finishing, texture matching, interior painting, and framing. That reduces the handoffs that often cause delays, uneven quality, and finger-pointing when the final surface still shows under light. For Portland-area homeowners, that matters. The standard is not a wall that is merely closed up. The standard is a wall that disappears after the room is painted.
For homeowners in Portland, Tigard, Lake Oswego, Gresham, and Vancouver WA, local experience also matters. Older homes, remodel layers, and moisture history can change how a repair should be approached. If you're looking for local coverage, the Portland service area page is the right place to check.
Why homeowners care about process
Homeowners usually ask for a result, not a drywall term. They want the repair to hold, the finish to look consistent, and the job to stay under control while people are still living in the home.
That only happens with a disciplined process:
- Clear scope: Homeowners need to know what is being repaired, what is being replaced, and whether the repair ends at drywall or continues through primer and paint.
- Clean containment: Dust control, floor protection, and orderly staging matter in occupied homes.
- Reliable scheduling: Good repair work has steps that need proper drying, inspection, and finish correction before paint.
- Paint-ready standards: A quality patch should blend into the surrounding surface, not leave a visible map of the repair.
Cheap fixes usually fail in plain sight. The wall may be closed quickly, but poor fastening, shallow prep, rushed mud work, or weak texture matching tends to show up later. Homeowners end up paying twice. First for the patch, then for the correction.
That is why professional drywall repair has value beyond the patch itself. For homeowners preparing to sell, landlords turning over units, and anyone updating an older Portland home, the key advantage is getting a finish that holds up and looks right the first time.
Your Drywall Repair Questions Answered
Is drywall repair messy?
It can be, but it shouldn't feel uncontrolled. Good prep, dust containment, and clean work habits make a big difference, especially in occupied homes.
Do I need to be home during the whole repair?
That depends on access, scope, and whether other work is tied to the drywall repair. Many clients only need to be available for the estimate, access coordination, and final walkthrough.
Can you match my existing wall texture?
In many cases, yes. Texture matching is a standard part of professional drywall work, but it takes testing, blending, and realistic expectations if the surrounding wall has aged paint or earlier repairs.
Should I repair the wall before painting the room?
Usually yes. Painting first and patching later almost always creates extra work. If the room is being updated, it's smarter to complete the drywall repair and then move into primer and paint.
If you're in Portland, Beaverton, Hillsboro, Tigard, Lake Oswego, or nearby areas and you want a clear answer on your wall, ceiling, or water-damaged drywall, request a no-obligation quote through the free estimate form for drywall and interior projects. Professional help is often the simplest way to avoid repeat repairs, uneven finishes, and wasted paint.
If your walls need real repair instead of a temporary patch, contact CS1 Real Interiors and request a free estimate. Whether you're dealing with cracks, holes, ceiling damage, texture matching, painting, insulation, or a larger interior project, the next step is simple: get professional help, get a clear scope, and get your space back to paint-ready condition.