You fixed the leak. Or removed an old speaker. Or patched the hole from a light fixture that never should've been there in the first place. The drywall repair is done, the surface feels solid, and then you look up.
The patch is obvious.
That's the part homeowners in Portland, Beaverton, and Hillsboro usually don't expect. Repairing the drywall itself is often the simpler part. Matching the ceiling texture so the repair disappears is where the job gets difficult. A ceiling doesn't give you much forgiveness. Light rakes across it, paint highlights every edge, and even a small mismatch can stand out from across the room.
Older Portland bungalows, mid-century homes in Gresham, and newer builds in Tigard all bring different texture patterns, different paint layers, and different repair histories. Some ceilings have a clean knockdown pattern. Others have a heavier stomp texture that was clearly done by hand. Some have been patched more than once, which means you're not matching the original texture. You're matching a layered history of repairs.
Table of Contents
- The Challenge of an Invisible Ceiling Repair
- Identifying Your Existing Ceiling Texture
- Gathering Your Tools and Repair Materials
- The Art of Application and Blending for an Invisible Finish
- Troubleshooting Common Texture Matching Mistakes
- When to Call a Professional for Your Ceiling Repair
The Challenge of an Invisible Ceiling Repair
A lot of people start this project thinking the texture itself is the main issue. It usually isn't. The primary challenge is blending the new work into the old surface so your eye doesn't stop at the repair.
That's why ceiling texture work frustrates even capable DIY homeowners. You can buy patching compound, a texture product, and fresh paint in one trip. What you can't buy is the judgment that tells you when the material is too wet, when the pattern is too tight, or when the edge of the patch is about to flash through the final coat.
Why ceiling patches stand out
Ceilings catch light differently than walls. A wall can hide a small texture mismatch behind furniture, shadows, or normal sight lines. A ceiling sits broadside to windows and overhead fixtures. If the pattern changes, the room announces it.
In Portland-area homes, I see the same pattern over and over. The repair itself is solid, but one of these things gives it away:
- The patch edge is too clean and looks like a circle or square on the ceiling
- The texture size is wrong so the patch looks finer or heavier than the surrounding field
- The paint sheen changes and creates a visible ring
- The ceiling had previous repairs that already altered the original pattern
An invisible ceiling repair usually comes from restraint, not from piling on more texture.
If you want another practical perspective on repairing a textured ceiling, that guide is useful for seeing why patching and matching are really two separate skills.
Why blending is harder than listing texture types
Most online guides stop at identification. They tell you whether your ceiling is popcorn, orange peel, or knockdown. That helps, but it doesn't solve the hardest part. Two knockdown ceilings can still look very different depending on mud thickness, spray pressure, tool angle, and how aggressively someone flattened the peaks.
That's why homeowners in Lake Oswego or Vancouver, WA often get stuck after the first attempt. They identified the texture correctly, but the repair still doesn't disappear. Matching texture is part product choice, part hand technique, and part knowing when to leave it alone before you make it worse.
Identifying Your Existing Ceiling Texture
Before you can figure out how to match ceiling texture, you need to identify what's already there. Don't guess from memory while standing in the hardware aisle. Look closely at the ceiling from different angles, especially where natural light hits it.
What the pattern tells you
Some textures are easy to spot. Others get confused all the time.
Popcorn has raised clumps and a more acoustic-looking finish. It doesn't look flattened. It projects from the surface and tends to cast small shadows.
Orange peel looks finer and more sprayed-on. It has a bumpy surface, but the bumps are smaller and tighter than popcorn.
Knockdown starts with a sprayed or splattered texture, then someone flattens the tops. The result looks like irregular islands with soft edges.
Slap brush or stomp usually shows a repeated hand-applied pattern. You can often see arcs, bursts, or fan-like marks from the brush itself.
Comb texture has visible directional lines or repeated grooves. It's less common, but when it's there, it's obvious.
If the texture looks random but the same kind of random repeats across the room, it was probably hand-applied with a consistent motion.
Common Ceiling Texture Identification
| Texture Type | Visual Description | DIY Difficulty |
|---|---|---|
| Popcorn | Raised clumps with a rough, acoustic look | High |
| Orange Peel | Fine to medium sprayed bumps, fairly uniform | Moderate |
| Knockdown | Flattened splatter pattern with soft, low-profile islands | Moderate to High |
| Slap Brush | Hand-applied bursts, fan marks, or stomped patterns | High |
| Comb | Repeated arcs or grooves with clear direction | High |
What homeowners usually misidentify
The most common mistake is confusing orange peel with light knockdown. The difference is in the surface profile. Orange peel keeps its rounded bumps. Knockdown has peaks that were pressed or dragged flat.
Another common miss is assuming all heavier textures are popcorn. A stomp texture can look bulky from the floor, but when you get on a ladder and inspect it closely, you'll see brush marks rather than loose-looking aggregate.
Use this quick check before you buy materials:
- Look for flattened tops. If you see little plateaus, you're likely dealing with knockdown.
- Look for repeated hand marks. If the same burst shape appears again and again, it's probably slap brush.
- Look for directional lines. If the texture has a pattern you can trace, it isn't orange peel or popcorn.
- Look at the repair history. A patched ceiling may contain more than one texture style in the same room.
For homes in Beaverton and Hillsboro, I also recommend checking the entire ceiling, not just the damaged spot. Builders and past contractors don't always texture every room the same way, and a touch-up product that works in one bedroom may look wrong in the hallway.
Gathering Your Tools and Repair Materials
Buying texture first is where a lot of ceiling repairs go sideways. The better approach is to build your setup around two things: the texture already on the ceiling, and how visible the patch will be once the room is painted and the lights are back on.
A small patch in a closet ceiling can tolerate a simpler setup. A repair in the middle of a living room ceiling, under side lighting from a window, usually cannot. That is the trade-off homeowners need to judge before spending money. The goal is not just to patch the hole. The goal is to gather the tools that let you blend the repair into the surrounding field of texture.
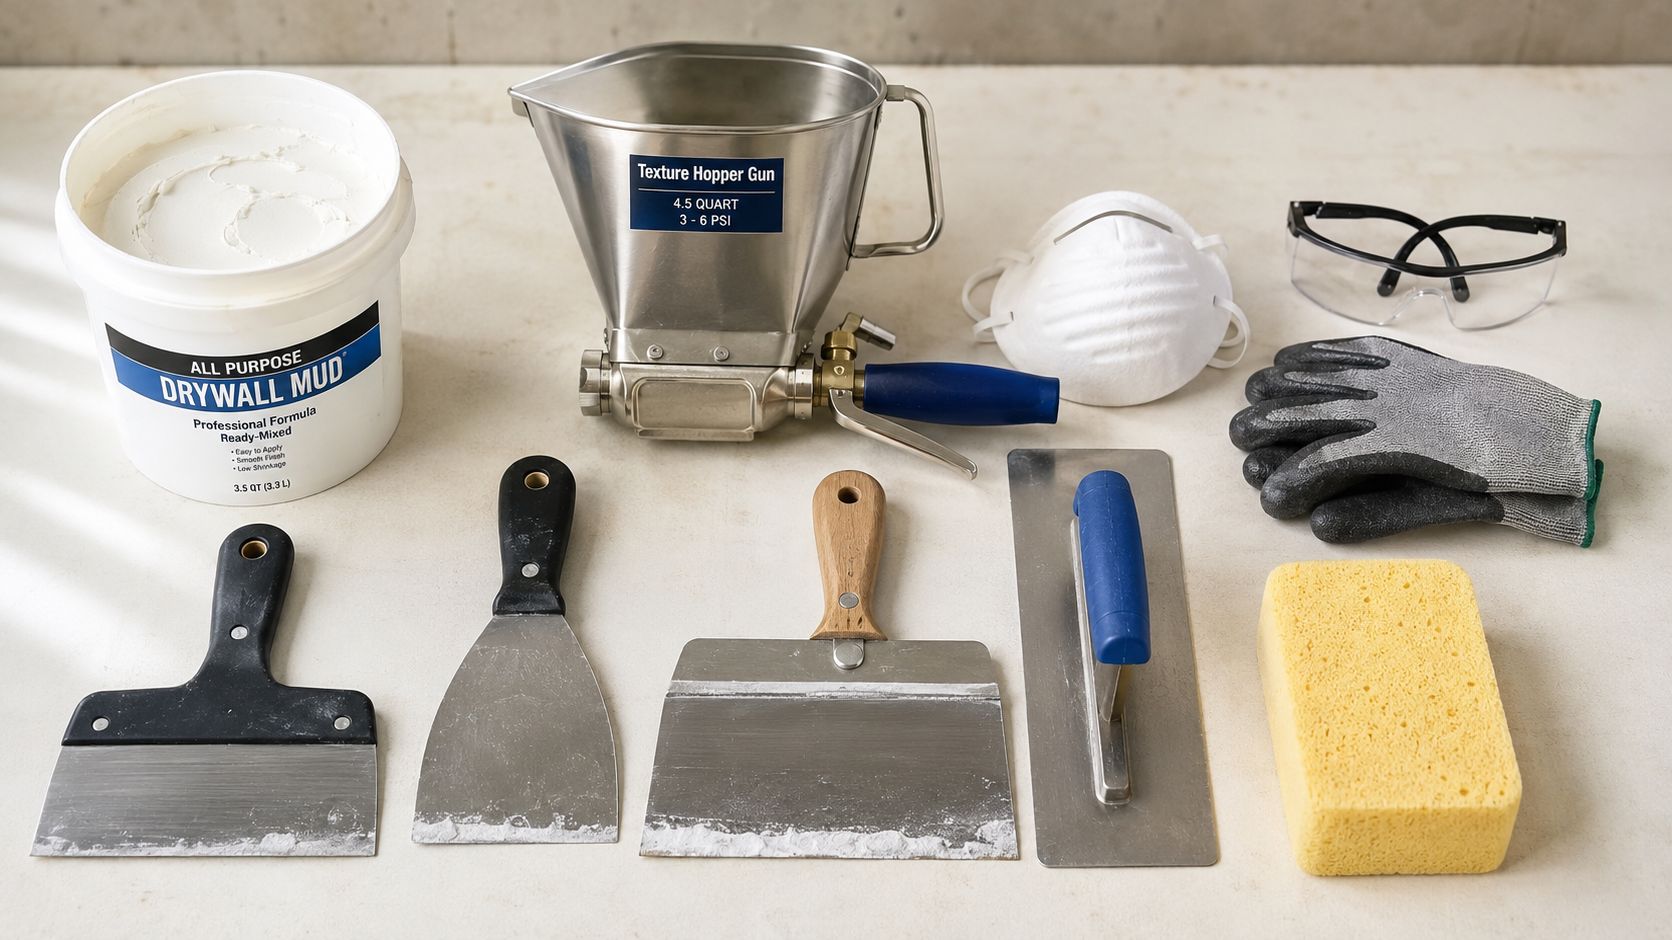
Universal prep and safety gear
Every ceiling repair starts with the same core kit because clean prep affects the final look as much as the texture material does.
- Drop cloths and plastic sheeting. Ceiling debris gets everywhere, and wet texture is messy.
- Painter's tape. Helpful for masking walls, fixtures, and HVAC grilles.
- Safety glasses and a respirator. Overhead scraping, sanding, and spraying put dust directly in your face.
- A stable ladder. You need both hands free and enough height to work without overreaching.
- Utility knife and sanding sponge. These help you cut out loose paper, clean up edges, and flatten repair areas.
- Mud pan and taping knives. A wider knife usually feathers patches better and leaves fewer ridges.
- Joint compound or patching compound. Use the one that fits the size and depth of the repair.
- Primer and matching ceiling paint. Unsealed patches absorb texture and paint differently, which can make the repair flash even if the pattern is close.
One warning matters here. If the ceiling is older and has popcorn texture, do not start scraping aggressively until you know what you are disturbing. In some homes, that calls for testing and a more cautious plan.
Texture-specific tools and materials
The original application method should guide your material choice. If the ceiling was sprayed, a spray repair usually gives you the closest pattern. If it was hand-applied, you will need hand tools that can recreate that motion and spacing.
For orange peel, a small spray texture product can work on limited repairs, especially if the surrounding pattern is light and uniform. For knockdown, you need material that can hold a peak and a broad knife or knockdown blade to flatten it at the right time. For slap brush or stomp-style textures, the brush itself matters as much as the mud because the bristle pattern leaves a signature. For larger repairs, a hopper-style sprayer gives better control over droplet size and coverage than a small aerosol can.
A few tool choices make a bigger difference than homeowners expect:
- Match the application family to the original ceiling. Spray for spray. Hand-applied for hand-applied.
- Use a scrap piece of drywall or cardboard for test shots. Adjusting pattern off the ceiling saves a lot of cleanup.
- Keep clean water, a sponge, and rags nearby. Texture is much easier to soften, wipe back, or reshape before it sets.
- Have enough material to extend beyond the patch. Blending often requires working outside the repaired spot, not stopping right at the edge.
If your repair is wide, in a high-visibility room, or part of a ceiling that already has uneven past patches, the tool list gets longer fast. That is usually the point where DIY stops being cheaper in practice. Renting or buying specialty tools for one repair can cost more than expected, and the bigger risk is ending up with a patch that is structurally fixed but still easy to spot.
The Art of Application and Blending for an Invisible Finish
A ceiling patch usually looks acceptable from two feet away on the ladder. The ultimate test comes when you get back on the floor, daylight hits across the room, and your eye goes straight to the repair.
Blending is the hard part. Matching the general texture type is only half the job. The repair also has to fade into the surrounding field without a visible edge, a change in scale, or a flat spot that catches light differently.
Build the patch to the same plane first
Texture does not hide a bad patch. If the repair sits high, dips low, has torn paper, or still shows rough sanding marks, the texture will telegraph every one of those flaws after paint.
Cut away loose material. Tighten up the patch edges. Fill, sand, and check the area from the side so you can see raking light across the surface. Then seal the repair if the patch and the existing ceiling will absorb moisture differently. Bare compound, old paint, and previous repairs all dry at different rates, and that changes how the new texture breaks and bonds.
This step decides whether the rest of the work has a chance.
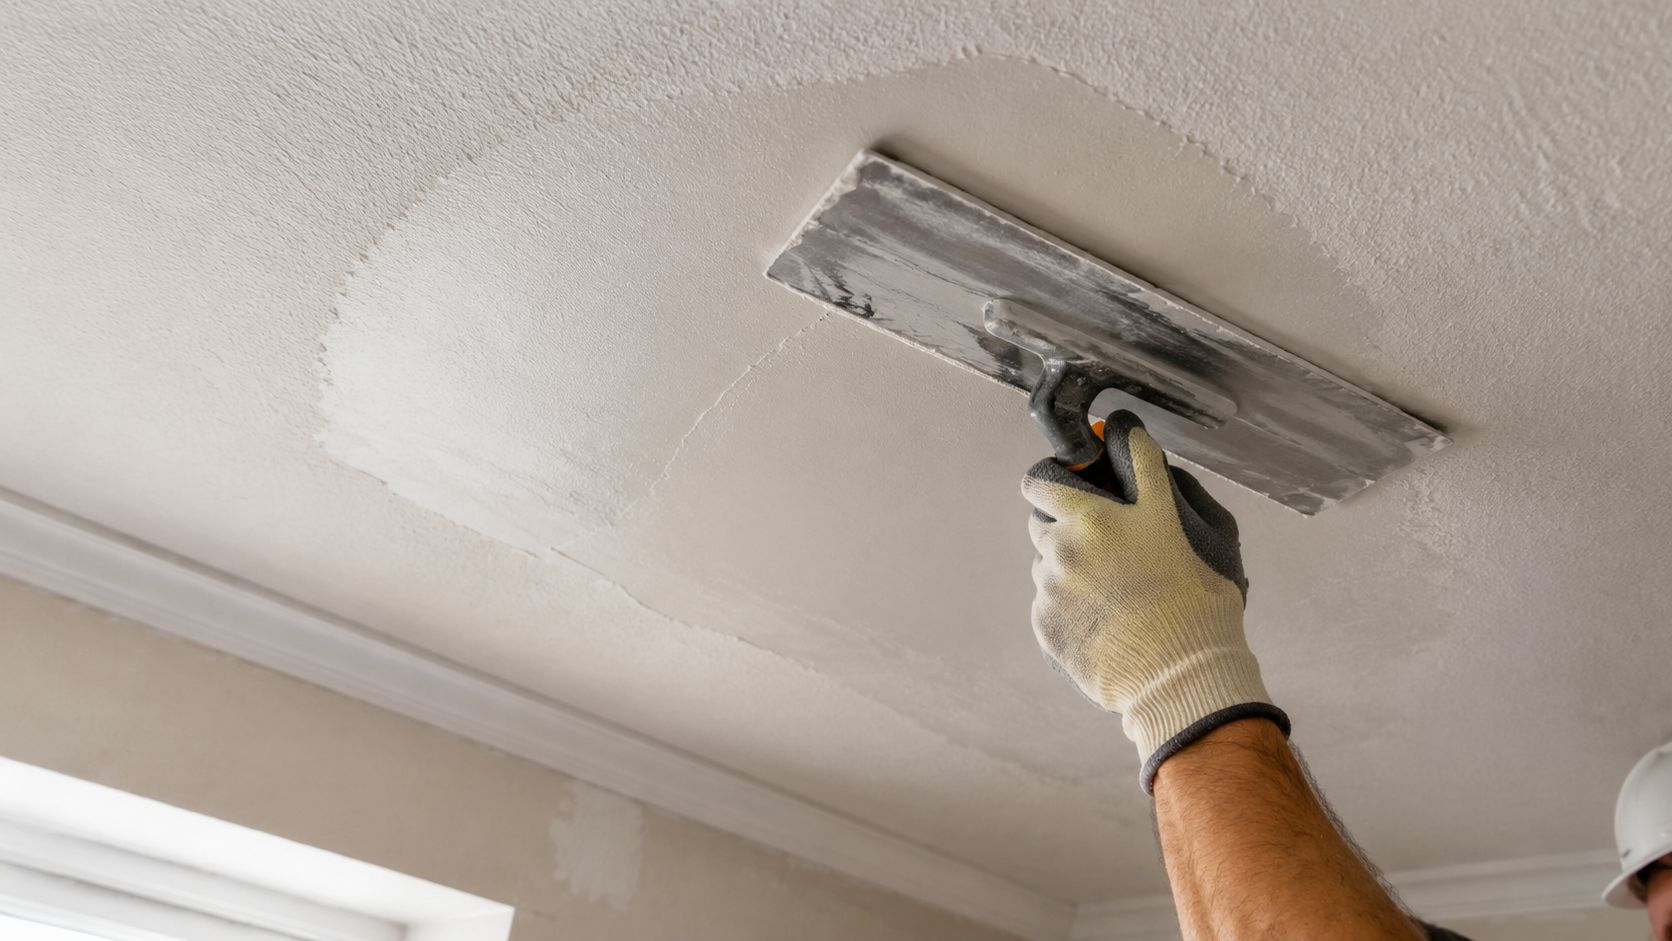
Match the field, then blend past the repair
The goal is to match the room, not just the opening you patched. That means working outside the repair area on purpose.
For spray textures, build the pattern lightly and carry it beyond the patch into the existing ceiling so the transition fades out. For hand-applied textures, copy the spacing, pressure, and irregularity of the original pattern, then soften the perimeter before it starts to set. A repair that stops at a sharp border almost always reads like a repair.
A simple working sequence keeps the process under control:
- Make a test sample first. Check droplet size, mud thickness, or brush imprint on scrap drywall or cardboard.
- Apply less than you think you need. It is easier to add another pass than scrape down a heavy one overhead.
- Expand past the patch. The blend zone matters as much as the center.
- Get off the ladder and inspect from normal viewing distance. A pattern that looks close up can still read wrong from the floor.
- Adjust before it fully sets. Small corrections are manageable early. Reworking half-dry texture usually makes the patch larger and uglier.
If you can trace the edge of the repair before paint, you will usually still see it after paint.
Control matters more than speed
Homeowners often rush the application because working overhead is tiring. That is understandable, but it leads to the two problems I see most. The patch gets too much material in the center, and the outer edge gets fussed with until it turns muddy.
Spray textures need consistent distance and motion. Hand textures need a repeatable rhythm. Knockdown is especially unforgiving because the timing window matters. Flatten it too soon and the pattern smears. Wait too long and the peaks tear instead of laying down cleanly. Stomp and slap-brush finishes have their own trap. If the pattern is placed too evenly, it looks manufactured instead of natural.
A short demo can also help you visualize pacing and tool control before you touch the ceiling.
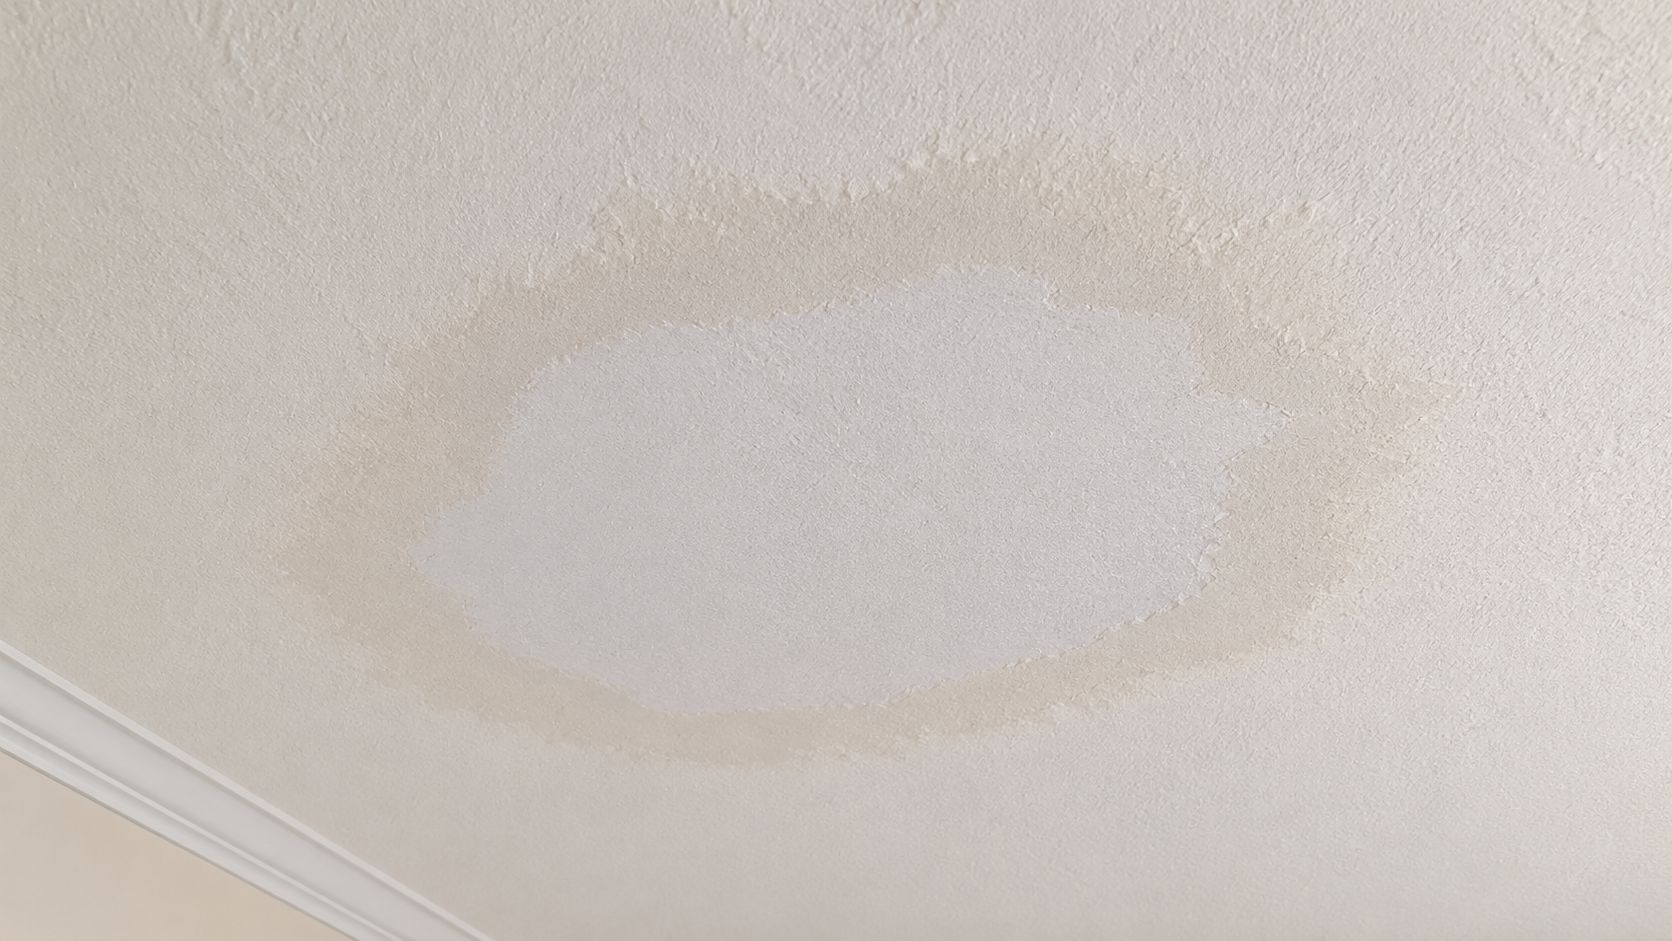
Avoid the halo around the repair
The most common giveaway is a halo. The center may be close, but the perimeter forms a ring that tells you exactly where the new work starts and stops.
Prevent that by feathering the texture outward, keeping the pattern density consistent, and resisting the urge to keep poking at spots that are already setting up. Then prime and paint the repaired area carefully so the finish coat absorbs evenly. A good texture match can still flash if the repaired area drinks paint differently than the surrounding ceiling.
Lighting changes the standard. In many Portland homes, soft window light runs across the ceiling and exposes every change in height or texture density. A patch that looks acceptable in a dim hallway may stand out in a bright kitchen or living room.
That is the point where the DIY decision needs to be honest. If the repair is small, in a low-visibility area, and the texture is forgiving, a patient homeowner can often get a result they can live with. If the patch is large, the room gets strong natural light, or the ceiling has a layered hand texture that needs to disappear into older work, calling a local pro like CS1 is usually the cheaper choice once you factor in repainting, extra materials, and the chance of having to scrape it back and start over.
Troubleshooting Common Texture Matching Mistakes
Most bad ceiling repairs don't fail for one dramatic reason. They fail because several small choices stack up. The patch was a little high, the mud was a little wet, the spray was a little heavy, and the edge wasn't blended enough.
Why the patch still shows
If you can still see the repair after paint, the issue is usually one of these:
- The texture scale is off. The patch may be too fine or too coarse for the room.
- The patch edge is visible. This creates that halo effect.
- The repaired area sits proud or low. Texture can't hide a bad plane.
- The stain was painted over without full prep. Water damage often leaves a visual reminder if the ceiling wasn't handled correctly.
Sometimes homeowners keep adding more texture, hoping it will disguise the mismatch. It usually does the opposite. The repair becomes heavier than the surrounding ceiling and catches more shadow.
A visible patch doesn't always mean you need more material. It often means you need better shape, better transition, or a reset.
Knockdown timing mistakes
Knockdown repairs are especially sensitive to timing and consistency. If the compound is too thin, it collapses. If it's too thick, it won't spray or splatter naturally. One instructional source describes the right consistency as about the texture of pudding, which is a useful target because it needs to move easily while still holding shape. That same source also shows a common working window of about 15 minutes before flattening the texture, using a light touch so the knife rides over the tops instead of crushing the pattern (knockdown timing and consistency demonstration).
That gives you two practical diagnostics:
- If the mud runs or slumps, it's likely too loose or was applied too heavily.
- If the knife smears the whole patch, you probably knocked it down too soon or pushed too hard.
For homeowners in Portland and surrounding cities, a lot of DIY projects turn into redo work. Knockdown has a short forgiving window. Miss it, and the pattern changes fast.
When to Call a Professional for Your Ceiling Repair
A lot of homeowners decide to call for help at the same point. The patch is technically done, but every time they turn on the lights, their eye goes straight to it.
That usually means the repair problem is no longer the hole. It is the blend.
A small ceiling repair can be a reasonable DIY project if the patch is limited, the texture is simple, and the room is forgiving. A guest room with flat light gives you more margin for error than a kitchen or living room with morning sun washing across the ceiling. If you have time to make test boards, adjust the pattern, sand lightly, and repaint the full ceiling if needed, doing it yourself can make sense.
Portland-area homeowners should be especially realistic about lighting and finish expectations. A repair that looks acceptable at noon can stand out badly in the evening or during the winter when low-angle daylight rakes across the surface. That is why the hardest part is not getting texture onto the patch. It is getting the new work to disappear into the old field.
Professional help is usually the smarter choice in a few specific situations:
- The patch is bigger than a small, isolated repair. The larger the area, the harder it is to hide the transition.
- The texture is irregular or hand-applied. Stomp, slap brush, and older custom patterns are difficult to copy without practice.
- There was water damage. Stain blocking, damaged drywall, soft joint compound, and hidden movement all need to be addressed before texture goes on.
- The room has strong side lighting. Natural light from large windows will expose ridges, edge flashing, and pattern changes fast.
- The ceiling has been repaired before. Multiple layers of patching often create buildup that needs to be cut back and reworked, not covered again.
- You need the repair to disappear. That includes pre-sale work, remodel punch lists, rental turns, and main living spaces where a visible patch will keep bothering you.
Older homes deserve extra caution too. Matching the pattern is only part of the job. Paint age, previous patching, framing movement, and texture buildup all affect the final result. I have seen homeowners get the texture close enough, then still end up with a visible repair because the perimeter was not feathered well or the ceiling needed broader repainting to unify the sheen.
That is the essential DIY decision framework. Do it yourself when the cost of a visible patch is low. Call a pro when the cost of being almost right is high.
For occupied homes, there is also a practical side homeowners tend to underestimate. Ceiling repair creates dust, requires overhead sanding, and often means more protection, cleanup, and repaint coordination than expected. A contractor is not just applying mud. They are controlling the work area, fixing the substrate if needed, matching the surrounding field, and getting the room ready for paint without turning the project into a second repair cycle.
For homeowners around Portland, Beaverton, Hillsboro, Tigard, Lake Oswego, Gresham, and Vancouver, WA, CS1 Real Interiors handles this kind of work every week. If the ceiling needs to look right the first time, especially in a high-visibility room, bringing in a pro is often the less expensive decision once you factor in redo work, repainting, and the time spent chasing a patch that still shows.