You're standing in the living room, looking up at an old textured ceiling, and the question hits fast. Is this just dated texture, or is it a popcorn ceiling with asbestos?
That concern is common in Portland, Beaverton, Hillsboro, Tigard, Lake Oswego, Gresham, and Vancouver WA, especially in older homes where remodel plans run straight into original ceilings. The good news is that this problem has a safe path forward. The wrong move is panic. The right move is to stop disturbing the ceiling, get the material evaluated properly, and make a clean plan for testing, abatement or encapsulation, and then final drywall and paint work.
Table of Contents
- That Old Popcorn Ceiling A Common Portland Problem
- Understanding the Health Risks of Asbestos Fibers
- How to Safely Test Your Ceiling for Asbestos
- Encapsulation vs Removal Your Two Safe Options
- Ready to Solve Your Ceiling Problem
- Assembling Your Team Abatement and Finishing
- Your Next Steps for a Safe and Finished Home
That Old Popcorn Ceiling A Common Portland Problem
A lot of homeowners first notice the issue during a small project. They want to swap a light fixture, patch a stain after a leak, or finally get rid of that heavy texture before listing the house. Then someone says the words nobody wants to hear. That ceiling might contain asbestos.

That's a reasonable concern in this area. Portland's older neighborhoods, along with homes in Beaverton and Hillsboro, have plenty of houses from the years when spray textures were common. According to EPA timeline context on popcorn ceilings, asbestos was banned for use in spray-applied ceiling treatments in 1978, but manufacturers were allowed to keep using existing stockpiles, so asbestos-containing popcorn ceilings were still installed into the 1980s.
Why this comes up so often in older homes
Popcorn ceilings were widely used because they covered imperfections well and went on quickly. In older housing stock, that means a plain-looking ceiling can still raise a real safety question.
The key point is this. A suspicious ceiling is a management problem, not a reason to tear into it blindly.
Practical rule: If the house is older and the ceiling texture hasn't been tested, don't scrape, drill, sand, or cut it just to “see what's there.”
That matters for homeowners and property managers alike. A rental turnover in Gresham, a prep-for-sale project in Lake Oswego, or a remodel in Tigard can all get delayed when an untested ceiling becomes part of the work scope. A calm process keeps the project safe and avoids turning a cosmetic update into a contamination event.
Understanding the Health Risks of Asbestos Fibers
The danger is not the word asbestos by itself. The danger is airborne fibers.
Asbestos was used in some textured ceilings because it added fire resistance and durability. In an intact ceiling, those fibers may remain bound in the material. The problem starts when someone scrapes, sands, drills, cuts, or damages the surface enough to release dust.
What actually creates the hazard
A damaged popcorn ceiling with asbestos can shed microscopic fibers into indoor air. Those fibers are too small to judge by sight, which is why people often underestimate the risk after a minor ceiling hit or a water-damaged area.
Public health guidance summarized in this asbestos exposure review notes that even relatively low asbestos content in the 1% to 10% range can release respirable fibers when disturbed, leading to measurable indoor contamination. The same source states there is no established safe level of asbestos exposure, and diseases linked to inhalation can appear after latency periods ranging from 10 to 50 years.
What this means in day-to-day situations
Homeowners usually run into risk during ordinary repair work, such as:
- Fixture changes: Replacing lights, smoke alarms, fans, or speakers can require drilling or cutting.
- Leak response: Water damage can soften texture, cause sagging, or leave a stain that tempts someone to scrape and patch.
- Cosmetic updates: Smooth-ceiling upgrades often start with the assumption that old texture can be sanded or knocked down.
- Accidental impacts: Moving furniture, a loft bed, a thrown toy, or attic work can chip the ceiling.
An intact ceiling is one situation. A disturbed ceiling is a different situation entirely.
That distinction helps people avoid overreacting and underreacting. If the texture is undamaged and nobody plans to touch it, the next step is evaluation, not demolition. If the surface has been broken, flaked, or gouged, the area needs to be handled much more carefully.
The illnesses behind the caution
The diseases most often associated with asbestos inhalation include asbestosis, lung cancer, and mesothelioma. Those aren't short-term irritation problems. They're the reason professionals treat older suspect ceiling textures with strict containment and careful sampling.
For homeowners in Portland and nearby cities, the practical takeaway is simple. Don't create dust from a suspect ceiling. Small repair habits that seem normal with standard drywall can be the wrong move here.
How to Safely Test Your Ceiling for Asbestos
Testing is the first step that gives you a real answer. Until then, treat the ceiling as suspect.
The basic rule from agencies and industry guidance is clear. The EPA and CPSC emphasize that any suspected asbestos-containing material in homes built before roughly 1985 should be treated as if it contains asbestos until lab analysis confirms otherwise, as described in this guidance on asbestos in popcorn ceilings.
What not to do
A lot of bad outcomes start with “just a small sample.” Dry scraping a bit into a bag, poking around above a light fixture, or cutting a test patch without containment can spread dust into occupied space.
Avoid these common mistakes:
- DIY dry sampling: Pulling a sample without wet methods and controls can release fibers.
- Testing during another repair: Don't combine “sample collection” with patching, painting, or fixture work.
- Assuming visual clues are enough: Texture appearance does not confirm or rule out asbestos.
- Starting demolition first: Once debris is on the floor, the project gets harder and riskier.
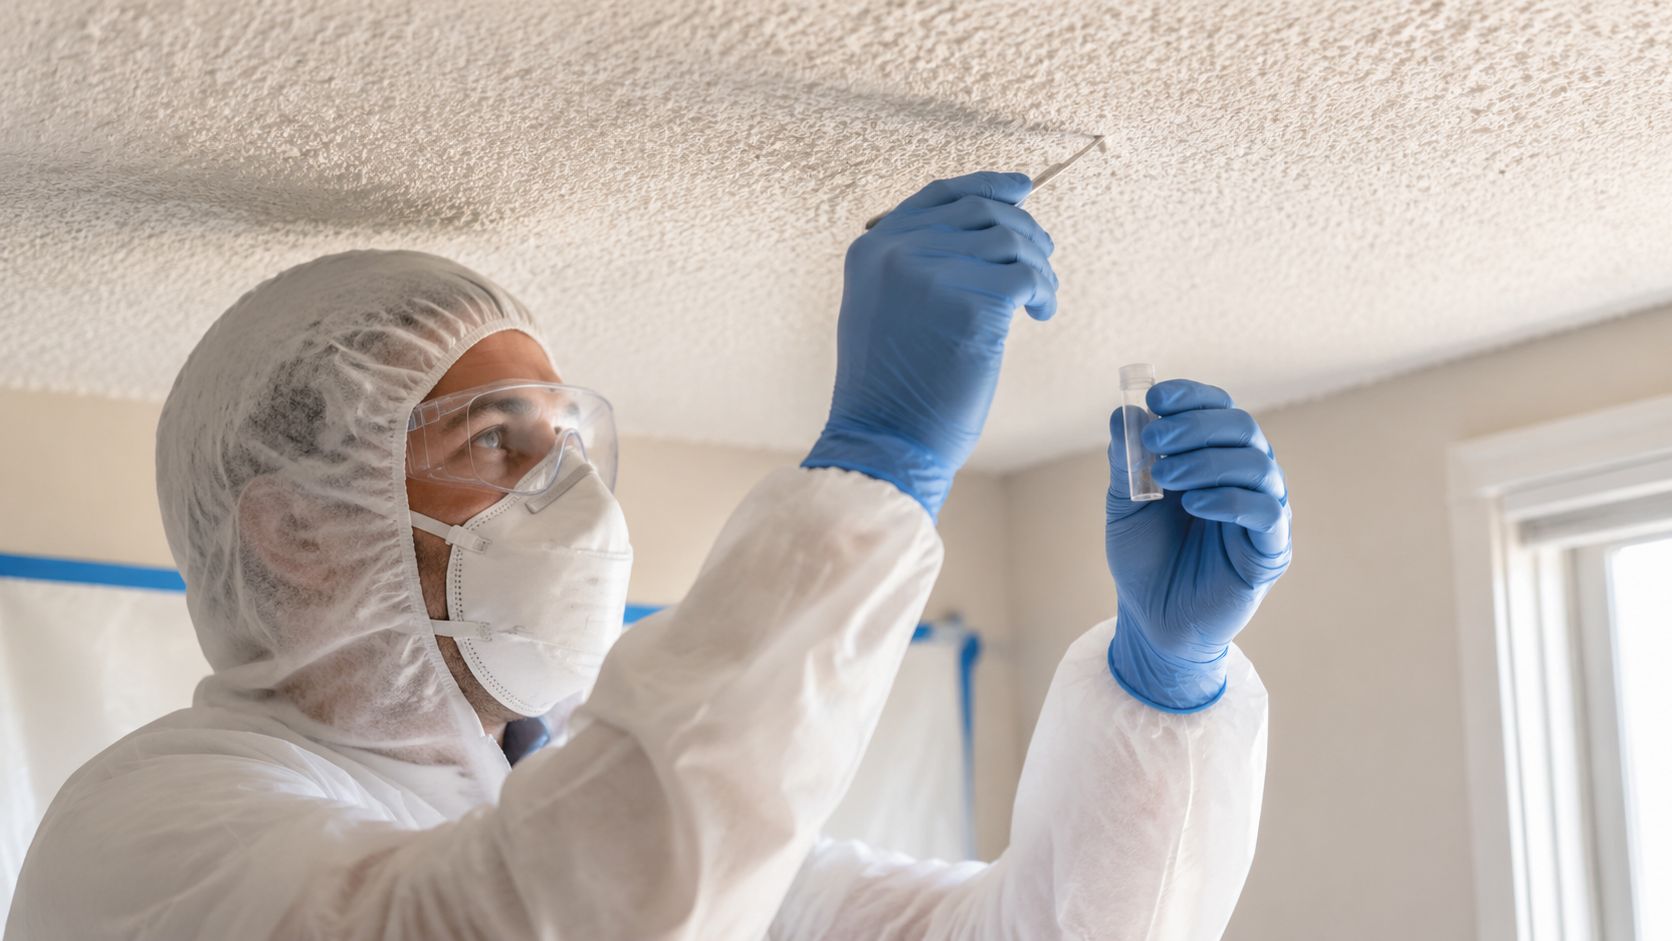
What proper testing looks like
A qualified inspector collects a controlled sample from the ceiling and sends it to an accredited lab. The sample is typically wetted and handled in a way that minimizes fiber release. Laboratory analysis can identify asbestos content and fiber type using recognized methods.
For homeowners, the process is straightforward:
- Leave the ceiling alone.
- Schedule professional inspection and sampling.
- Wait for the lab result.
- Make the repair or remodel plan based on that result.
If a room has water damage, impact damage, or a planned ceiling change, testing should happen before any drywall, painting, electrical, or remodeling work begins.
That applies whether the property is a condo in Tigard, a ranch house in Beaverton, or an older home in Vancouver WA. Once you know what the material is, you can choose the right path without guessing.
Encapsulation vs Removal Your Two Safe Options
If testing confirms asbestos, the decision usually comes down to encapsulation or professional abatement and removal. Both can be valid. The right choice depends on the ceiling's condition, your remodel plans, access for future work, and whether you want a short-term control strategy or a permanent change.
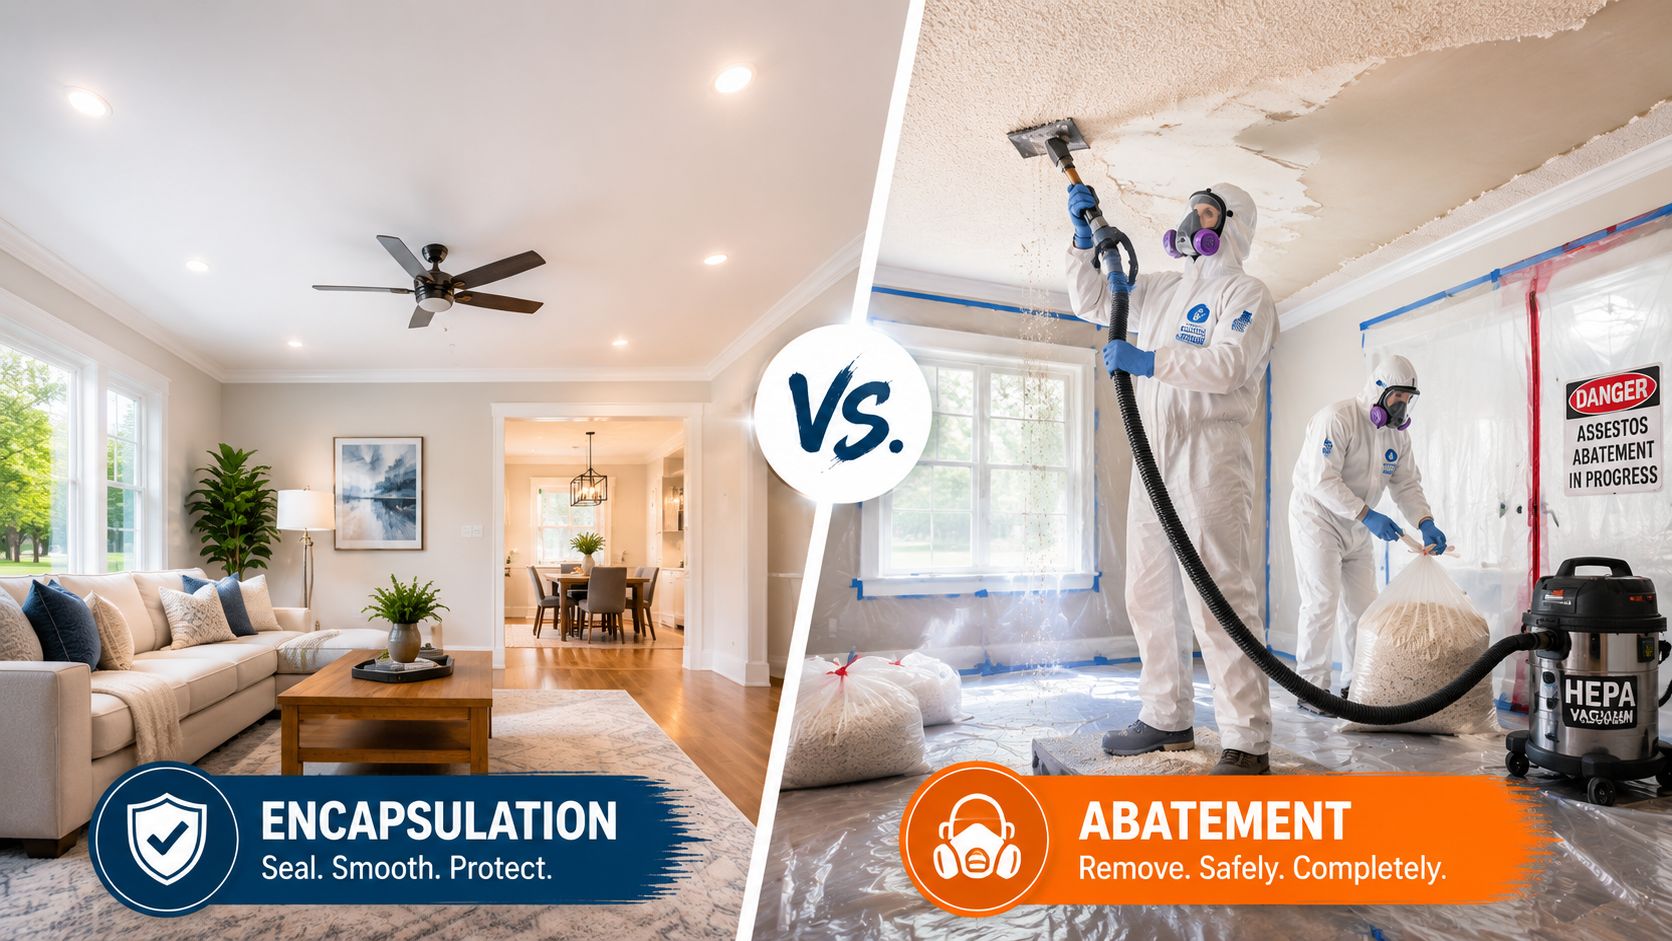
According to Southwest Clean Air guidance for popcorn ceiling asbestos work, encapsulation involves sealing the ceiling or installing gypsum board over it to isolate fibers. Abatement requires wetting the material with a detergent-water solution before scraping so fibers are less likely to become airborne.
When encapsulation makes sense
Encapsulation is often the practical option when the ceiling is intact and nobody needs to disturb it. The goal is to keep fibers locked in place and create a stable finished surface.
Common encapsulation approaches include:
- Sealing the surface: A penetrating sealant can help stabilize the existing texture.
- Covering with gypsum board: New drywall installed over the old ceiling gives you a modern surface and isolates the old material.
- Using a full barrier approach: Some projects use panel or overlay systems as part of a complete ceiling update.
This path works well when the texture is in decent condition, there isn't major water damage, and the owner wants to avoid a more disruptive removal process. It also fits some resale situations where the priority is a clean, updated interior without opening a larger abatement scope.
When removal is the better choice
Removal becomes more attractive when the ceiling is damaged, repairs will require future access, or the owner wants the asbestos gone rather than managed in place.
In practice, removal may be the better fit when:
- The ceiling has visible deterioration
- A remodel will involve lights, ducts, framing, or layout changes
- Water damage has compromised the texture
- The owner wants one permanent resolution before sale or long-term occupancy
Removal is more involved because it requires containment, wet methods, controlled cleanup, and proper disposal. It's not the place for shortcuts.
A lot of homeowners also think ahead to marketability. If you're weighing future budgets, regional pricing context can help. For another point of reference, this overview of Canadian asbestos removal costs shows how labor, containment, and disposal can shape project decisions in older properties.
Here's a quick way to compare the two:
| Option | Best Fit | Main Advantage | Main Trade-Off |
|---|---|---|---|
| Encapsulation | Intact ceiling, limited disturbance planned | Less invasive way to isolate fibers | Asbestos remains in place |
| Removal | Damaged ceiling or larger remodel | Permanent elimination of the material | More disruption and stricter work scope |
A short visual overview can help if you're deciding between the two approaches.
The biggest mistake is choosing based only on appearance. A ceiling that “doesn't look that bad” may still be a poor candidate for patching if it has been hit, softened by leaks, or needs future penetrations. A clean decision looks at condition, access, and what the room needs next.
Ready to Solve Your Ceiling Problem
A lot of Portland homeowners reach this point after something small turns into a bigger decision. A light fixture gets swapped, a leak stains the texture, or a buyer asks whether the ceiling contains asbestos. What looked like a cosmetic issue now affects safety, budget, scheduling, and often resale.

At that point, the job needs more than a test result. Homeowners usually need a plan for the full sequence. Confirm the material, protect the home during abatement, then bring the room back to a clean finished condition so it does not look like half a project. That handoff matters just as much as the hazardous material work.
In Portland area homes, I often see delays happen because nobody defines the scope early. One contractor handles the asbestos. Another repairs drywall. Then painting, trim touch-up, insulation, or patching around new lighting gets decided later, after the containment is gone and the room is already in limbo. A clear plan at the start avoids that stop-and-start cycle.
If you are vetting companies before work begins, Hand Vetted's advice on contractor screening is a useful outside reference for background questions, insurance checks, and scope review.
For homeowners and property managers in Portland, Beaverton, Hillsboro, Tigard, Lake Oswego, Gresham, and Vancouver WA, the right next step is to line up qualified help for both phases of the project. If your ceiling problem ties into a leak, accidental damage, a remodel, or prep before listing the house, get the scope defined early so the hazardous material work and the finished surfaces are coordinated from the start.
Assembling Your Team Abatement and Finishing
Once testing confirms asbestos, the project usually splits into two phases. First comes licensed asbestos handling. Then comes the work that makes the room look normal again.
A lot of homeowners only plan for the first half. That's where projects stall. The abatement crew removes or isolates the hazard, but someone still needs to restore the ceiling, repair transitions, prep surfaces, and bring the room back to a finished condition.
What to verify before abatement starts
Before anybody starts work, verify who is doing what. Abatement contractors and finishing contractors solve different problems.
Check these points carefully:
- Licensing and compliance: Confirm the asbestos contractor is qualified for the scope and follows required safety procedures.
- Insurance coverage: Make sure the contractor carries appropriate insurance for this type of work.
- Containment plan: Ask how they will isolate the work area, protect adjacent rooms, and manage cleanup.
- Disposal process: The crew should explain how material stays contained and how waste leaves the property.
- Handoff condition: Get clear on what the ceiling and walls will look like after abatement is complete.
If you want a practical outside checklist for vetting companies before work begins, Hand Vetted's advice on contractor screening is a useful reference for background questions and due diligence.
The cleanest projects are the ones where the homeowner knows, before day one, exactly where abatement ends and finish work begins.
Project Team Responsibilities
| Professional | Primary Role |
|---|---|
| Asbestos inspector | Collects controlled samples and confirms whether asbestos is present |
| Abatement contractor | Contains, removes, or encapsulates asbestos-containing material safely |
| Drywall contractor | Repairs substrate, installs new drywall if needed, and finishes the ceiling |
| Painter | Primes and paints the finished surface for a uniform final look |
| Interior contractor coordinating multiple scopes | Helps sequence repairs, finishes, and related interior work |
What happens after the asbestos work is done
This is the part many people underestimate. After abatement, the room may be safe, but it usually doesn't look finished. You may be left with a stripped ceiling, patched openings, uneven transitions at walls, or a surface that needs full refinishing.
That's where a finishing contractor matters. Homeowners often need:
- Drywall repair: Damage from leaks, access cuts, or ceiling removal has to be repaired correctly.
- New ceiling installation: Some rooms are best served by fresh board over framing or new drywall after removal.
- Texture matching or smooth finish work: Depending on the house, the right answer may be matching adjacent areas or upgrading to a cleaner modern look.
- Painting: Final prime and paint pull the whole room back together.
- Related interior scopes: Insulation and metal stud framing sometimes become part of the project during remodel work.
For that stage, CS1 Real Interiors provides professional drywall repair services and serves clients throughout the region, including work based from its Portland service area. The company also handles drywall installation, interior painting, insulation, and metal stud framing for residential and small commercial interiors.
That matters for more than looks. Good finish work protects the value of the earlier abatement decision. If a ceiling has been safely dealt with, the room should also end up straight, smooth, paint-ready, and consistent with the rest of the home.
Your Next Steps for a Safe and Finished Home
A common Portland call goes like this. A homeowner is getting ready to paint, change a light fixture, or list the house. Someone nicks the popcorn ceiling, dust drops to the floor, and the whole project suddenly feels uncertain.
At that point, the right move is simple. Stop disturbing the area, keep people out of the room as much as possible, and treat the ceiling as suspect until testing says otherwise. Trying to patch it like normal drywall or wipe up debris without a plan can turn a small problem into a larger cleanup.
The next decisions should follow the condition of the ceiling, your remodel plans, and your timeline for the home.
A practical sequence
Stop any dusty work
Hold off on scraping, sanding, cutting, drilling, or demolition until you know what is in the texture.Get a proper asbestos test
The test result sets the direction for everything that follows, including budget, schedule, and whether the ceiling can stay in place.Choose the right scope for the house
Some ceilings are better left contained and covered. Others need licensed abatement because of damage, planned renovations, or buyer concerns before a sale.Plan the finish work before the abatement starts
This is the part many homeowners miss. If you wait until the hazardous material is gone to start calling drywall and paint contractors, the room can sit half-finished longer than expected.Bring the room back to a completed condition
That means straight surfaces, repaired transitions, primer, paint, and a finish that matches the rest of the home.
Coordination matters because asbestos work does not end when the testing or removal crew leaves. Homeowners in Portland often have to solve two problems at once. One is safety. The other is how to get the house looking normal again without weeks of delays between trades.
That is especially true after accidental damage, leak repairs, or pre-listing updates. Sellers want a clean result that will not raise questions during inspection. Homeowners staying put usually want the room opened once, finished correctly, and closed up for good. If the project is part of a larger remodel, it also helps to discover integrated ceiling solutions so the ceiling work fits the rest of the interior plan.
A safe project should also leave you with a finished room, not a reminder of the problem.
For homeowners in Portland, Beaverton, Hillsboro, Tigard, Lake Oswego, Gresham, and Vancouver, WA, the safest path is a professional sequence from testing to abatement to final wall and ceiling repair. That approach protects the household, keeps the schedule tighter, and supports the value of the home.
If you need help after testing or abatement, CS1 Real Interiors can restore the space with professional drywall repair, drywall installation, interior painting, insulation, and metal stud framing. Whether the job involves ceiling damage, remodel prep, texture matching, or a full smooth-finish upgrade, contact CS1 Real Interiors for professional help with your drywall or interior project in Portland, Beaverton, Hillsboro, Tigard, Lake Oswego, Gresham, Vancouver WA, and surrounding areas.