You look up, see a stain spreading across the ceiling, and your first thought is usually the same as every homeowner in Portland, Beaverton, or Gresham: “Can I patch this without making it look worse?”
That’s a fair question. Textured ceilings hide minor flaws well until they don’t. A small hole from an old light fixture, a seam crack, or a water spot from a leak can turn into a repair that draws more attention than the original damage. The hard part usually isn’t filling the hole. It’s making the repair disappear.
Older Pacific Northwest homes add another layer of difficulty. Many still have popcorn, stipple, swirl, orange peel, or knockdown ceilings from earlier remodels. Some textures are machine-applied. Some were done by hand. Some have been painted over so many times that a simple patch behaves differently than the surrounding ceiling. If you want to know how to fix textured ceilings without creating a visible scar overhead, the decision matters as much as the technique.
Table of Contents
- The Problem with Damaged Textured Ceilings
- Safety First Asbestos, Texture ID, and Prep Work
- How to Repair Small Holes and Cracks
- Is Your Ceiling Repair Getting Complicated? We Can Help
- Beyond Patching Skim Coating vs Full Texture Removal
- Finishing Touches and When to Call a Professional
The Problem with Damaged Textured Ceilings
You notice the ceiling after the room is quiet. Maybe it is a yellow stain outside the bathroom, a hairline crack over the hallway, or a patch from an old light fixture that looked fine until the afternoon sun hit it. On a textured ceiling, small defects rarely stay subtle.
That is what makes these repairs so frustrating for homeowners. Ceiling work is overhead, messy, and slow. Light rakes across the surface and highlights every hump, flat spot, and missed edge. A wall patch can disappear once the furniture goes back in place. A ceiling patch usually stays on display.
Older textured ceilings also create a decision problem, not just a repair problem. In a lot of Portland-area homes, especially pre-1980s houses, the visible damage is only part of the story. A stain may point to ongoing moisture from a roof leak, poor bath fan venting, or condensation in an older attic assembly. A crack may be simple seasonal movement, or it may be telling you the tape joint has failed across a wider section.
What homeowners usually run into
- Water stains and soft spots: Common below bathrooms, roof penetrations, and older windows or vent lines.
- Seam cracks: Often show up where framing shifts or an older taped joint starts to let go.
- Small holes and dents: Usually caused by fixture changes, storage mishaps, or previous repairs.
- Old patches that stand out: The hole is filled, but the texture, sheen, or plane of the ceiling is still off.
One trade rule holds up every time. If your eye finds the patch before it finds the room, the repair still needs work.
That is why the right fix is not always another patch. If the damage is tight, dry, and limited to one area, a careful DIY repair can make sense. If the texture pattern is inconsistent across the room, the ceiling has multiple old repairs, or moisture has left swelling and staining behind, patching often turns into chasing defects from one spot to the next. At that point, skim coating part of the ceiling, or bringing in a pro to evaluate the whole surface, usually saves time and gives you a result that looks finished.
Safety First Asbestos, Texture ID, and Prep Work
A lot of ceiling repairs go sideways before the patch even starts. The homeowner sees a stain or a crack, grabs a scraper, and starts knocking down texture. In an older Portland house, that can turn a manageable repair into a contamination issue, a bigger finish problem, or both.
Know the age of the ceiling before you disturb it
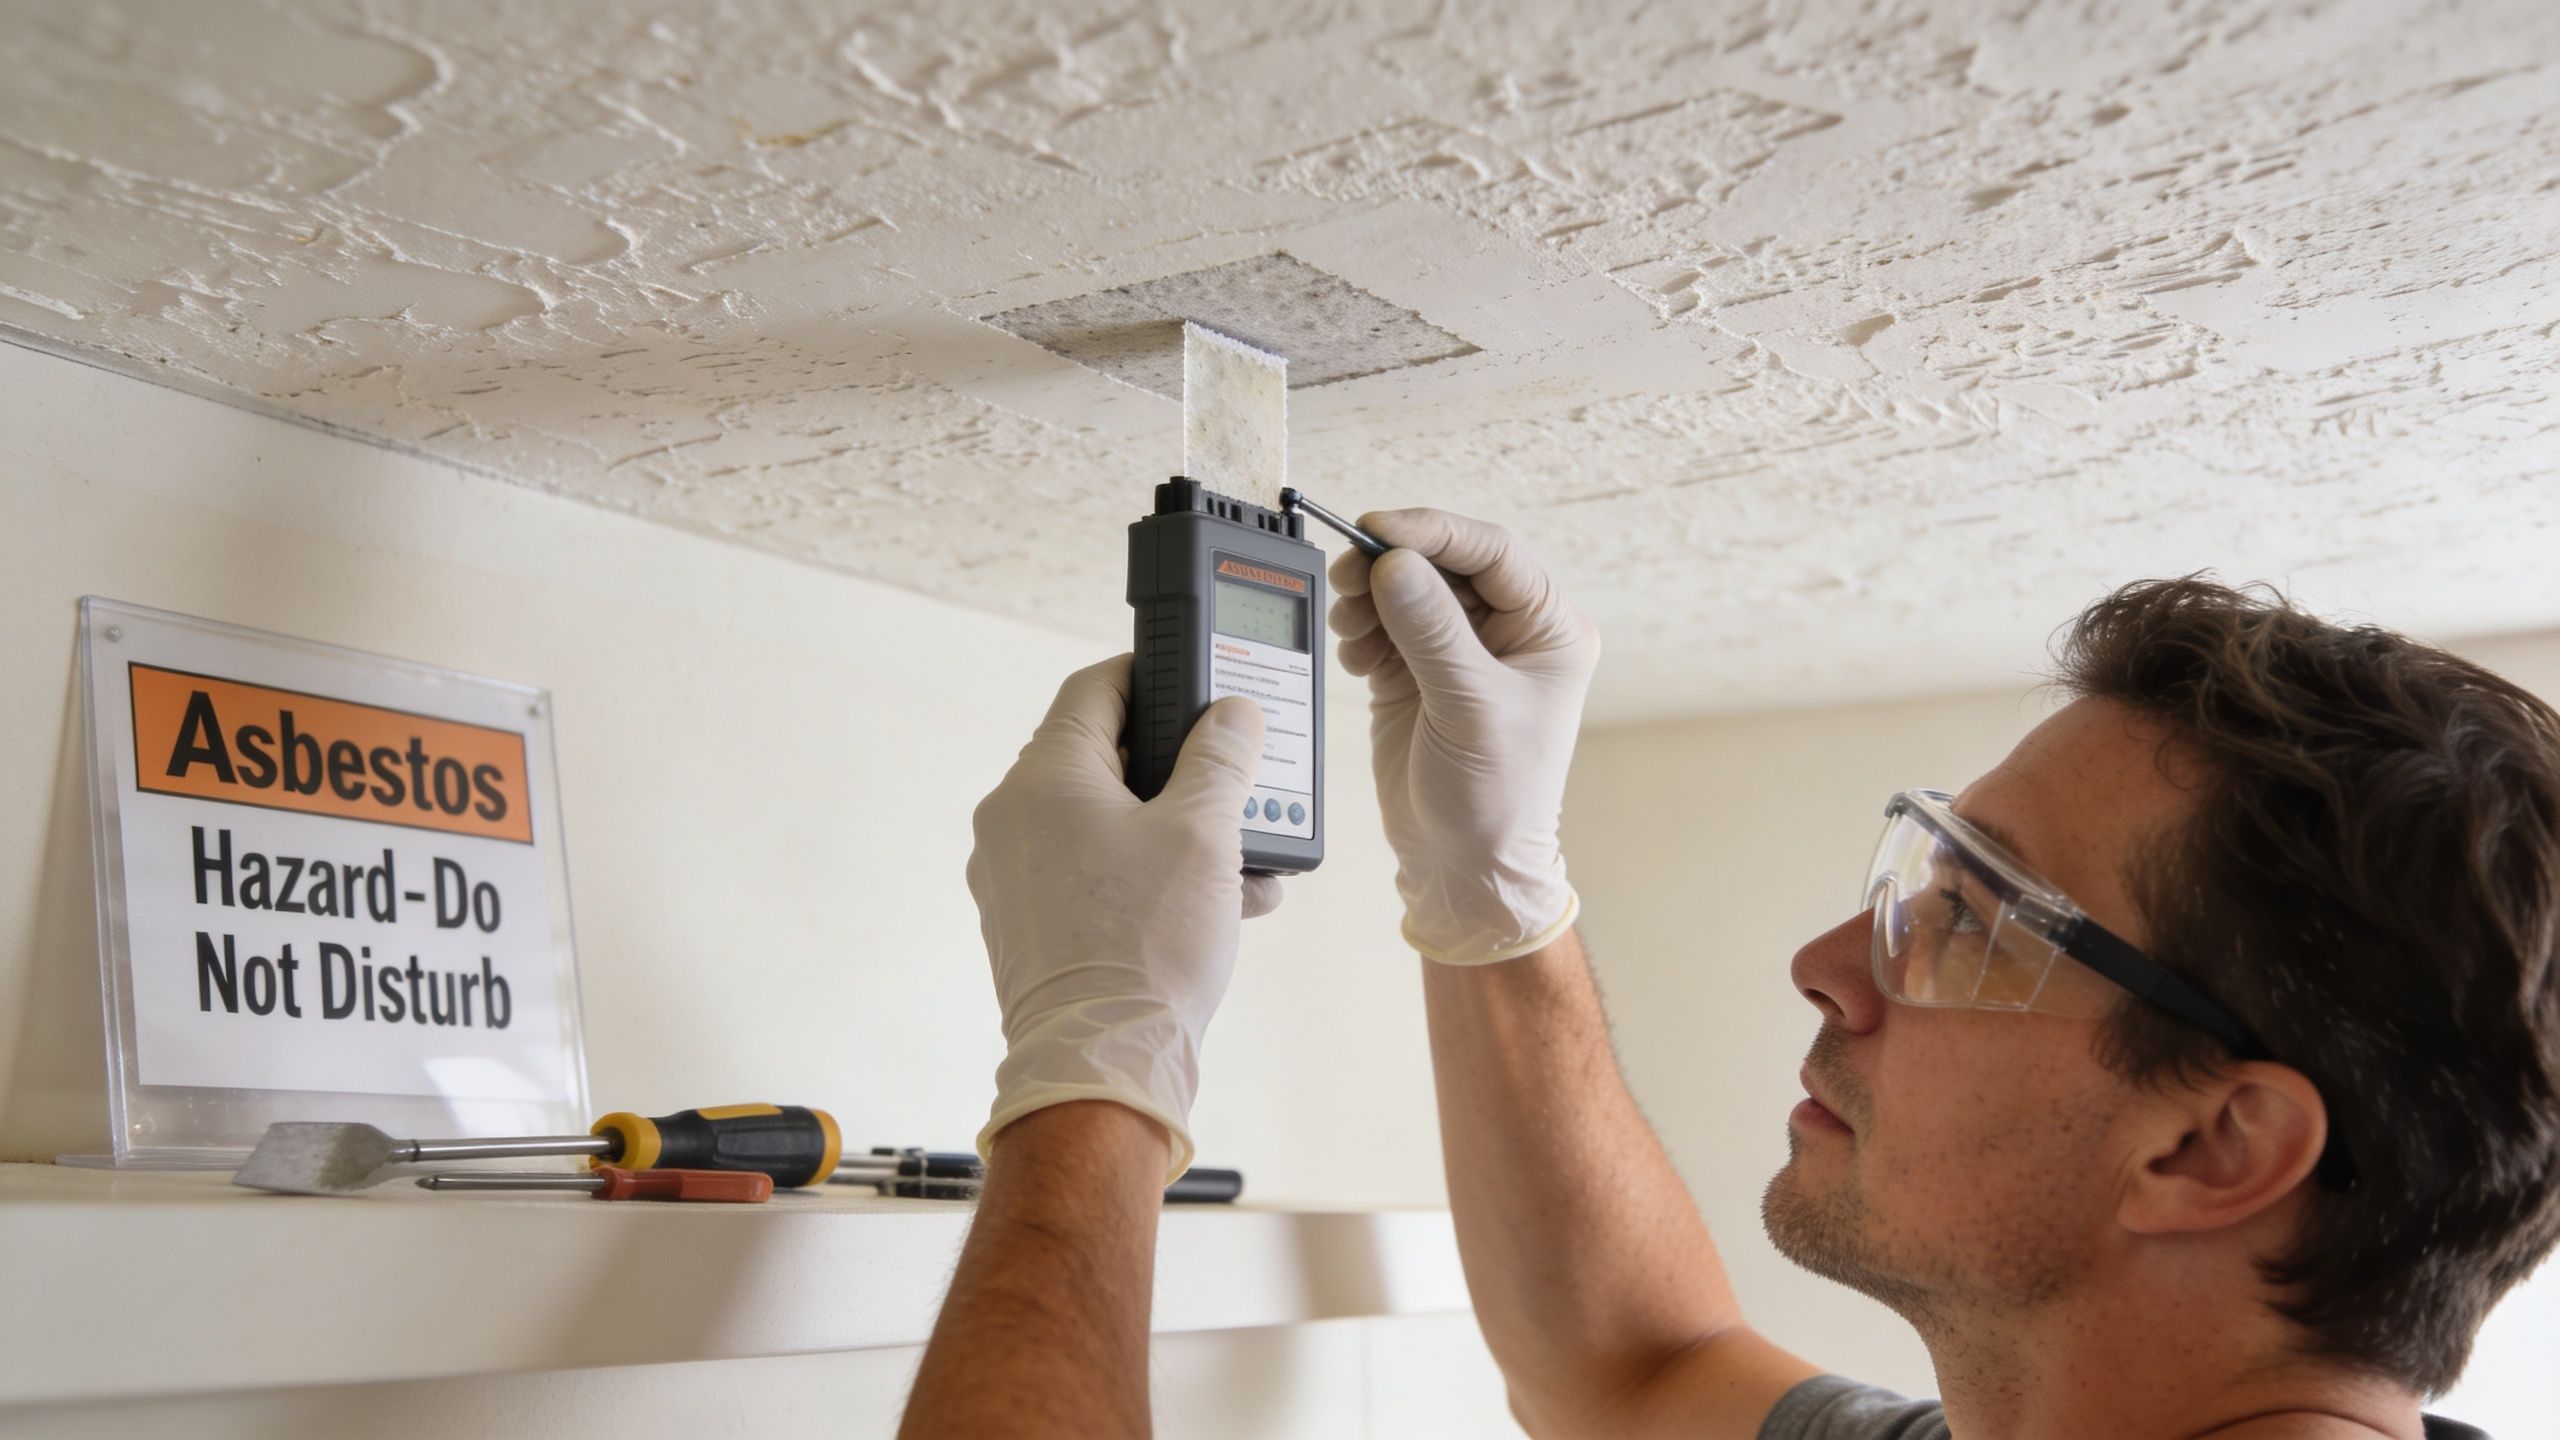
If the texture was installed before 1978, treat it as suspect until testing says otherwise.
That does not mean it contains asbestos. It means sanding, scraping, or cutting into it without checking first is a poor gamble. In Portland-area homes built or remodeled before that cutoff, especially homes that have had multiple partial updates over the years, I tell homeowners to verify what is on the ceiling before they disturb it. Older Pacific Northwest houses also tend to have a history of roof leaks, bath fan moisture, and attic condensation, so the texture issue is often tied to a moisture issue at the same time.
For a small isolated repair, testing may feel like a hassle. It is still the right call if the ceiling age is unclear or the house predates the ban. If the result comes back clean, you can move ahead with a lot more confidence. If it does not, the job shifts out of DIY territory fast.
Identify the texture before you pick a repair method
Texture matching starts with naming the surface correctly. Homeowners often call every bumpy ceiling popcorn, but popcorn, orange peel, knockdown, and hand-applied patterns all repair differently.
Here’s a quick field guide:
| Texture type | What it looks like | Typical repair challenge |
|---|---|---|
| Popcorn | Raised, chunky, acoustic look | Hard to patch without obvious edge lines |
| Orange peel | Fine to medium splatter | Easier to blend if spray pattern matches |
| Knockdown | Flattened splatter with soft islands | Direction and knife pressure matter |
| Stipple or swirl | Hand-applied pattern with brush or trowel movement | The hardest to mimic cleanly |
This step matters because the repair plan changes with the texture. A small orange peel patch is often reasonable for a careful DIY job. A swirl or stomp pattern in an older ceiling is a different animal. Even if the hole is small, matching the hand work can take longer than the actual patching, and one bad repair tends to stand out every time the light hits it.
If you cannot tell how the original texture was made, stop before the finish stage and reassess.
Set up the room like a repair site
Prep is what separates a repair that stays contained from one that spreads across the room.
Move furniture out if you can. Cover the floor and anything that stays. If the damage is near a light, fan, or smoke alarm, shut off the circuit first. Bag loose debris as you work so you are not grinding dust into the room or tracking it through the house.
For patch work, thin coats are easier to control and blend than one heavy coat. Keep the tool kit simple: putty knife, taping knife, sanding sponge, drywall saw, screws, backing support, patch material, and primer. Most small ceiling repairs do not need more than that.
One more practical call. If the ceiling shows staining, softness, sagging, repeated cracking, or signs of long-term moisture, prep should include finding the source above the drywall. In older PNW homes, that is often the point where a small patch stops making sense and a broader skim coat, or a professional inspection, becomes the smarter move.
How to Repair Small Holes and Cracks
A small ceiling patch can stay small if you slow down and build it in the right order. Rush it, and a dime-size repair turns into a visible hump, a flashing seam, or a texture mismatch you notice every time daylight crosses the room.
Start with the cause, not the patch
Water changes the whole decision.
If the damage came from a roof leak, plumbing issue, or bathroom moisture, correct that first. In Portland-area homes, especially older ones with attic ventilation problems or long-term humidity, drywall can stay soft longer than it looks. If the stain is growing, the paper face feels swollen, or the ceiling has any give when you press near the damage, wait. Patch over that and the repair usually fails.
A small, dry nick from moving furniture or cutting in a light fixture is one thing. A stain with softness around it often points to a bigger repair, and sometimes a skim coat, not a spot patch, ends up being the cleaner fix.
Repairing a small hole
For a true small hole, clean edges and support matter more than speed. The goal is a flat patch that does not sink back or print through the texture later.
Use this sequence:
- Square up the damage: Trim loose or broken drywall so the opening has solid edges.
- Add backing: Slip wood backing above the ceiling and fasten through the existing drywall into it.
- Cut a matching patch: Use drywall the same thickness as the ceiling.
- Set the patch flush: Screw it in so it sits even with the surrounding surface.
- Tape the seams: Paper or fiberglass tape both work, but paper usually finishes flatter if the patch is tight.
- Apply thin coats of compound: Feather each pass wider than the last.
- Sand lightly between coats: Knock down ridges without digging into the patch.
Thin coats win overhead. Heavy mud shrinks, cracks, and leaves a crown around the repair that texture cannot hide.
If the hole is less than a few inches wide and the surrounding drywall is solid, a careful DIY repair is realistic. Once the patch gets larger, or the hole sits in a spot with strong side light, the finish work gets less forgiving. That is usually the point where homeowners find out patching drywall and making a ceiling look untouched are two different jobs.
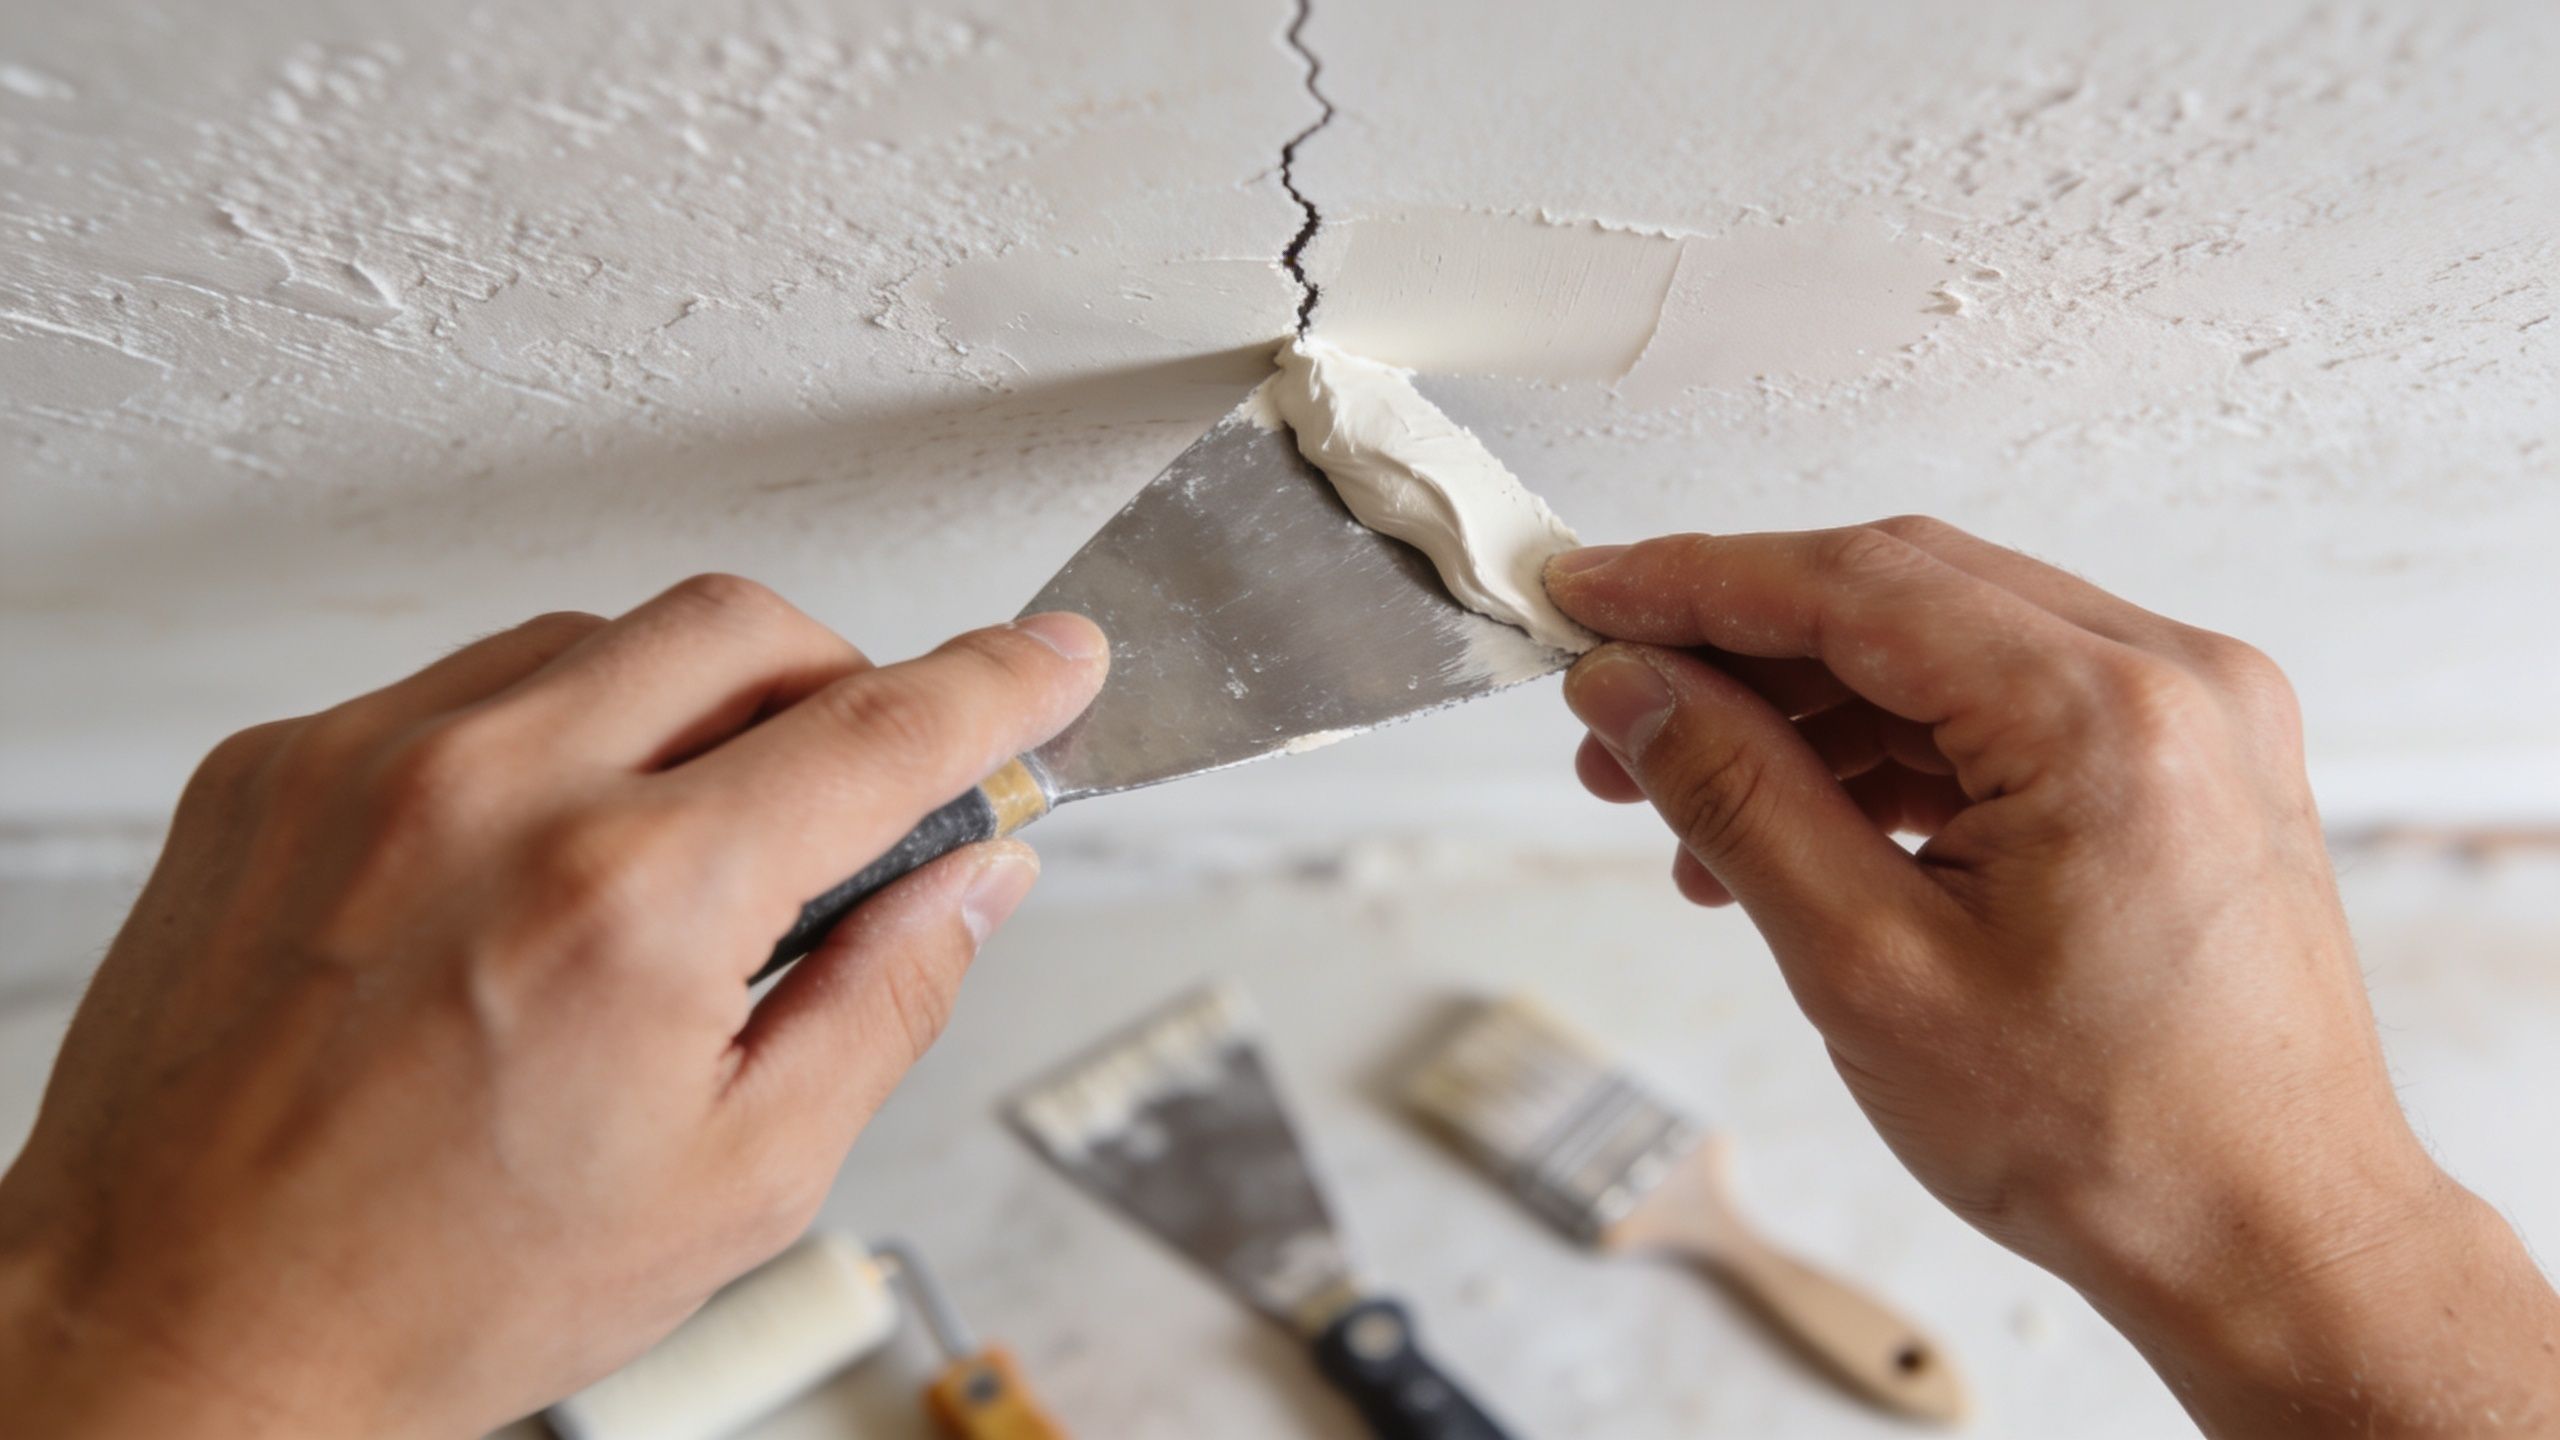
Repairing hairline cracks and split seams
Hairline cracks can be simple, but only if they are stable.
Open the crack slightly with a utility knife so fresh compound has something to grab. Apply a thin coat, embed tape if the crack follows a seam or shows any movement, then feather it out. Let it dry fully. Sand it lightly and repeat as needed.
A crack that keeps coming back usually has a reason. Seasonal movement, loose fasteners, framing shift, or past moisture can all show up as the same thin line in the paint.
Stop and reassess if you see any of these:
- The crack comes back after painting
- The area around it feels soft or loose
- You can see staining or discoloration
- The seam looks raised, not just split
- There is sagging nearby
At that stage, it is less about filling a line and more about figuring out why the ceiling moved in the first place.
Here’s a useful walkthrough if you want to see the repair sequence in motion before trying it yourself:
Texture matching is where most DIY repairs go sideways
Most homeowners can fill a hole. Matching the surrounding texture is the part that separates an acceptable patch from one that keeps catching your eye.
Practice on cardboard first. Match the size of the existing texture, not just the general style. If the ceiling has a fine orange peel, a heavy spray patch will stand out immediately. If it is knockdown, timing matters. Spray or apply the texture, let it firm up slightly, then flatten it lightly. Too soon and it smears. Too late and it breaks off in chunks.
Older Portland homes add another wrinkle. Hand-applied swirl, stipple, and stomp textures often vary from one room to the next, and repairs in pre-1980s houses can come with extra caution around original materials and past moisture problems. In those homes, a “small patch” is often only small structurally. Visually, it can be one of the hardest repairs in the house to hide.
A ceiling repair usually fails at the finish stage, not the patch stage.
If the repair sits in a hallway, kitchen, or living room where light washes across the ceiling, be honest about your tolerance for a visible blend line. A utility room patch is a good DIY candidate. A front entry ceiling in an older home is often worth professional texture matching from the start.
Is Your Ceiling Repair Getting Complicated? We Can Help
A ceiling project can turn fast. It starts as a stain or crack, then you find soft drywall, old texture that won’t blend, or a patch that needs multiple return trips to look right.
That’s usually the point where calling a pro makes more sense than spending another weekend overhead with mud on your arms and dust in the house. If the damage is widespread, if moisture is involved, or if you want the repair to disappear instead of just “look better,” get help before the patch grows into a bigger finish problem.
CS1 Real Interiors handles drywall repair, texture matching, interior painting, insulation, and metal stud framing for homeowners and small commercial clients across Portland, Hillsboro, Tigard, and nearby cities. If you want a free estimate, use the contact form here: Request a Free Estimate.
Beyond Patching Skim Coating vs Full Texture Removal
A lot of Portland homeowners reach this point after a patch or two. The original stain is gone, but the ceiling still looks busy, uneven, or dated every time the light hits it. At that stage, the decision is no longer how to fix one spot. It is whether to improve the whole surface or strip it back and start over.
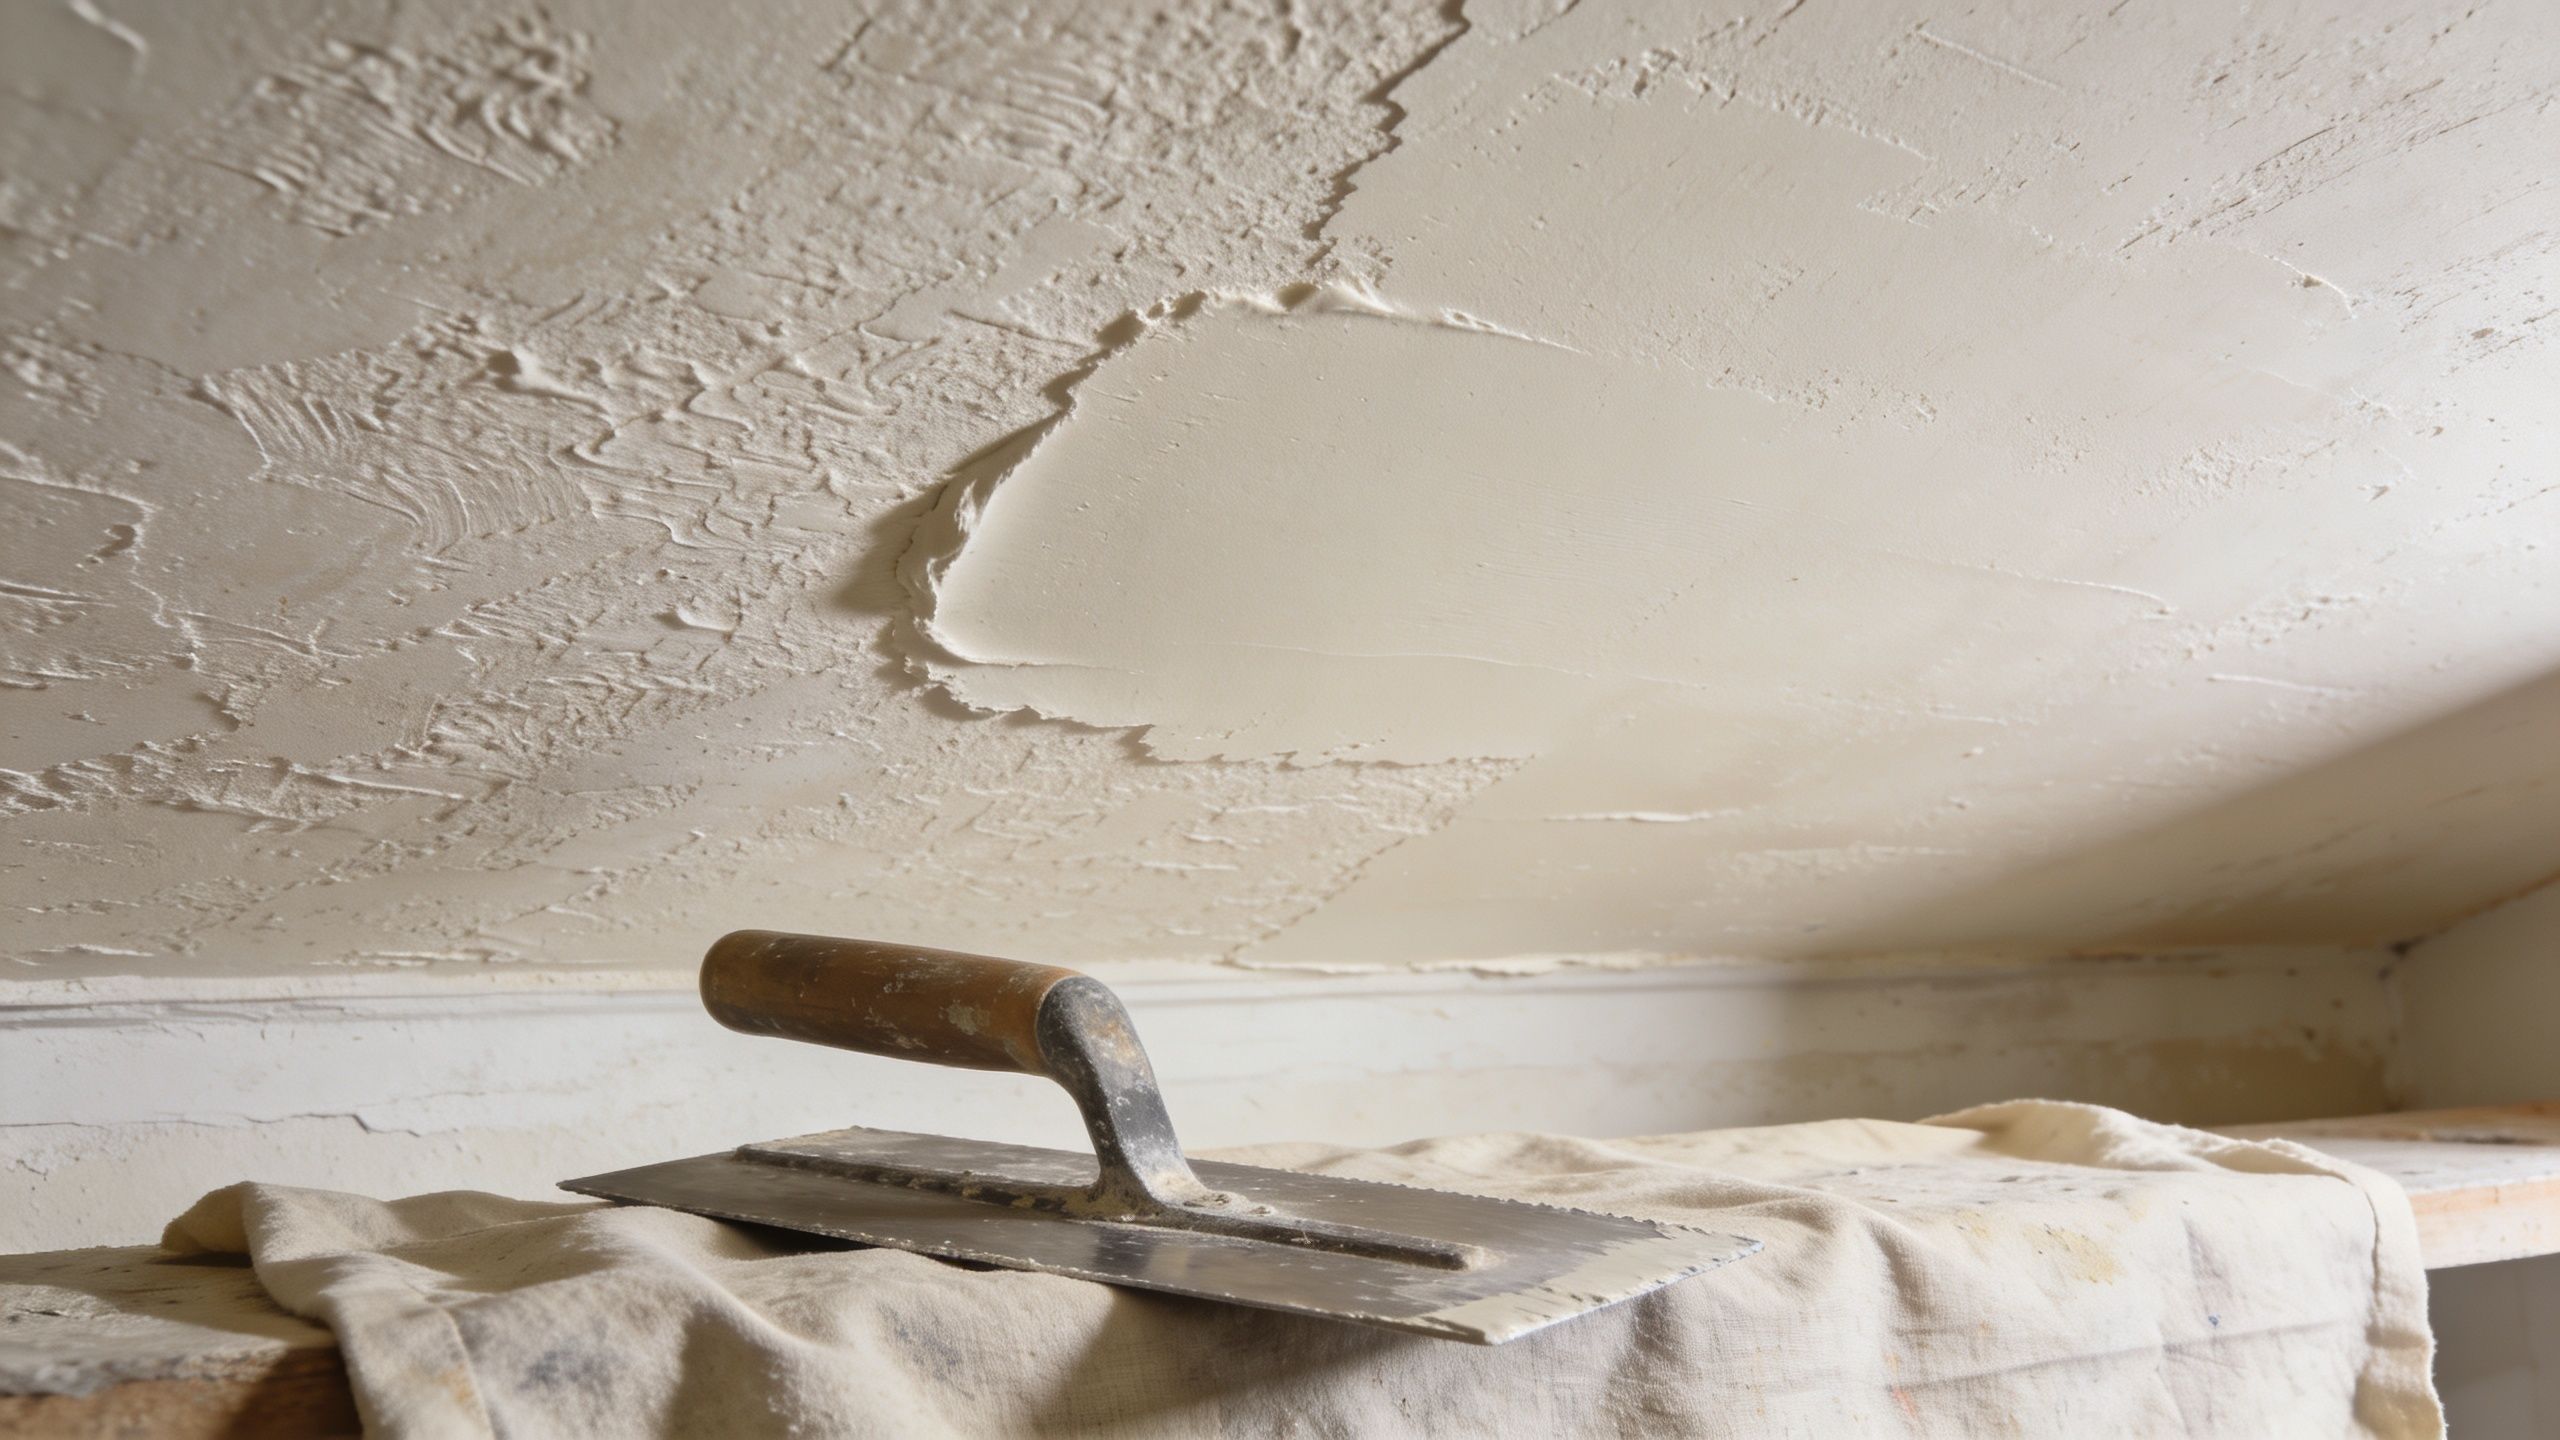
When skim coating makes sense
Skim coating works well when the existing texture is sound but the room has too many patched areas, uneven knockdown, or an older look you want to clean up. Instead of trying to match every repair, you create one consistent surface across the ceiling.
This option often makes sense in older Portland homes where the drywall is still serviceable but the finish has been touched up for years. It also avoids disturbing the original texture as much as full removal, which matters if the house was built before the 1980s and you have not ruled out asbestos yet.
The trade-off is finish work. Overhead skim coating is slower than homeowners expect, and the final look depends on patience, lighting, and restraint with the mud. Thin coats work better than heavy ones. If the first pass still shows some texture underneath, keep building gradually instead of trying to bury everything in one coat.
When full texture removal makes sense
Full removal fits a different problem. Use it when the texture is failing, very heavy, badly patched across large areas, or painted so unevenly that skim coating would still leave a wavy result.
In practice, removal can save time on one ceiling and create a much bigger job on another. Some textures scrape clean after proper prep. Others are locked in by layers of paint, old repairs, and moisture damage. In many Pacific Northwest homes, that last part matters. A ceiling that has seen roof leaks, bathroom humidity, or attic condensation often has softened paper, staining, or loose tape underneath. Scraping into that can turn a finish project into drywall replacement.
It is also the dirtier option by a wide margin.
A practical side by side decision guide
| Option | Best for | Main downside | Finish result |
|---|---|---|---|
| Localized patching | Small isolated damage | Hard to hide in visible areas | Can blend well if texture match is accurate |
| Skim coating | Dated or uneven texture across the room | Labor-intensive overhead finishing | Smooth, updated appearance |
| Full texture removal | Very heavy or failing texture | Messy and disruptive | Clean substrate for new finish |
Good results come from process more than product. For a ceiling that reads smooth in normal room lighting, pros build the surface with multiple thin coats, feather repairs wide, let each coat dry fully, and sand lightly between passes. Rushing that sequence is what leaves ridges, flashing, and visible patch edges.
If you are deciding what path makes sense, ask these questions first:
- Is the problem limited to one area, or does the whole ceiling look inconsistent?
- Has the ceiling had past water damage, staining, or soft spots?
- Is the house old enough that disturbing the texture needs extra caution?
- Will you be satisfied with a close match, or do you want the room to look fully updated?
- Do you have the time to prep, coat, sand, and contain dust for several days?
That last point matters more than people think. A DIY patch is reasonable when the ceiling is dry, stable, and the texture pattern is simple. Skim coating is still possible for a careful homeowner, but it demands more finish skill than patching. Full removal is where I usually tell homeowners to slow down and make a clear call, especially in older homes or anywhere moisture may have weakened what is underneath.
Finishing Touches and When to Call a Professional
The last part of the job is where repairs either disappear or stay visible forever.
Prime and paint the repair like it belongs there
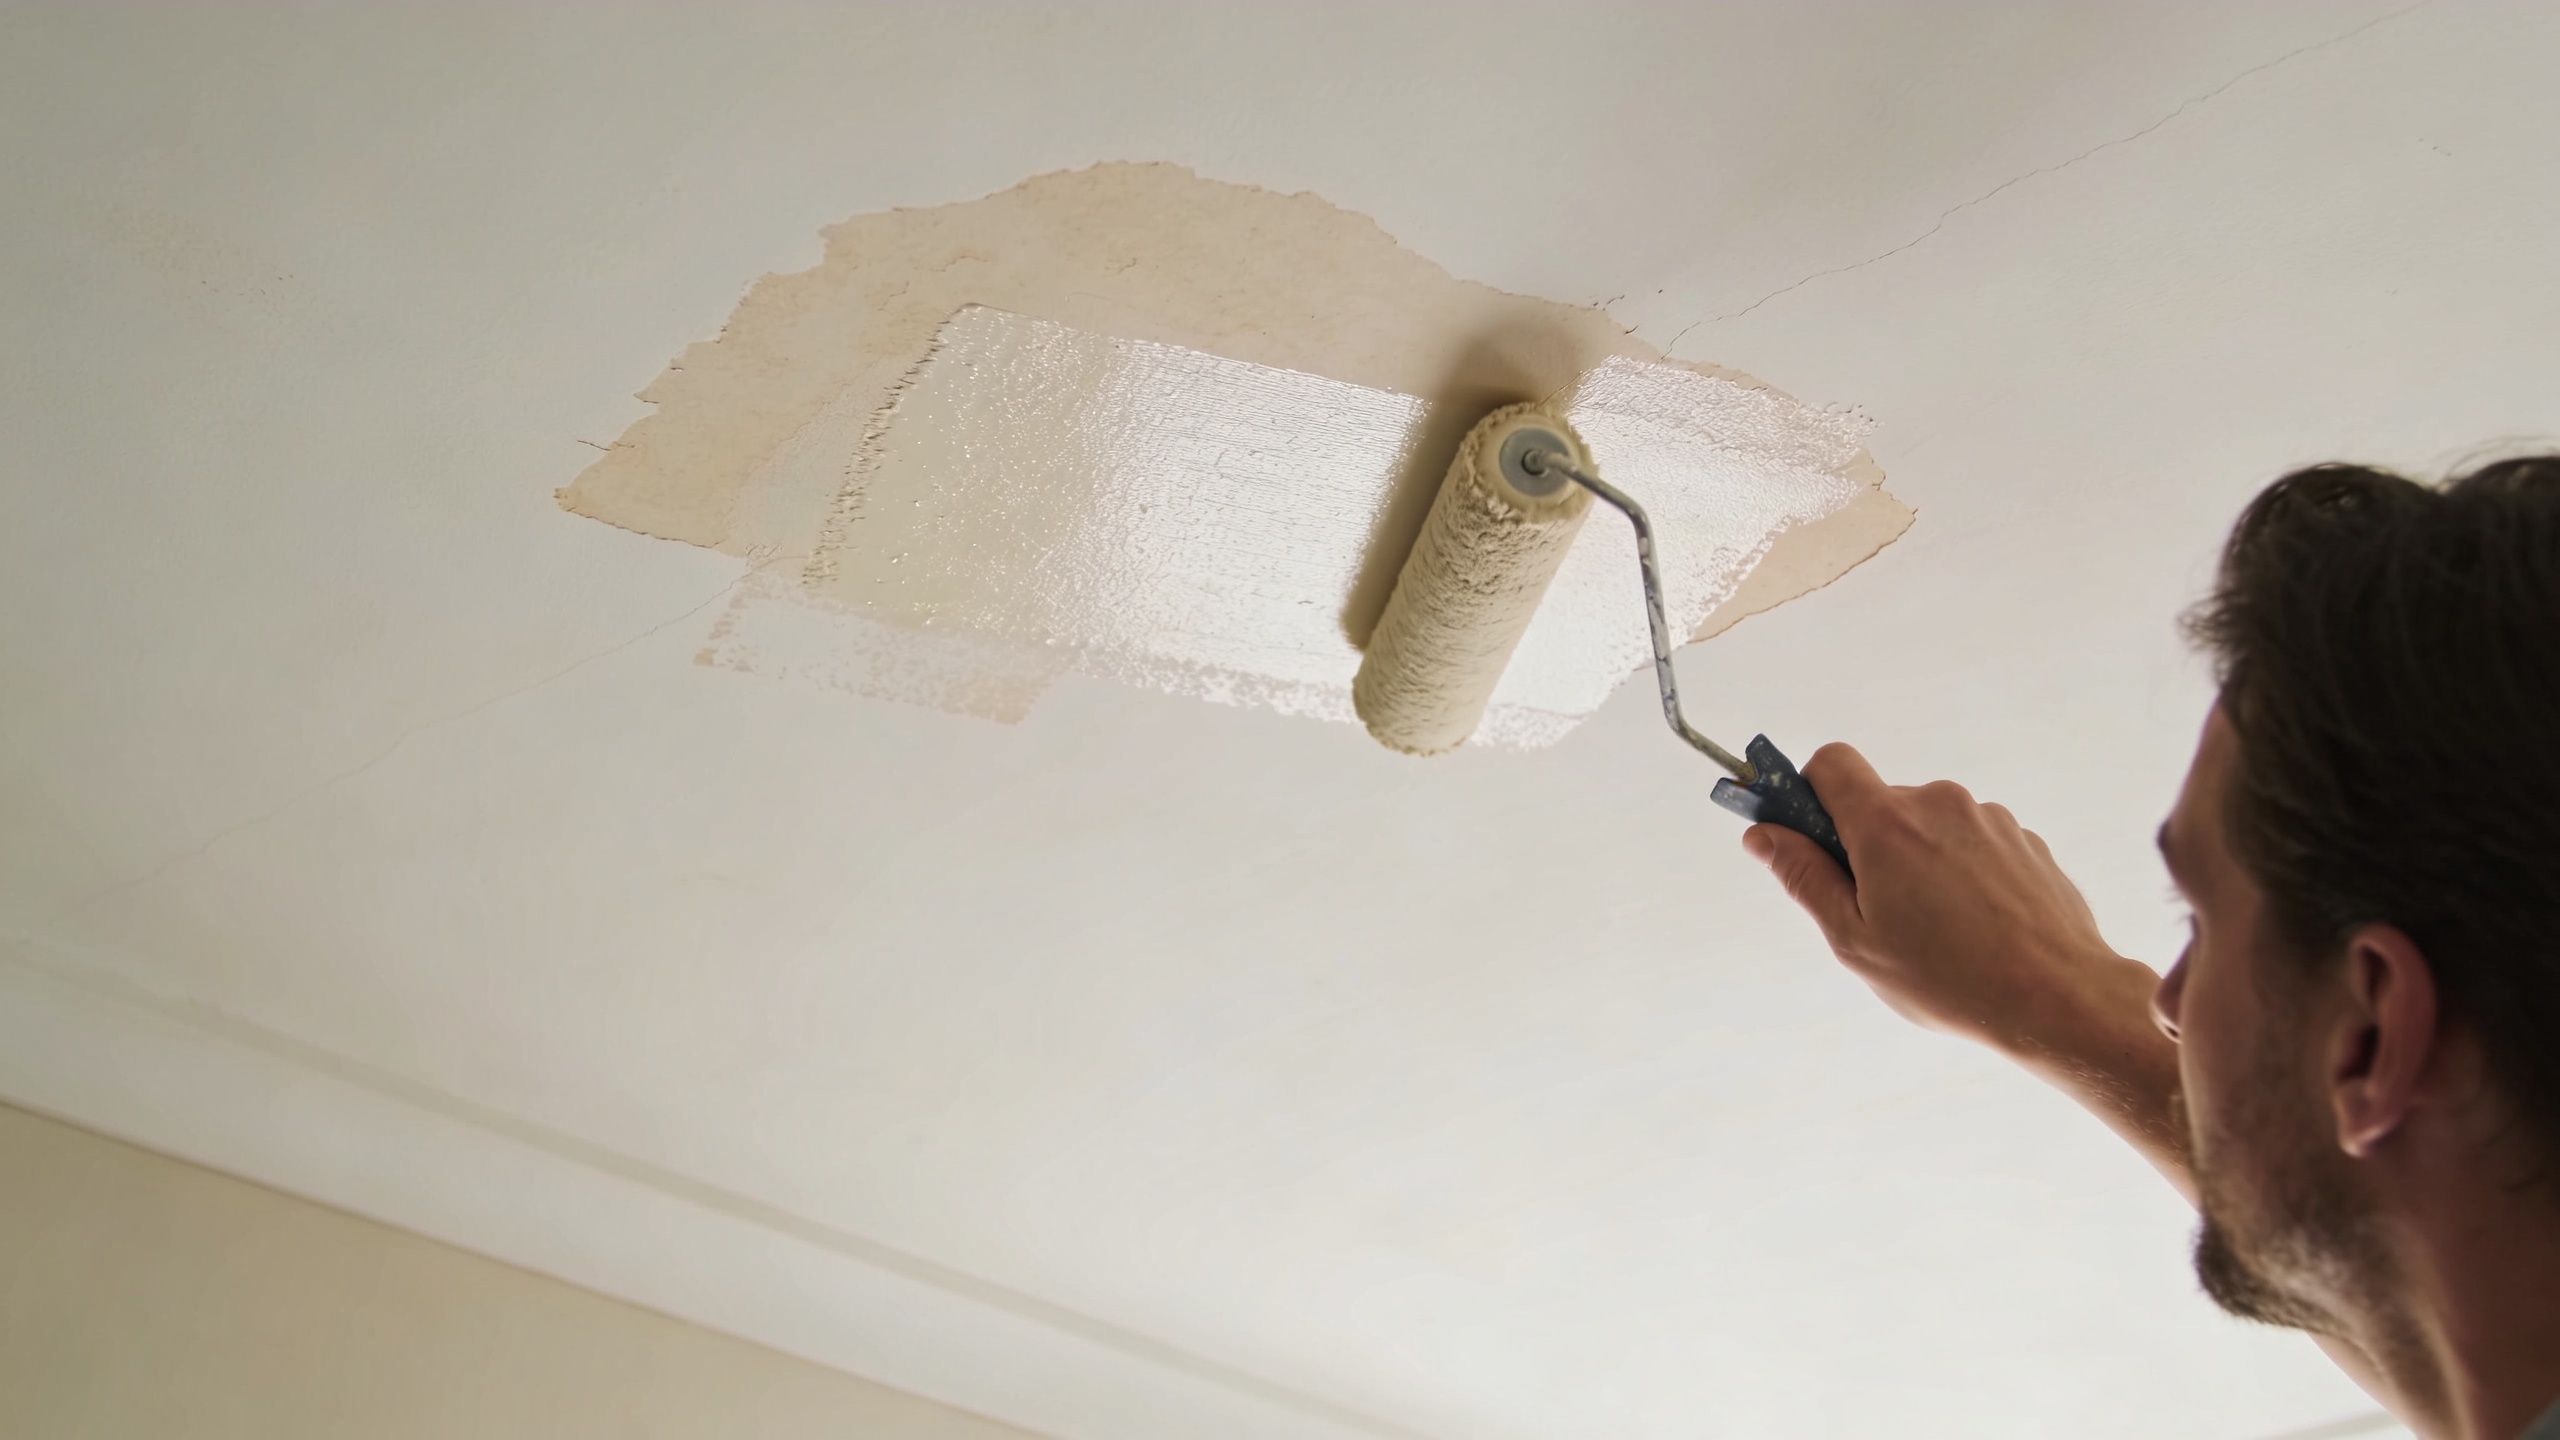
After the patch dries and the texture looks right, prime it before paint. That step matters because repaired areas absorb paint differently than the surrounding ceiling. If you skip primer, the patch can flash dull, shiny, or blotchy even when the surface itself is sound.
For water damage, use a stain-blocking primer before the finish coat. Otherwise, discoloration can bleed back through and make a clean patch look like a failed one. Then repaint in a way that makes sense for the room. Sometimes a spot paint works. Often, especially on ceilings, repainting the full plane gives the best visual blend.
A few habits help at the end:
- Check the repair in daylight and artificial light
- Sand only what needs sanding
- Vacuum dust before primer
- Don’t judge the final look before the paint dries
Know when the repair has become a trade job
Some ceilings stop being a reasonable DIY project.
Heavy hand-applied textures are a good example. Matching heavy swirl textures is notoriously difficult, with 60% of reviews on platforms like HomeAdvisor for the Portland area citing texture mismatches in pre-1980s homes, according to this video discussion of swirl texture blending problems. That tracks with what property managers and homeowners run into all the time. The patch is solid. The pattern is wrong.
Call a professional if any of these are true:
- The ceiling may contain asbestos
- The damage is larger than a small isolated patch
- The drywall is sagging, soft, or repeatedly cracking
- The texture is hand-applied swirl, heavy stipple, or an older custom pattern
- You already tried once and the repair still stands out
- You need the room finished cleanly for a sale, remodel, tenant turnover, or business use
The more decorative the texture, the less forgiving the repair.
That’s especially true in older homes around Portland, Beaverton, and Vancouver, WA where ceilings have seen decades of repainting, movement, and piecemeal fixes. At a certain point, the skill isn’t patching drywall. It’s knowing whether to patch, skim, remove, retexture, or stop and solve a bigger substrate problem first.
If you want the repair done cleanly and you don’t want to chase the same crack or mismatch again, contact CS1 Real Interiors through the free estimate form.
If your ceiling has cracks, water damage, failed patches, or texture that won’t blend, CS1 Real Interiors can help. We work with homeowners, property managers, builders, and small commercial clients across Portland, Beaverton, Hillsboro, Tigard, Lake Oswego, Gresham, and Vancouver, WA. For drywall repair, ceiling texture work, painting, insulation, or interior build-outs, request a free estimate and get professional help for your interior project.