



A doorknob, a chair leg, or a moving box has left a shallow dent right at eye level, and now you can't stop seeing it. That's the usual moment people grab filler and start spreading. Don't start there. Press the dent first, check what's behind it, and decide whether it's a simple impact dent or a warning sign. Learning how to fix small dent in wall damage properly means knowing both how to patch and when not to.
Table of Contents
- Step-by-Step Repair for a Shallow Dent
- Check for Moisture Before You Fill Anything
- Drying Times and Filler Options Compared
- Dust Control and Lead-Safe Sanding
- Matching Texture, Sheen and Paint Blend
- Cost and Time Estimates
- When to Call a Professional Drywall Contractor
Step-by-Step Repair for a Shallow Dent
This sequence is for a dry, firm dent with intact paper. Press it gently before you open any filler. If it's soft, spongy, stained, or smells musty, stop and do the moisture check below. Set up dust containment before you sand, especially in an older Portland home, and pick a filler that matches the depth rather than the fastest label claim.
The visual below shows the basic order, from prep through paint.
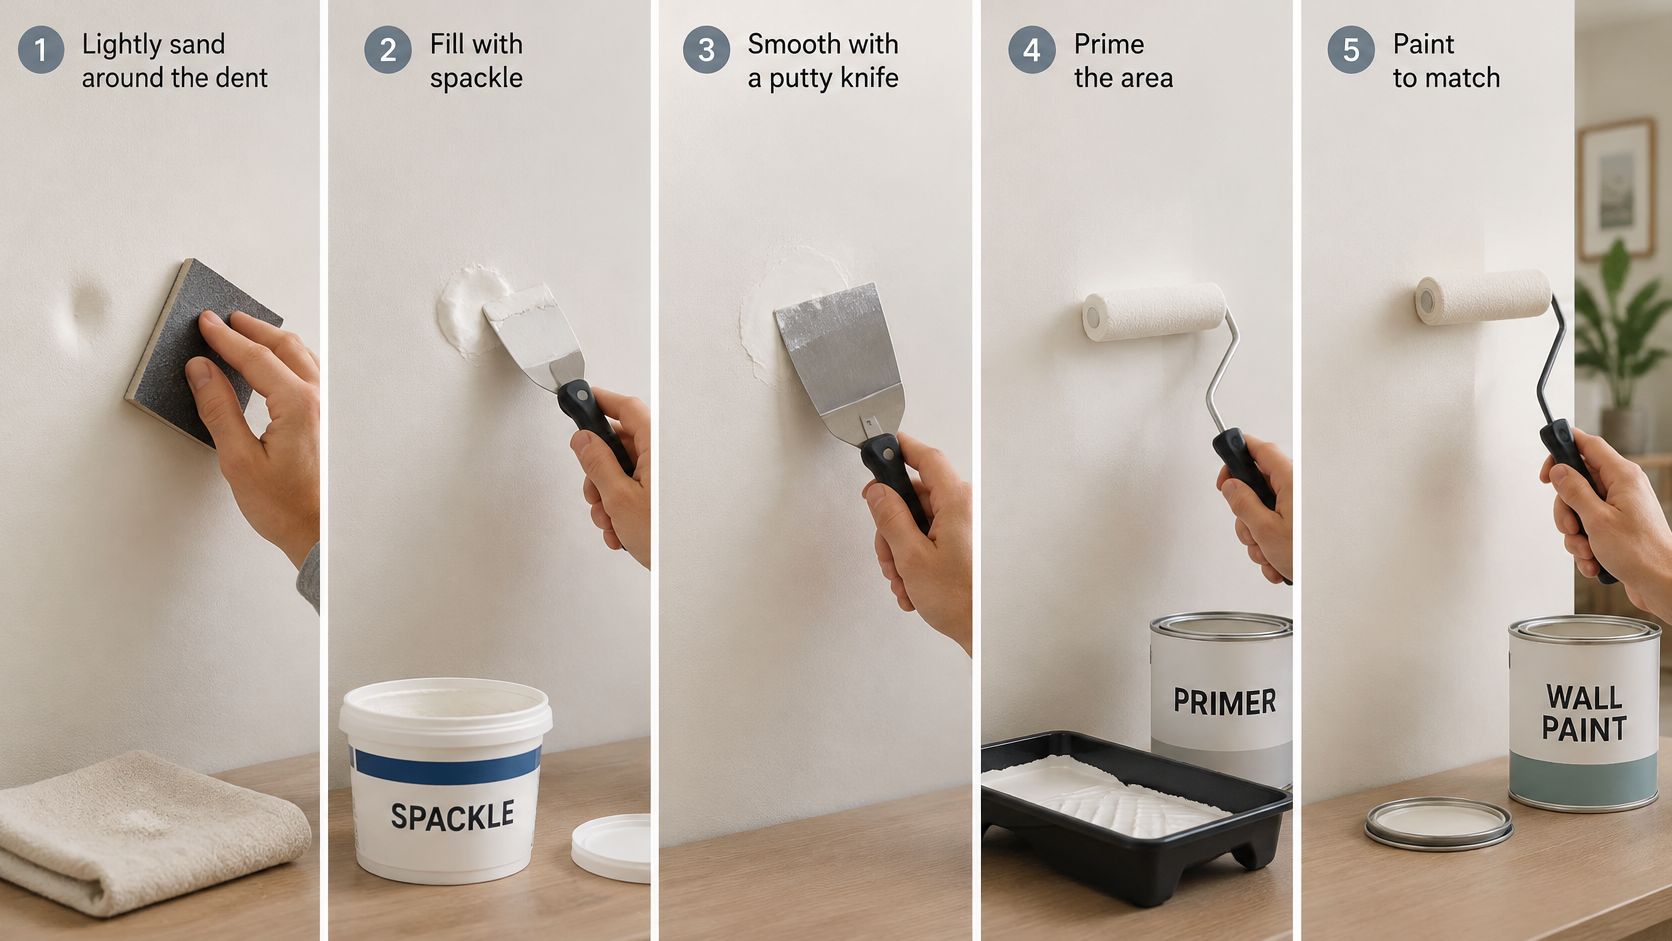
The Repair Sequence
- Sand lightly first. Use 120-grit paper on the dent and a few centimeters around it, and remove any loose paint or paper. Compound won't bond well to a glossy, flaking edge, and that edge will lift later.
- Wipe the dust away. Use a slightly damp cloth, then let the surface dry. Dust left in the dent weakens the bond and can leave grit under the knife.
- Apply one thin coat. Load a putty knife with joint compound or spackling, press it into the dent, and pull the knife tight so the feathered edges extend beyond the damage. You're skimming, not building a mound.
- Let it harden fully. Judge the coat by hardness and dryness, not the clock. Humidity and room temperature change the timing, and sanding a soft coat tears it instead of leveling it.
- Add a second, wider coat if needed. If the depression still shows, spread another thin coat slightly wider than the first. One thick coat shrinks and dries unevenly, so two thin coats give you a flatter result with less rework.
- Sand only until it's flush. Stop as soon as the transition feels smooth. Over-sanding is the most common failure here because it fuzzes or exposes the paper face and turns a small dent into a bigger repair.
- Prime the patch. Bare compound absorbs paint differently from the surrounding wall, so skipping primer leaves a dull or shiny spot even when the fill is level.
- Paint to a natural break. If a small touch-up flashes, carry the paint to a corner, trim line, or other break instead of trying to hide a hard edge in the middle of the wall.
That order matches USG drywall repair guidance, which recommends sanding a dent before filling it, letting the compound harden, adding a second coat when needed, and sanding and priming only after drying. If the paper has torn or a small hole has formed, trim loose paper and crumbled gypsum back to firm material, wipe it clean, and fill in thin layers before you continue. For general context on trimming and filling larger breaks, Neasden Hardware's wall repair guide is a useful plain language reference alongside these steps.
The Raking Light Check
Before primer, hold a work light low and to the side so it rakes across the wall. Look for a shadow, a knife edge, a raised perimeter, or visible paper fibers. If you can see any of those, you're not ready to prime.
Practical rule: If your fingertip can find the edge with your eyes closed, paint will find it too. Add a thin skim or sand lightly, then check again.
I would not chase perfection with more sanding at this point. A whisper-thin extra coat, pulled tight, usually fixes a shallow edge better than aggressive sanding does.
Check for Moisture Before You Fill Anything
A dent beside a pipe, window, or exterior wall deserves a moisture check before filler goes on. Patch only when the drywall is dry, firm, and stable. If water or movement is still affecting the wall, a surface repair can conceal the problem while it continues behind the paint.
| Warning sign | Likely cause | Action |
|---|---|---|
| Soft or spongy when pressed | Wet or failed gypsum core | Stop patching and have moisture assessed |
| Brown stain or bubbling paint | Active leak | Find and fix the source first |
| Musty smell | Hidden moisture or mold | Get a professional inspection |
| Dent near plumbing, a window or an exterior wall | Possible water intrusion | Check for leaks before filling |
| Crack or dent that keeps returning | Framing movement or impact damage | Correct the cause, then patch |
| Dry, firm dent with intact paper and no stains | Ordinary impact dent | Proceed with the repair steps |
In kitchens, bathrooms, and on exterior walls in Portland, Beaverton, and Hillsboro, a small stain can signal a slow plumbing leak or a failed window seal. Covering it before finding the source may leave a larger repair for later. For background on what happens after a leak, wet drywall advice from Erica's Plumbing explains why the source needs to be fixed before the wall is closed up.
Drywall may be dried in place only when there is no obvious swelling and the seams remain intact, according to the EPA. OSHA mold remediation guidance says porous materials such as drywall and insulation that have been wet for more than 48 hours, or are visibly mold-contaminated and cannot be properly cleaned, should be discarded. The EPA recommends drying water-damaged areas within 24 to 48 hours to help prevent mold growth.
Use the warning signs to decide whether a dent is ready for ordinary repair. A dry, firm surface with intact paper and no staining can be patched. Softness, recurring damage, bubbling paint, or a musty smell calls for addressing the underlying cause first.
If any warning sign appears, arrange an assessment rather than covering it with filler. Request a free estimate from CS1 Real Interiors for drywall repair in Portland, Beaverton, Hillsboro, Tigard, Lake Oswego, Gresham, and Vancouver, WA.
Drying Times and Filler Options Compared
| Filler | Drying or ready time | Best for | Coats |
|---|---|---|---|
| Lightweight spackling | 1 to 3 hours | Tiny dents and hairline defects | 1 to 2 thin coats |
| Heavyweight spackling | 3 to 6 hours | Deeper dents needing more fill | 2 coats |
| 3M Wall Repair Quick Patch | Ready to paint in 15 minutes | Repair about 1/2 inch across and 1/8 inch deep | 1 coat |
| 3M High Strength Small Hole Repair | No published drying time, judge by hardness | Damage up to 3 inches | 1 to 2 thin coats |
| Setting or ready-mixed joint compound | Judge by hardness | Shallow dents with feathered edges | 2 thin coats |
Choose by dent depth first, speed second. A fast-setting product can suit a small, isolated pock when time is tight. For a wider, shallow repair, joint compound gives you more working time to feather the edges into the wall. A quick-drying filler is less forgiving if you need to spread it over a broad area.
The product guidance for 3M High Strength Small Hole Repair describes repairs up to 3 inches and says it repairs small damage 3 times faster than traditional vinyl spackling. That size describes the product's intended use, not a promise that every repair will be ready to sand on the same schedule.
Room conditions affect how a filler sets. A cold or humid space can slow drying, so use the stated time as a guide rather than a sanding signal. Press the patch gently: if it feels soft or tacky, leave it alone and check again later. Sanding before it hardens can pull filler out of the dent and leave a low spot that needs another coat.
Match the filler to the depth, then let hardness, not the label, tell you when it is ready to sand.
For a tiny ding, lightweight spackling is usually a practical choice. A deeper single dent calls for heavyweight spackling, while joint compound suits a shallow repair that needs feathering across a wider area. Apply thin coats and allow each to dry before adding another. This limits shrinkage and makes it easier to keep the patch level without sanding away more surrounding wall than necessary.
Dust Control and Lead-Safe Sanding
Before sanding, contain the work area, especially in an older home where paint may contain lead. Cover floors and furniture with plastic sheeting, seal off the work zone, and keep children, pets, and other occupants away until cleanup is complete. Containment limits how far dust can travel.
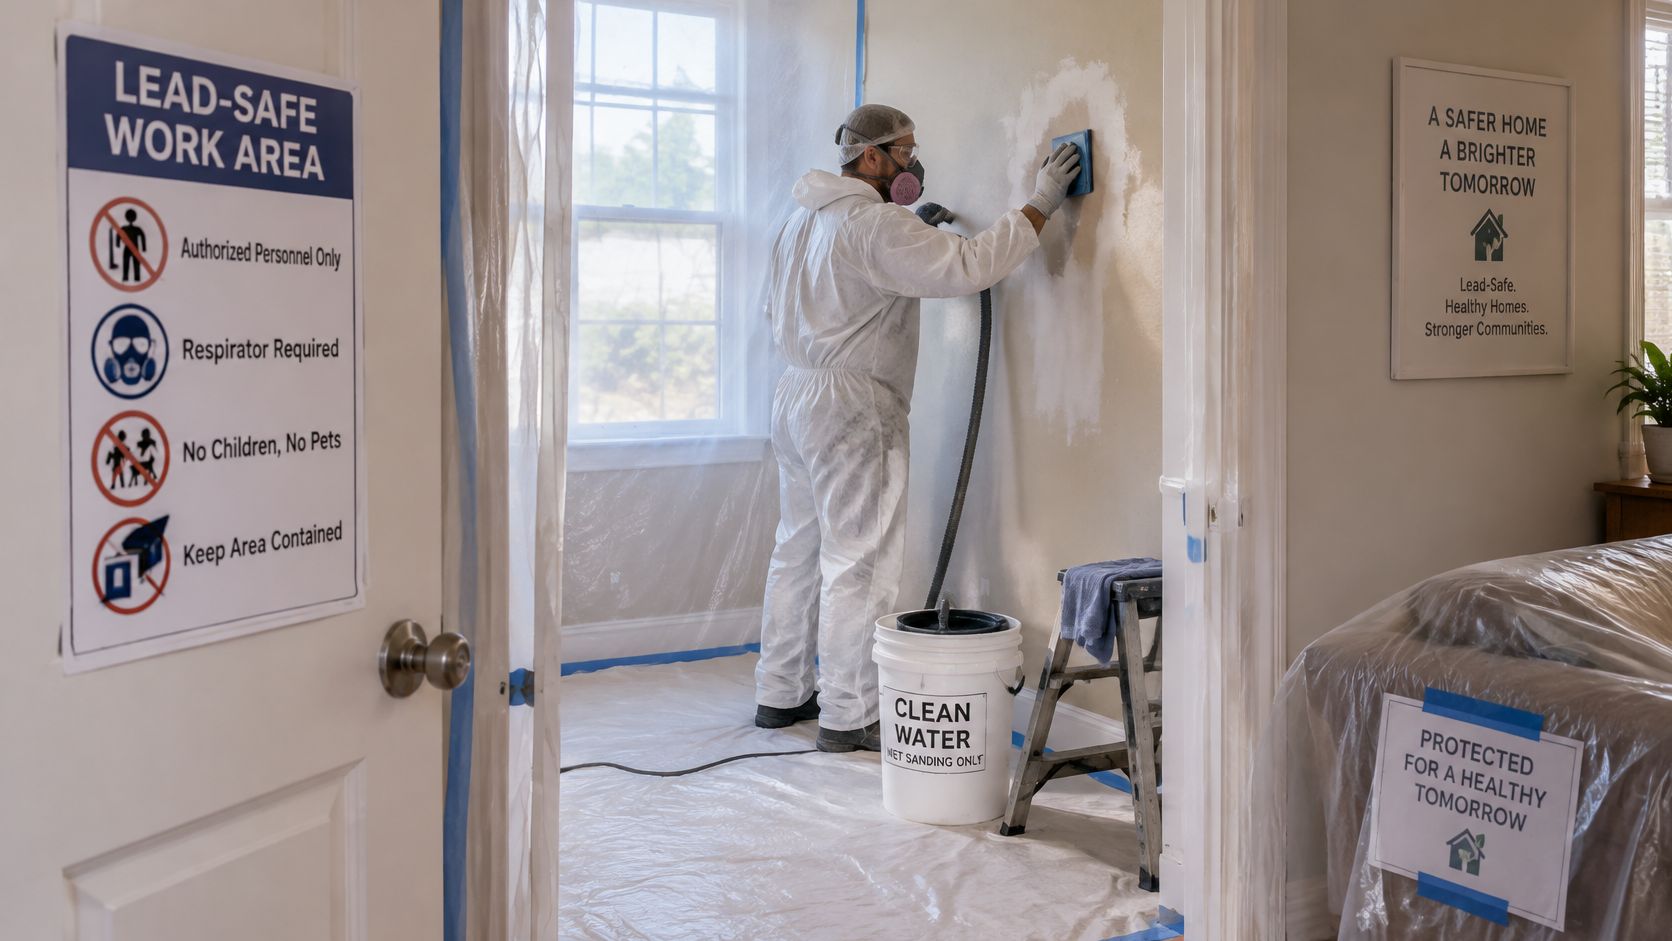
Sanding Method and Cleanup Order
For a surface that may have lead paint, use wet hand-sanding with a damp sanding sponge. Keep the sponge damp, not dripping, and use light, controlled strokes over the filler rather than scrubbing hard. Avoid an unshrouded power sander, which can spread fine dust beyond the patch and into the room.
The EPA lead-safe renovation guide identifies sanding, cutting, and demolition as activities that can create hazardous lead dust when lead-based paint is present. It advises wet sanding or a HEPA-connected sander and recommends HEPA vacuuming surfaces within approximately two feet of the repair. After sanding, wet-wipe nearby surfaces and securely bag the debris. Do not dry-sweep dust.
In the video, watch how the sanding tool stays on the repair and moves with short, even strokes. The sponge should be damp enough to control dust without leaving water running down the wall.
Keep water away from live outlets and switches. Cut power to the circuit before wet sanding nearby, or have a qualified professional handle the work. Once cleanup is complete, the surface should be free of dust before primer goes on.
Matching Texture, Sheen and Paint Blend
| Wall finish | Why the patch shows | Blending approach |
|---|---|---|
| Smooth Level 4 wall | Sheen difference halos the patch | Prime, then paint to a corner or trim line |
| Level 5 smooth wall | Compound flashes under raking light | Skim a wider area and paint the full section |
| Orange-peel texture | Patch texture differs from surrounding wall | Re-create the texture before the compound sets |
| Knockdown texture | Sharp edges catch the light around the patch | Feather the edges and re-knock to blend |
| Matte or satin paint | Touch-up sheen does not match | Paint the wall section to the nearest break |
A knockdown finish can reveal a patch when the sharp edge of the new texture catches light differently from the surrounding flattened pattern. Orange-peel has its own challenge: a spray pattern that is too heavy or too fine stands out beside the original texture. The Lowe's drywall patch guidance notes that even a small patch may show as a halo when the sheen differs, and that compound must dry fully before sanding or coating.
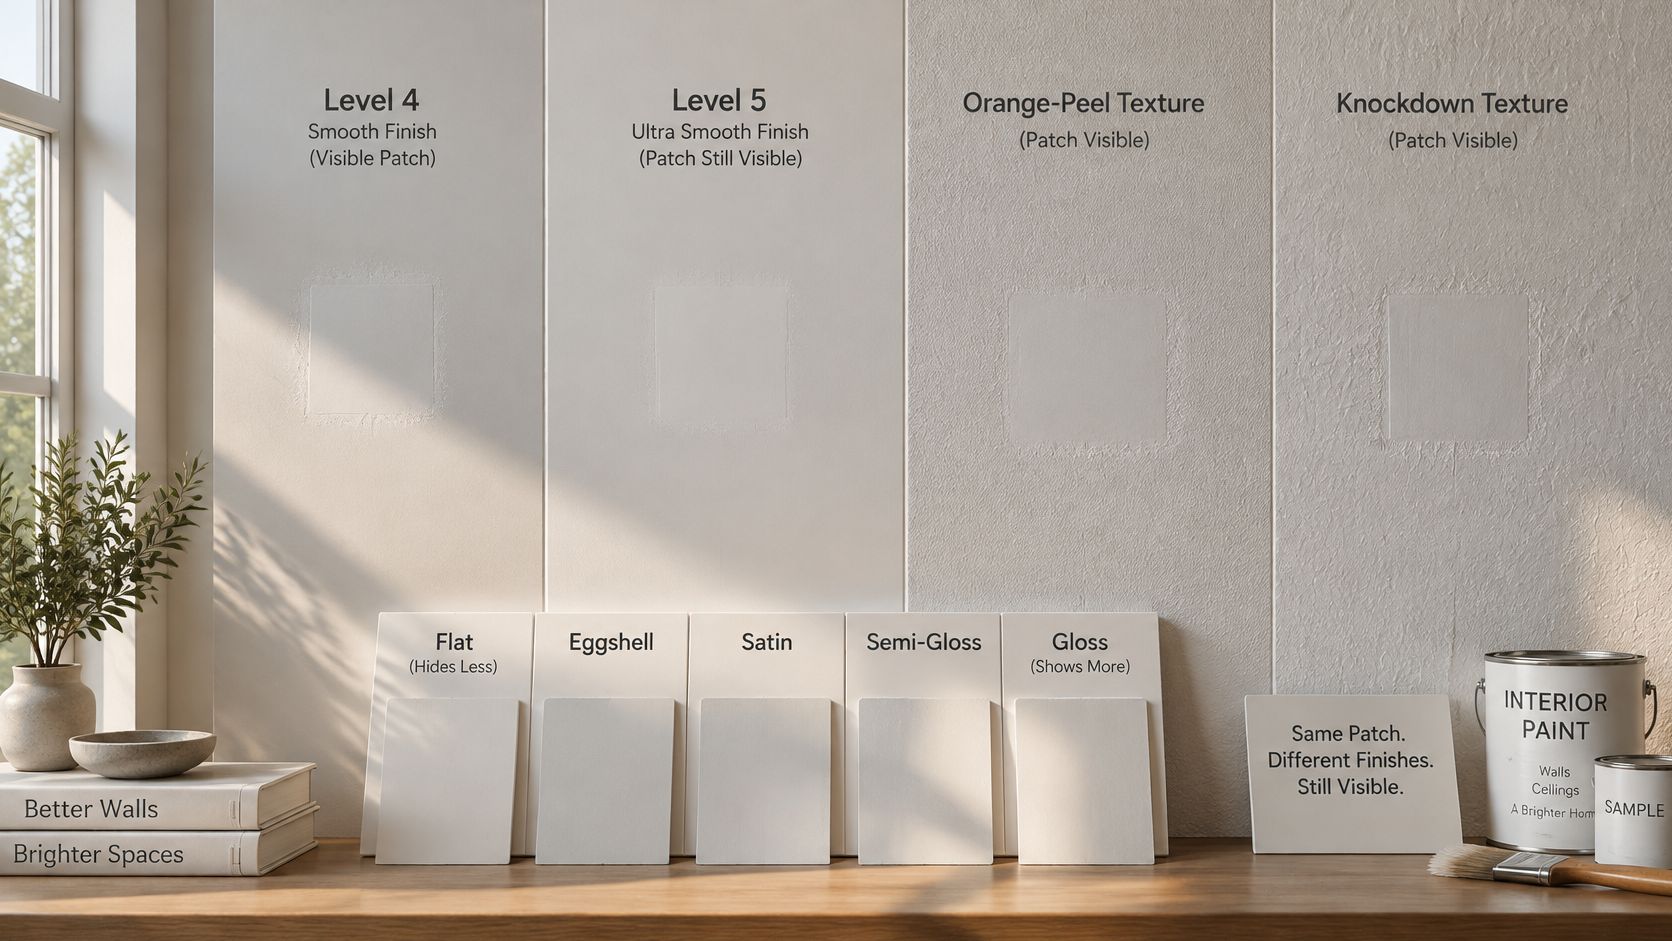
The Side Light Test
Use the side-light check from the first repair step to judge the surface, then focus on reproducing the wall's texture. Feather the compound beyond the dent so the repair does not end in a distinct ridge. For orange-peel, apply a matching pattern while the compound is workable. For knockdown, let the texture begin to set, then flatten it lightly to match the surrounding pattern.
Prime before judging the paint blend. Primer can expose differences in texture and absorption that are difficult to see on bare compound. Match both the paint color and sheen; if a touch-up flashes against matte or satin paint, extend the coat to the nearest corner, trim line, or other natural break.
This is particularly noticeable on Level 5 smooth walls and textured finishes in high-end interiors, including homes in Portland and Lake Oswego. If the patch still shows after a careful attempt, adjust the texture or repaint a wider section rather than adding more filler.
Cost and Time Estimates
For one small, dry dent, plan on a filling session, drying between coats, then a later session for sanding and priming. Paint only after the primer is dry. The work is usually split across sessions because each coat needs time to dry before the next step.
For materials, expect to buy compound or spackling, 120-grit sandpaper or a sanding sponge, a putty knife, primer, and matching paint. A putty knife, sanding sponge, and primer are typically all you need beyond the filler and paint. The actual materials bill depends on what you already have and whether you need to buy paint.
What Drives a Professional Quote
- Patch size and coats: Larger repairs and additional coats increase labor and may require return visits.
- Height and access: Ceiling and stairwell work takes longer and requires safer setup.
- Texture and finish level: Matching orange-peel, knockdown, or a Level 5 wall calls for more skill than filling a shallow dent.
- Containment: Occupied and older homes may need plastic, floor protection, and HEPA cleanup.
A written quote is the dependable way to price professional work because the patch size, access, finish, and dust containment all affect the job. Compare quotes by checking that they cover the same repair steps and cleanup, not just the fill itself.
When to Call a Professional Drywall Contractor
A hand-sized repair may be manageable, but call a contractor if the dent or crack keeps returning, the gypsum feels soft, or moisture is present. Ceiling patches, textured walls that need to match, and Level 4 or Level 5 finishes in bright rooms also take more skill to make inconspicuous.
Dust is another reason to get help. Sanding compound can irritate the eyes, skin, nose, throat, and upper respiratory tract. USG joint compound guidance recommends good ventilation, eye protection, a NIOSH/MSHA-approved respirator, and a vacuum-attached sander or wet-sanding method to reduce dust. High ceilings, respiratory sensitivities, and occupied rentals or commercial spaces make dust containment harder, especially around HVAC returns and finished surfaces.
CS1 Real Interiors serves residential and small commercial clients across the Portland metro area, including Beaverton, Hillsboro, Tigard, Lake Oswego, Gresham, and Vancouver, WA. Its work includes drywall repair, installation, finishing, and interior painting, with clean job sites and paint-ready results.
Before requesting an estimate, take clear photos of the dent, the surrounding wall, and any moisture or texture issues. Include a wider view showing the room and access to the repair area. That helps clarify the scope, especially when texture or paint matching is involved.
When moisture is present, address its source before patching. A repair over damp or soft drywall can fail, while a clean, dry patch still needs to match the wall's texture and sheen to disappear under side lighting.


