A ceiling problem usually shows up at the worst time. You notice a brown spot after a rainstorm, a crack that seems wider than it was last month, or a soft area that doesn't look safe to ignore. Most homeowners in Portland don't need a lecture in that moment. They need a clear answer on what's happening, whether it's urgent, and what a proper repair involves.
That's where a lot of “ceiling repair near me” results fall short. They promise a fix, but they don't explain the sequence that matters most. Diagnose the cause first. Repair the damaged area correctly. Then finish it so the patch doesn't stand out every time you look up. If you own a home in Portland, Beaverton, Hillsboro, Tigard, Lake Oswego, Gresham, or Vancouver, WA, that practical order matters more than any sales pitch.
Table of Contents
- That Unsettling Drip or Spreading Crack What to Do Next
- What Caused the Damage to Your Ceiling
- Should You Repair Your Ceiling Yourself or Hire a Pro
- What to Expect During Your Ceiling Repair Project
- How Much Does Ceiling Repair Cost in the Portland Area
- Tips for Preventing Future Ceiling Damage
That Unsettling Drip or Spreading Crack What to Do Next
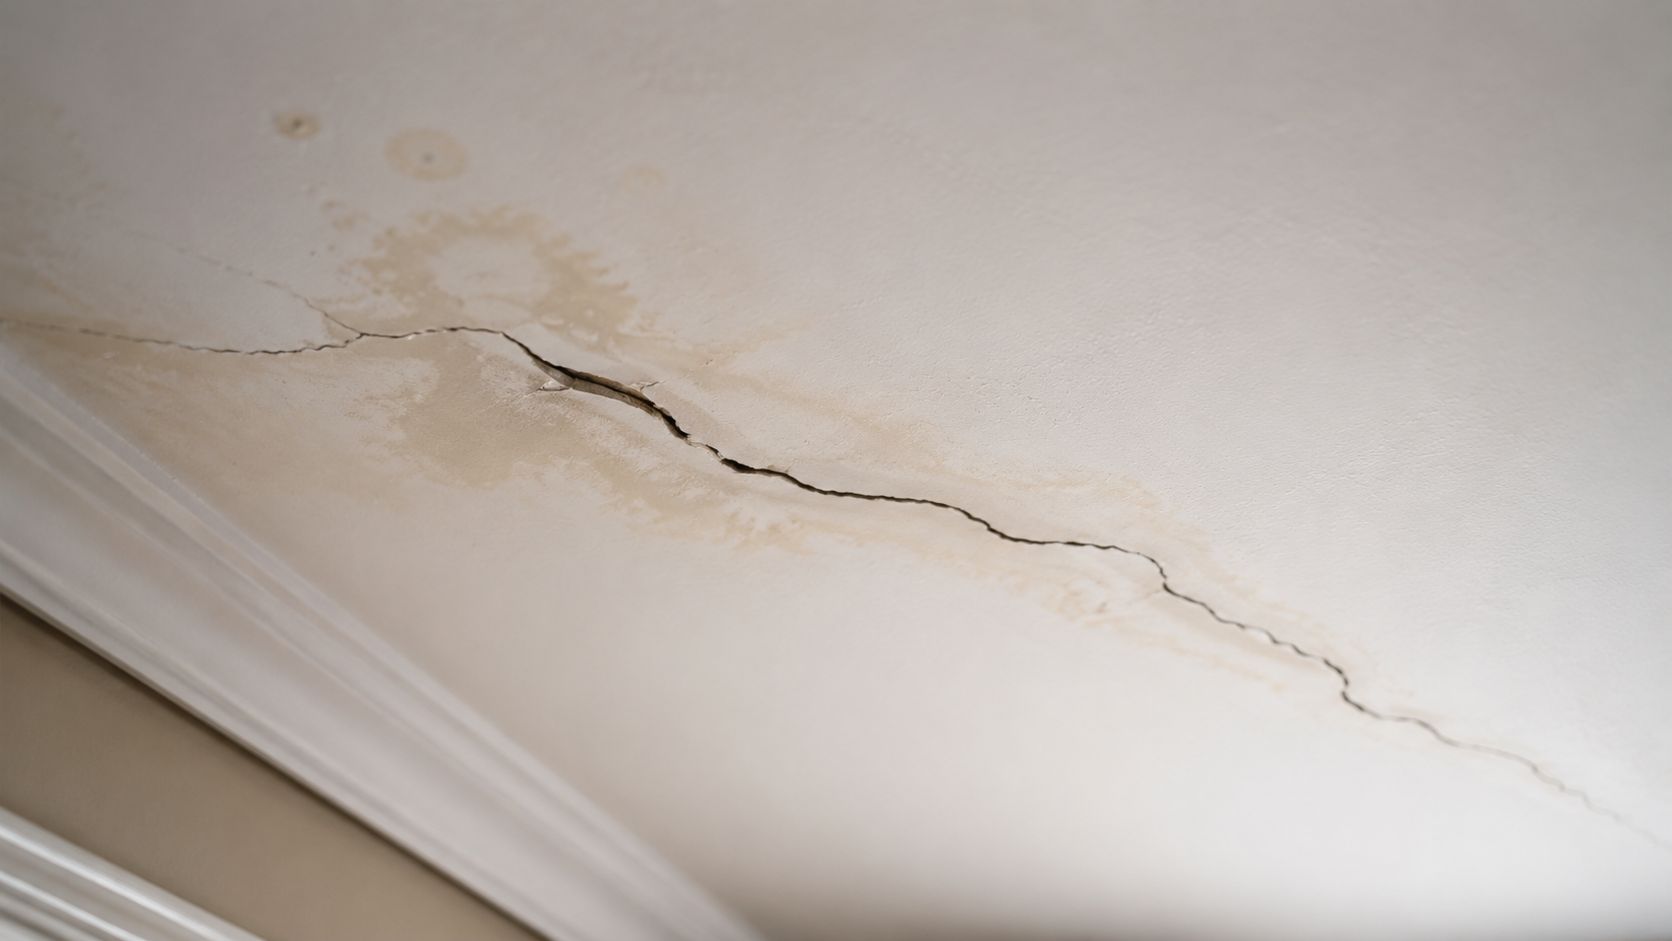
A damaged ceiling gets your attention fast because it sits over your head and feels unpredictable. Even a small stain can make you wonder if there's an active leak above it, and a sagging area can make a room feel unsafe. The first step is simple. Don't rush to patch the surface before you know what caused it.
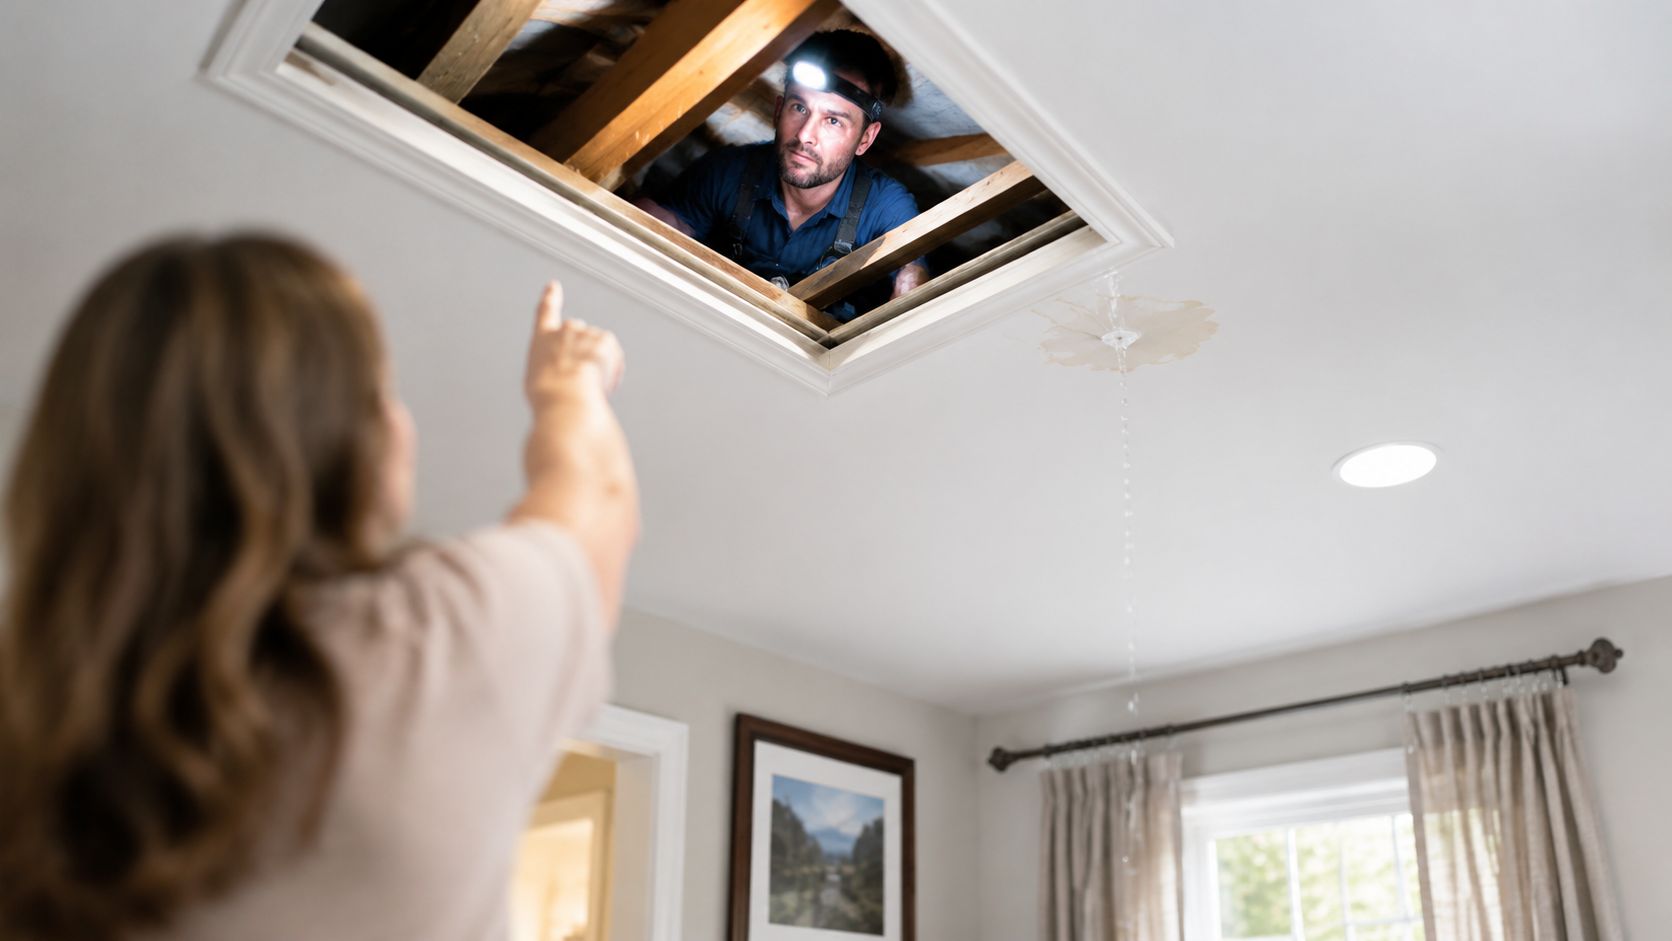
If the ceiling is dripping, bowing, or looks soft, treat it like an active problem. Move furniture out of the area if you can. Put down protection. If there's a visible bulge from trapped water, don't stand underneath it deciding what to do later. Safety comes first, then diagnosis.
Start with these immediate checks
- Look for active moisture: Check whether the stain is growing, the paint is bubbling, or the drywall feels damp.
- Think about what's above the damage: An attic, roofline, bathroom, plumbing line, or second-floor laundry room all point in different directions.
- Take photos now: Clear photos help document the progression and make it easier for a contractor to judge scope before arriving.
- Avoid cosmetic patching: Primer and paint can hide a problem for a week, but they won't stop a leak or strengthen weakened board.
Practical rule: If the material is wet, soft, sagging, or crumbling, the ceiling doesn't need cosmetics first. It needs the cause identified.
Homeowners often call when they've already spent a few days hoping the spot won't get worse. Sometimes it doesn't. Often it does. A proper ceiling repair follows a straightforward path. Confirm the source, remove compromised material if needed, rebuild on a sound base, and finish the surface so it blends back into the room.
That's the standard you want from any contractor serving Portland and the surrounding cities. Not a quick patch. A repair that makes sense the first time.
What Caused the Damage to Your Ceiling
A ceiling doesn't fail for no reason. The visible mark is just the symptom. The underlying issue could be above the drywall, inside the framing cavity, or tied to an earlier installation that never had enough support.
Water damage is the most common problem
Water-damaged ceilings usually show up as yellowing, brown stains, bubbling paint, soft drywall, or a swollen seam. The mistake many people make is assuming the stain is the repair. It isn't. The stain is the evidence.
Timing matters here. Guidance on ceiling repair often skips the most important practical question, which is whether the area is ready for repair or still needs drying, leak correction, or further evaluation first, as discussed in this water-damaged ceiling repair overview. If the source isn't fixed before closing the ceiling, you risk paying twice for the same area.
If the issue traces back to supply lines, drain lines, or plumbing fixtures, it helps to work from the source outward. For readers trying to understand how plumbers typically approach leak diagnosis and repair sequencing, this guide on trusted local Paddington plumbers is a useful general reference.
Cracks don't all mean the same thing
Some ceiling cracks are minor finish issues. Others tell you movement or stress is continuing. A short hairline crack at a taped joint may come from settling, seasonal movement, or an older repair that didn't hold. A wider crack, a repeating crack, or one paired with nail pops and uneven plane deserves a closer look.
What matters is pattern. A single isolated line is different from a crack that keeps reopening after repainting. If a homeowner in Beaverton or Tigard tells me the crack was “fixed before” and came back, I assume the surface repair didn't address the reason it moved.
A recurring crack is usually a diagnosis problem before it's a mudding problem.
Sagging usually means stop and inspect
A sagging section can mean prolonged moisture exposure, weakened gypsum core, loose fasteners, or poor support behind the board. That's not the time for filler and touch-up paint. Sagging changes the conversation from finish quality to stability.
Here's what usually separates a lasting repair from a short-lived one:
- Dry material vs compromised material: Dry, firm board can sometimes stay. Soft or deteriorated board usually can't.
- Stable framing vs movement: If backing, joists, or fastening are part of the issue, the repair scope grows.
- Local damage vs spread damage: A small affected area is one thing. Staining or softness traveling beyond the visible spot is another.
The right repair starts once the cause is clear. That's what keeps a stain from becoming a repeat visit.
Should You Repair Your Ceiling Yourself or Hire a Pro
A lot of homeowners can handle basic wall touch-ups. Ceilings are different. Overhead work is slower, messier, and much less forgiving when the finish has to disappear into the surrounding surface.
When a DIY fix might be enough
If you have one tiny cosmetic flaw, such as a small nail pop or a minor blemish in a smooth ceiling, you might be able to handle it yourself. That kind of work is limited, low-risk, and easier to correct if the finish isn't perfect.
Once the damage involves moisture, cracking that keeps returning, a hole, tape failure, or texture matching, the equation changes. Then you're not just patching. You're deciding whether that area should be repaired in place, cut out and replaced, or rebuilt more broadly so the result lasts.
Why ceilings are harder than walls
Ceiling repair punishes rushed work. Joint compound behaves differently overhead. Sanding is harder to control. Dust management matters more because it falls everywhere. Matching an existing texture from a ladder while keeping the patch flat and visually consistent takes practice.
There's also a basic decision point many service pages don't explain well. A ceiling can sometimes be repaired without replacing the whole section, but that depends on the damage pattern, visibility, and whether a partial repair will still look right over time, as noted in this discussion of drywall repair scope and patching decisions.
A good repair is often a finish problem
Most failed ceiling repairs aren't failures because the patch fell out. They fail because the repair is obvious. The plane is off. The texture doesn't match. The painted area flashes differently in daylight. The homeowner sees the patch every time they walk into the room.
That's why professional help makes sense in these situations:
- Water damage is involved: The source, drying condition, and material integrity all need verification.
- The crack is more than a minor cosmetic line: Recurrent movement has to be addressed, not covered.
- The ceiling has texture: Matching knockdown, orange peel, or older texture takes finish experience.
- The room matters visually: Kitchens, living rooms, entryways, and primary bedrooms don't hide bad patch work.
For homeowners comparing options in places like Hillsboro, Lake Oswego, or Vancouver, WA, the practical question isn't “Can somebody patch this?” It's “Will it still look right after primer, paint, and daylight hit it?”
What to Expect During Your Ceiling Repair Project
You notice a stain getting darker, or a crack that suddenly looks wider than it did last week. At that point, most homeowners want two things. A clear plan and a crew that keeps the mess under control.

The job starts with diagnosis, not demolition
A good ceiling repair begins with figuring out what failed and whether the area is dry, stable, and safe to rebuild. With water damage, that means confirming the leak has been addressed and checking whether the surrounding drywall, framing, insulation, or joint tape has been compromised. Cutting and patching too early can trap moisture, stain back through, or leave you with a repair that cracks again.
Before any board comes down, the work area should be protected properly. Floors get covered. Furniture is moved or masked off. Dust should be contained as much as the room allows, because ceiling work has a way of spreading farther than homeowners expect.
What a professional job site looks like: protected floors, controlled debris, tools kept in one area, and a crew that cleans as the job progresses instead of leaving the room unusable.
Removal, rebuilding, and finish work
Once the damaged area has been evaluated, the repair crew cuts back to solid material. Soft drywall, stained board, loose seams, and damaged corners usually need to go. Leaving weak material in place saves a little time up front and often creates callbacks later.
After that, new drywall is installed, seams are taped, and joint compound is applied in stages so the patch sits flat with the surrounding ceiling. Drying time matters here. Rushing this part is one of the main reasons a repair looks fine for a week and then starts flashing, shrinking, or showing ridges.
The finish is where homeowners usually judge the whole job. A ceiling patch can be structurally sound and still look poor if the plane is off or the texture stops abruptly around the repair. Matching an existing ceiling takes more than filling the opening. The patched area has to blend into the field of the ceiling so it reads consistently in daylight, overhead lighting, and at angles from across the room.
Here's a quick look at what homeowners often want to see from the process in real time:
For related interior work, many homeowners bundle ceiling repair with drywall repair services in Portland so patched rooms can move straight into primer and paint-ready finishing.
What you should get from the estimate and the crew
A useful estimate should spell out the repair scope in plain language. You should know whether the job includes removal, replacement board, taping, texture matching, sanding, cleanup, and paint coordination. You should also know what might change the plan, especially if hidden water damage or framing issues show up after the ceiling is opened.
From the crew, expect punctual communication, a clean work area, and an honest explanation of what the finish will look like once the job is complete. That matters because some repairs disappear cleanly, while others in older homes may require a larger blend area to look right. CS1 Real Interiors handles ceiling repair with that full-project mindset, from diagnosis to finish quality to job-site cleanup, so homeowners know what is being fixed and what the final result should look like.
How Much Does Ceiling Repair Cost in the Portland Area
Cost is usually the first practical question, and the honest answer is that ceiling repair pricing depends on scope. A small cosmetic issue and a water-damaged cut-out with texture blending are not the same job.
The most useful national benchmark comes from Thumbtack's 2026 ceiling repair data, which places the national average cost for repairing ceiling drywall between $360 and $975 in Thumbtack 2026 ceiling repair cost data. That range is wide because the repair method, amount of damage, and labor conditions all matter.
Aggregated contractor estimates also place ceiling repair at about $50 to $100 per square foot, while smaller drywall or plaster holes and cracks are often quoted around $200 to $500 total, according to HomeGuide ceiling repair pricing. For metro pricing context, Angi reports that in a major market such as Kansas City, homeowners typically pay $45 to $90 per square foot for ceiling repair in its 2026 ceiling repair cost data for Kansas City.
What sets the price
In the Portland area, these are the main cost drivers:
| Factor | Low-Cost Scenario | High-Cost Scenario |
|---|---|---|
| Damage type | Small cosmetic crack or minor patch | Water-damaged area needing removal and replacement |
| Surface area | Limited repair footprint | Larger affected section with more finish work |
| Access | Standard ceiling height with open room access | Tall ceilings or rooms requiring more setup |
| Finish | Smooth patch with simple blending | Complex texture matching and paint blending |
| Hidden conditions | Dry, stable substrate | Moisture-related damage or weakened backing |
Cost trade-off: The cheapest visible repair isn't always the lowest total cost if it leaves weak material, misses the source of moisture, or creates a patch that still needs to be redone.
If you want a project-specific number, the best approach is still a site visit with photos, measurements, and a look at the finish condition. That matters even more in older Portland homes where texture, framing conditions, and past repairs can change the scope quickly.
Tips for Preventing Future Ceiling Damage
Once a ceiling is repaired properly, most homeowners want to avoid going through the same disruption again. Prevention usually comes down to catching moisture early and not letting small problems sit.
A few habits prevent a lot of repair work
- Check after storms: Look at ceilings below roof transitions, chimneys, and attic access points after heavy rain.
- Watch plumbing areas: Bathrooms, kitchens, laundry rooms, and second-floor fixture locations deserve regular visual checks.
- Use exhaust fans consistently: Bathrooms need ventilation during and after showers so moisture doesn't linger above the ceiling finish.
- Keep gutters and drainage working: Water that backs up or drains poorly often shows up indoors later.
- Track maintenance in one place: A simple preventive maintenance checklist can help homeowners stay on top of inspections before a stain or crack turns into drywall replacement.
If you're planning broader interior updates, it also helps to coordinate repairs by location. Homeowners looking for local service coverage can review the company's Portland service area page when they're scheduling drywall, painting, insulation, or related interior work.
Ready to Restore Your Ceiling Contact CS1 Real Interiors Today
If your ceiling shows staining, cracking, sagging, or obvious finish failure, don't guess at the cause and don't rush into a cosmetic patch. The right sequence is diagnosis, proper repair, and a finish that blends back into the room. CS1 Real Interiors handles drywall repair, drywall installation, interior painting, insulation, and metal stud framing for homeowners, property managers, builders, and small commercial spaces throughout the Portland metro.
If you need help with ceiling repair, drywall damage, or interior finishing, contact CS1 Real Interiors and request a free estimate through the online contact form. Whether you're in Portland, Beaverton, Hillsboro, Tigard, Lake Oswego, Gresham, or Vancouver, WA, you can get a clear repair plan, professional help, and a clean, paint-ready result.