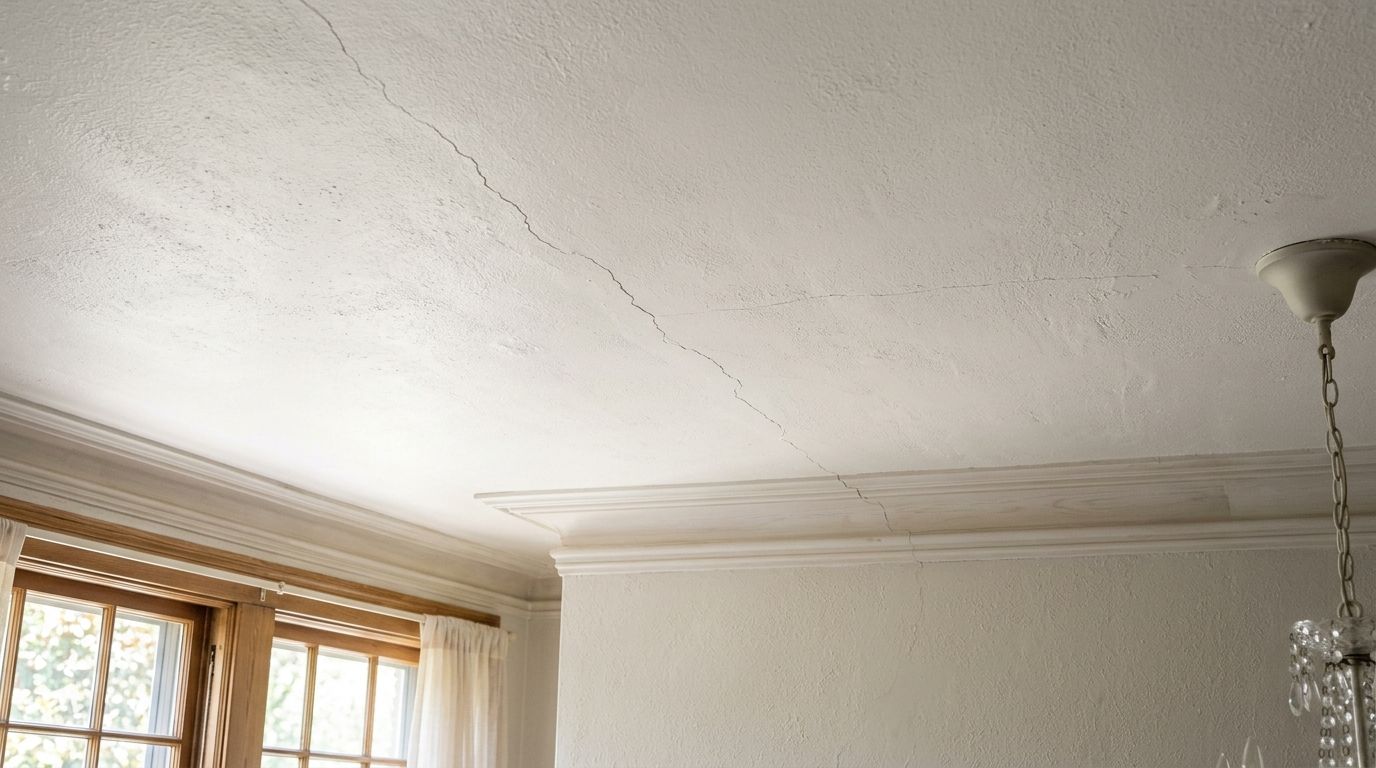
You notice it while turning on the hallway light or lying in bed at night. A thin line is suddenly visible across the ceiling, and your mind jumps straight to the worst case. Is the house shifting? Is there a leak above it? Is this going to turn into a major repair?
That reaction is normal. Most homeowners in Portland, Beaverton, Hillsboro, Tigard, Lake Oswego, Gresham, and Vancouver, WA don't look at ceilings every day until something changes. Then every crack feels urgent.
The good news is that many ceiling cracks are cosmetic. The harder truth is that some are early warnings, especially in homes dealing with moisture, aging materials, or movement over time. In the Pacific Northwest, that moisture piece matters more than people think. If the crack came with staining, soft drywall, or a bulge, it also helps to understand what to do about ceiling water bubbles before you start patching anything.
Table of Contents
- That Sinking Feeling Seeing a Crack in Your Ceiling
- The Most Common Causes of Ceiling Cracks
- How to Identify Your Ceiling Crack Type
- When to Worry and Why You Should Call a Professional
- The Professional Ceiling Crack Repair Process
- Protect Your Home and Get Your Free Estimate
That Sinking Feeling Seeing a Crack in Your Ceiling
A ceiling crack gets attention fast because it's overhead and out of reach. Homeowners often don't know whether they're looking at normal movement, a bad drywall joint, or something more serious. That uncertainty is usually the worst part.
In Portland-area homes, ceiling cracks show up in a few familiar situations. A newer home in Hillsboro or Beaverton may develop a straight seam line as the framing dries and settles. An older Portland house with plaster may show fine cracking where different materials meet. A bathroom ceiling under a slow leak may start with a stain, then split as the surface weakens.
Practical rule: A crack is a symptom, not the full problem. The right repair depends on what caused it.
That's why the first question isn't how to patch it. The first question is what caused the movement, stress, or damage in the first place. Once you know that, the repair path gets much clearer, and you're less likely to waste time on a fix that cracks open again a few months later.
The Most Common Causes of Ceiling Cracks
On Portland jobs, I usually trace ceiling cracks back to four sources. Normal building movement, moisture, weak drywall joints, or stress from above. The repair only lasts if you identify which one you are dealing with first.
Normal settling and everyday movement
Houses shift a little as framing dries, fasteners tighten into place, and the structure adjusts to regular use. In newer homes, that movement often shows up first at drywall seams, inside corners, and long ceiling runs.
These cracks are usually thin and fairly clean. They tend to follow a joint instead of cutting across the ceiling in a random pattern. In many cases, the house is behaving normally, but the finish materials at the surface cannot flex enough to hide that movement forever.
Moisture and seasonal movement in the Portland area
Portland's wet climate creates a different kind of stress. Wood framing, drywall, and older plaster all react to moisture at different rates, so ceilings in this region often crack after a damp season, a ventilation problem, or repeated indoor humidity swings.
I see this a lot around bathrooms, laundry areas, and top-floor ceilings below poorly ventilated attics. The crack may start small, then reopen as conditions change through the year. That pattern matters because a patch alone will not hold up if the moisture source is still active.
If the crack is near a plumbing wall, it also makes sense to rule out hidden drain or vent problems. Homeowners trying to connect ceiling staining or recurring dampness with plumbing can review this guide on identifying main drain stack issues.
Drywall joint failure and poor past repairs
A lot of ceiling cracks come down to workmanship. If tape was poorly embedded, joint compound was applied too lightly, or a previous repair was skimmed over without new tape, the seam becomes the weak point.
That is why some cracks come back in the exact same line after a homeowner patches and repaints them.
A ceiling repair needs strength at the joint. Surface filler by itself rarely solves the problem for long.
This is one of the clearest DIY versus professional decision points. A small cosmetic line in stable drywall may be manageable for a careful homeowner. A recurring seam crack usually needs the joint opened, reinforced, and refinished correctly if you want it to stay closed.
Weight above the ceiling and aging plaster
Some cracks point to load or deflection above the ceiling. Stored items in the attic, framing movement, or sagging materials can transfer stress into the finished surface. If the ceiling looks bowed, feels soft, or seems to be dropping, treat that as a higher-priority problem.
Older Portland homes need a different lens. Plaster ceilings, especially those installed over wood lath, crack more easily as houses age because the plaster becomes brittle and the bond to the lath can weaken over time, according to the National Park Service's guidance on repairing historic flat plaster walls and ceilings. In those houses, vibration, moisture, and small structural shifts can turn a minor finish crack into loose or failing plaster.
Age by itself does not make a crack dangerous. It does change the diagnosis, the repair method, and how careful you need to be before deciding it is a weekend patch instead of a job for a pro.
How to Identify Your Ceiling Crack Type
A crack in the middle of the living room ceiling means one thing. A crack over a bathroom, under an attic access, or running out of a corner means something else.
That is the first step I use in Portland homes. Read the location before deciding how worried to be. Our moisture swings, older housing stock, and patched-over remodel work can all leave similar-looking cracks with very different causes.
Start with what you can see from the floor
You do not need special tools to do a useful first check. A phone camera, good light, and a slow walk across the room will tell you a lot.
Very fine cracks that look more like a pencil line than an opening are often surface-level issues in paint or finish. Wider cracks, uneven edges, or areas that catch a shadow usually point to a failed joint, movement, or damaged material underneath. If you want a second set of eyes on what inspectors look for during a visual review, the Michigan's Choice home inspection process gives a good example of how professionals document conditions before recommending repairs.
Look for these patterns:
- Fine hairline cracks: Usually limited to paint, skim coat, or an older finish layer.
- Straight cracks in a long line: Often follow a drywall seam or taped joint.
- Spiderweb or map-like cracks: Common in aging plaster or layered paint systems.
- Jagged cracks with staining: Often tied to moisture, material breakdown, or active movement.
- Cracks that continue onto a wall or corner: More likely to reflect movement beyond one ceiling patch.
Ceiling Crack Diagnostic Guide
| Crack Type | What it often points to | What to do first |
|---|---|---|
| Hairline crack | Surface shrinkage, minor seasonal movement, aging paint or finish | Photograph it, mark the date, and watch for change before patching |
| Straight crack along a seam | Drywall joint failure or poor previous repair | Plan for a proper joint repair with tape and compound |
| Spiderweb crack | Older plaster, brittle finish coats, or localized stress | Press gently nearby and check whether the surface feels solid |
| Jagged or diagonal crack with discoloration | Water damage, softened material, or more serious movement | Find the moisture source or cause before repairing the finish |
| Crack extending from ceiling down wall | House movement, framing shift, or settlement-related stress | Get a professional evaluation before treating it as cosmetic |
A simple fingertip check helps too. If the area feels firm and flat, the repair may stay in the finish layer. If it feels soft, crumbly, or slightly dropped, stop there and change from patching mode to diagnosis mode.
Use location to narrow it down
Pattern matters, but location usually confirms the story.
A straight crack down the center of a room often tracks a taped drywall joint. A crack near a skylight, chimney line, bathroom, or exterior wall deserves more suspicion because those spots see more moisture and temperature change in the Portland area. In older homes with plaster ceilings, circular or scattered cracking can mean the finish has aged out, but it can also mean the plaster keys have loosened from the lath.
The same crack shape can mean different things in different houses. A hairline line in a 1990s drywall ceiling is one repair path. A similar line in a 1920s plaster ceiling calls for a more careful inspection before anyone starts scraping or sanding.
What recurring cracks usually mean
A crack that was patched once and came back gives you useful information. The repair likely stayed on the surface, or the underlying movement never stopped.
That is usually the dividing line between a DIY touch-up and a professional repair. If the same seam keeps reopening, or the crack changes with wet weather, attic conditions, or seasonal movement, the goal is not to hide it again. The goal is to identify what is stressing that section of ceiling so the repair has a chance to last.
When to Worry and Why You Should Call a Professional
You notice a ceiling crack one week, then after a stretch of Portland rain it looks wider, the paint starts to discolor, or the ceiling line no longer looks flat. That is the point where watching it is no longer the best plan.

Red flags that change the situation
A crack moves out of the DIY category when there are signs the ceiling material has weakened, moisture is involved, or the framing may be shifting.
Call for a professional inspection if you see any of the following:
- Sagging or a slight drop around the crack: That often means the drywall or plaster has lost support, or it has been softened by moisture.
- Staining, bubbling paint, or a damp spot: In Portland-area homes, roof leaks, attic condensation, and bathroom moisture change the repair plan right away.
- A crack that keeps returning after patching: That usually means the movement never stopped, or the original repair did not address failed tape, loose plaster, or damaged board.
- Cracks that continue onto the wall or show up around door openings: That pattern can point to broader movement than a simple ceiling seam issue.
- Several cracks in the same area: One isolated finish crack is different from a cluster that suggests stress across a larger section.
- Any section that feels soft, crumbly, or loose to the touch: Stop poking at it and get it checked before material starts coming down.
The practical question is simple. Are you repairing a surface defect, or are you looking at a leak, failed drywall attachment, plaster separation, or structural movement? A lot of homeowners spend time and money on compound and paint when the issue is above the ceiling.
That broader view matters during ownership changes too. If you want a good example of how professionals separate cosmetic defects from larger house conditions, the Michigan's Choice home inspection process shows the kind of whole-home evaluation mindset that helps put ceiling cracks in context.
Why professional diagnosis matters
A good inspection narrows the problem before repair starts. In my experience, that is what keeps a small ceiling issue from turning into a repeat job six months later.
A pro can check for active moisture, attic conditions, insulation problems, framing movement, fastener failure, or aging plaster. That is hard to confirm from the floor with a patch knife and a flashlight. It also matters for safety. A stained or sagging ceiling is not something to scrape aggressively until you know what is holding above it.
For a visual overview of warning signs and repair considerations, this video is a useful starting point.
If you are in Portland, Beaverton, Tigard, or Lake Oswego, treat moisture-related cracks with extra caution. Our wet season exposes weak roof details, poor ventilation, and older ceiling materials fast. If the crack is growing, staining, sagging, or coming back after repair, bring in a professional like CS1 for a clear diagnosis and a repair plan that addresses the cause instead of covering it up.
The Professional Ceiling Crack Repair Process
A lasting repair starts with the cause, not the patch. That's where many failed ceiling repairs go wrong.
Why simple patching usually fails
Surface spackle over a moving or weak joint is usually a temporary cosmetic cover. It may look acceptable for a short time, but it doesn't add meaningful strength. If the ceiling is still shifting, if the tape has failed, or if moisture damaged the board, the crack usually reappears.
That's why professionals don't treat every crack the same way. A straight seam crack in a dry room gets handled differently than a damaged area under a roof leak or plumbing issue.
Jobsite reality: The repair that lasts is the one that deals with movement, damaged material, and finish quality together.
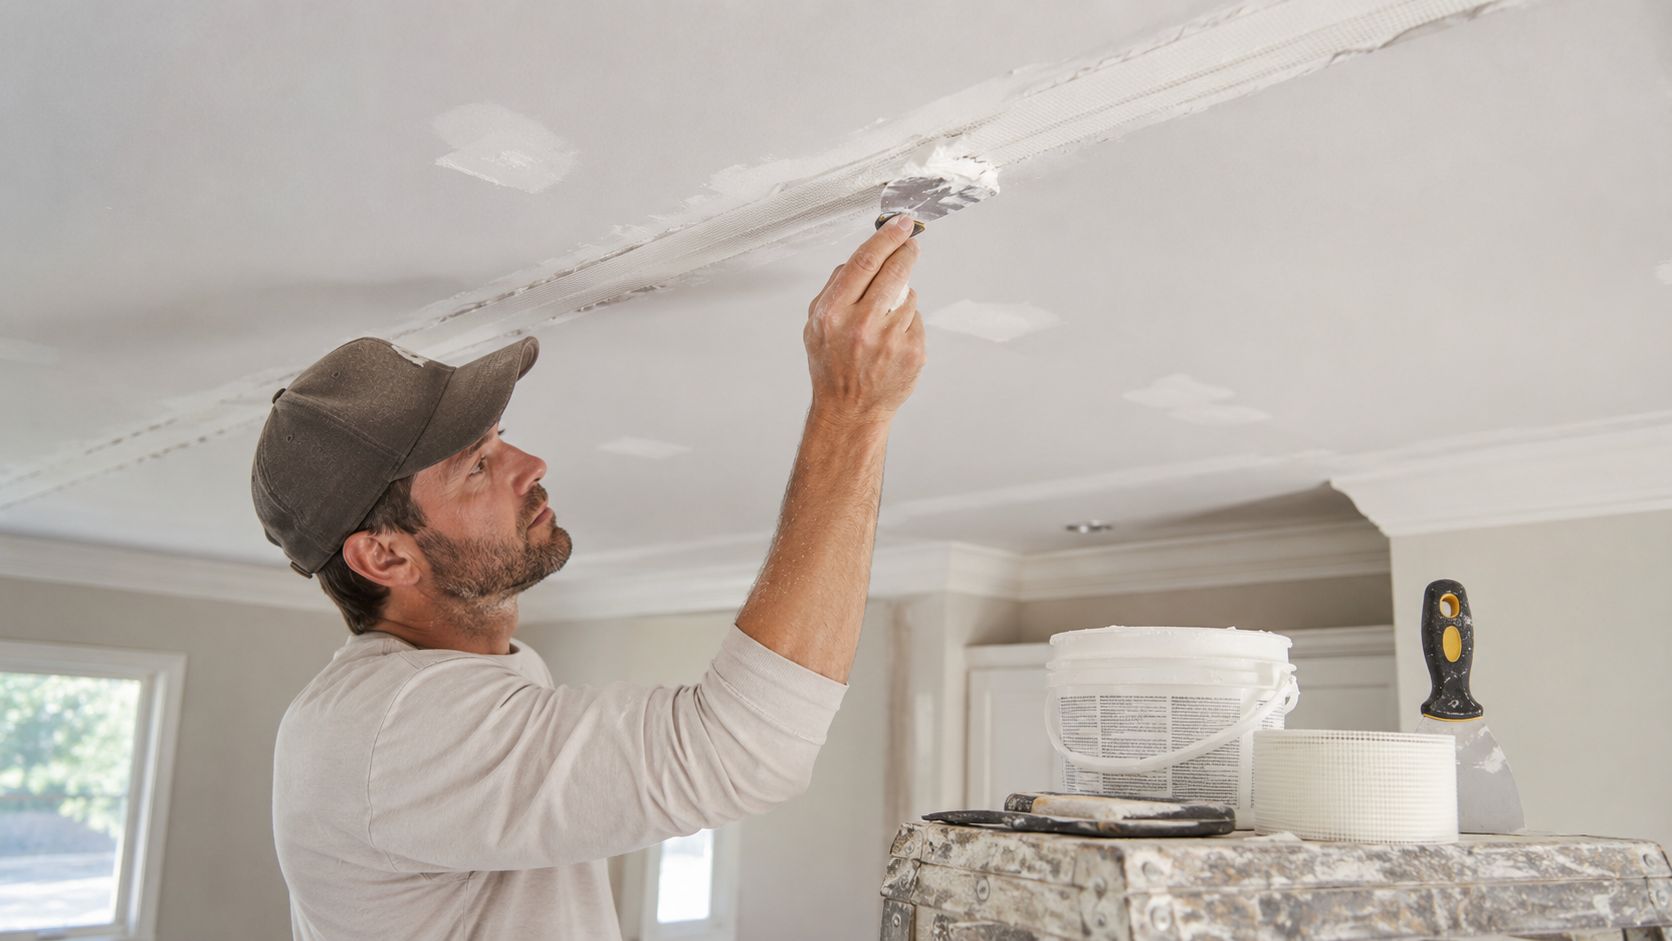
What a lasting repair actually involves
A solid ceiling crack repair usually follows a sequence like this:
Diagnosis first
The area gets checked for signs of moisture, sagging, recurring movement, joint failure, or damage beyond the visible line.Protection and prep
Floors, furniture, and nearby finishes get protected. Ceiling work creates dust, and clean containment matters in occupied homes.Opening the crack as needed
Loose material has to be removed. In many cases, the crack is slightly widened or cut back so the repair bonds to stable material instead of a weak edge.Reinforcing the joint
Tape matters here. Paper tape or fiberglass reinforcement gives the repair structure. Without reinforcement, the patch is mostly cosmetic.Building with multiple thin coats
Joint compound works best in controlled layers. Thin coats shrink less, dry more evenly, and create a flatter finished surface.Sanding and blending
The goal isn't just to make the crack disappear up close. The goal is to keep the repair from flashing under side light or standing out after paint.
For homeowners dealing with recurring seam damage, holes, or failed past patches, a professional drywall repair service is often the difference between a one-time fix and a repair cycle that never ends.
Where craftsmanship matters most
Texture matching is the step homeowners usually underestimate. Smooth ceilings require near-perfect transitions. Textured ceilings bring a different challenge because the pattern has to blend into the existing field without an obvious repair halo.
After the surface is repaired, the area still needs proper priming and painting. If that final step is rushed, the ceiling may be structurally sound but still visibly patched.
This is also where having one contractor who can handle drywall repair, drywall finishing, and interior painting makes the process easier. The repair isn't really done until the ceiling looks consistent again.
Protect Your Home and Get Your Free Estimate
Ceiling cracks don't always mean disaster, but they should never be ignored. A small stable crack may only need monitoring and proper repair. A widening crack, stained section, or sagging area needs action much sooner.
Small prevention steps that help
Homeowners can reduce future ceiling problems with a few practical habits:
- Control indoor moisture: Use bath fans, manage condensation, and pay attention to rooms that stay damp.
- Watch attic conditions: Good ventilation helps reduce material stress from trapped moisture and heat swings.
- Don't overload storage areas: Extra weight above the ceiling can create stress where the framing and finish are already vulnerable.
- Check small leaks early: Even minor water intrusion can weaken drywall or plaster before the damage becomes obvious.
- Document changes: Photos over time help show whether a crack is stable or active.
When it makes sense to bring in a pro
If you're not sure whether the crack is cosmetic or a warning sign, that uncertainty alone is a good reason to get it looked at. A professional can tell you whether the fix is simple patch-and-paint work, a full drywall repair, moisture remediation after the source is addressed, or a broader interior scope tied to remodeling or upgrades.
For homeowners and property managers in Portland, Beaverton, Hillsboro, Tigard, Lake Oswego, Gresham, Tualatin, Forest Grove, Cornelius, and Vancouver, WA, it helps to work with one contractor who can handle drywall repair, drywall installation, interior painting, insulation, and metal stud framing as needed. If you're local, you can also learn more about working with a drywall contractor in Portland.
If you want a clear answer and a repair plan that holds up, request a free estimate using this contact form.
If you need help with ceiling cracks, drywall damage, water-damaged ceilings, texture matching, or interior finishing, CS1 Real Interiors serves homeowners and small commercial clients across the Portland metro area. Request a free estimate, get a professional assessment, and move forward with a repair plan that's built to last.