


You look up, see a brown ring, a jagged crack, or a soft spot in the ceiling, and your stomach drops. Most homeowners in Portland have that same first reaction. Is it old settling, a roof issue, a plumbing leak, or something worse hiding above the drywall?
In this area, that question matters. Portland, Beaverton, Hillsboro, Tigard, Lake Oswego, Gresham, and Vancouver homes deal with long wet seasons, aging plumbing, roof wear, bathroom humidity, and remodel shortcuts from prior owners. Ceiling damage can be cosmetic, but it can also be the first visible sign that water or movement has been working for a while.
The good news is that not every ceiling problem turns into a major project. Some repairs are straightforward. Others need a proper diagnosis first, then a clean, supported patch and careful finish work so the repair doesn't flash through the paint later. If you're dealing with active water damage and need help understanding the claims side as well as the repair side, this guide on expert help with insurance claims can be useful before work starts. For local project planning, it also helps to know who serves your area across the metro, whether you're in Portland proper or nearby communities covered on this Portland drywall contractor service area page.
Table of Contents
- That Unmistakable Spot on the Ceiling
- Is It Just a Crack or a Bigger Problem
- Your Ceiling Repair Toolkit and Materials List
- Step-by-Step Guide to Ceiling Repairs
- The Art of a Flawless Finish and Texture Match
- DIY Repair vs Hiring a Portland Pro
That Unmistakable Spot on the Ceiling
A ceiling problem usually announces itself subtly. It starts as a faint stain over a hallway, a hairline crack over a doorway, or a small blister near a bathroom fan. Then one day the light hits it differently, and now it's the only thing you can see.
In Portland-area homes, the usual suspects are familiar. Slow roof leaks after extended rain. Plumbing issues from upstairs bathrooms. Condensation around vents. Older homes in places like Lake Oswego and Portland neighborhoods with long remodel histories often have layers of old patching underneath fresh paint, so what looks minor from the floor can turn out to be a failed repair.
That's why drywall ceiling repair starts with restraint. A lot of people want to mud over the mark right away because it feels like progress. Sometimes that works for a minor cosmetic issue. Sometimes it just buys a few weeks before the stain, crack, or sag comes back through.
What homeowners usually notice first
- A stain that grows slowly: This often points to moisture, even if the ceiling feels dry today.
- A crack that keeps reappearing: That suggests movement, not just surface damage.
- A soft or swollen area: Wet gypsum loses integrity fast and shouldn't be covered over.
- A patch that stands out after paint: The repair may be solid, but the finish or texture blend isn't.
A good ceiling repair fixes the cause first. The patch comes second.
Homeowners in Beaverton and Hillsboro often ask the same thing: can this be handled as a small repair, or is it going to open into something bigger? The honest answer is that you don't know until you read the signs correctly. That matters more on ceilings than walls because gravity exposes shortcuts. A weak patch, poor backing, or rushed finish has nowhere to hide overhead.
Is It Just a Crack or a Bigger Problem
Before you sand, tape, or buy a patch kit, look at the crack itself. The crack is only a symptom. The underlying issue might be harmless seasonal movement, or it might be moisture, framing movement, or a problem that keeps pushing the ceiling apart.
The important point is diagnosis. The International Association of Certified Home Inspectors notes that ceiling cracks can come from truss uplift, settlement, or moisture, and that pattern, location, and width matter more than the crack itself. It also flags recurring cracks after repainting, staining, or sagging as red flags that need more than a cosmetic fix, as summarized in this ceiling crack inspection discussion.

What to look at before you patch
Start with location. A straight crack along a taped seam can be a failed joint. A crack that runs from a corner, crosses a room oddly, or follows a recurring pattern may suggest movement above the drywall.
Then look for supporting clues:
- Discoloration: Brown, yellow, or gray staining points toward moisture.
- Texture change: Bubbling, peeling, or softness means the board may be compromised.
- Repeat history: If someone painted it and it came back, the cause likely wasn't solved.
- Sagging: Any visible dip or bow changes the job from cosmetic repair to investigation.
If you have a skylight nearby, don't assume the stain is coming from the exact spot you see on the ceiling. Water often travels before it shows. Homeowners dealing with that specific problem may find this resource on fixing leaking skylights permanently helpful for understanding why leak paths can be deceptive.
Signs you should stop and investigate first
There are a few situations where patching is the wrong first move.
Practical rule: If the drywall feels soft, crumbly, swollen, or damp, don't skim over it.
You should also pause if the crack is wider than a simple paint-line split, if the area has active staining, or if the ceiling is dropping even slightly. In older homes around Portland and Gresham, I'd also be cautious when a “small ceiling crack” sits under an old bathroom, a roof valley, or an attic area with known ventilation issues.
A cosmetic crack is usually stable, dry, and limited. A bigger problem usually leaves a trail. The trail might be a stain ring, repeated seam failure, or movement around light fixtures and corners.
A quick homeowner check can help:
| Check | What it may mean |
|---|---|
| Dry, fine crack with no stain | Often cosmetic, but still watch for recurrence |
| Stain or yellowing around crack | Possible moisture source above |
| Soft drywall surface | Damaged board likely needs removal |
| Sagging plane | Support, framing, or wet material issue |
| Same crack returns after paint | Movement or unresolved cause |
If any of those red flags show up, the best repair is often a proper inspection, not a faster patch.
Your Ceiling Repair Toolkit and Materials List
A ceiling repair goes smoother when you set up for overhead work instead of treating it like a wall patch. The right tools don't just save time. They help you control dust, keep the patch flat, and avoid overworking the repair.
Tools that make the job controllable
Keep the list practical.
- Safety glasses and a dust mask: Ceiling debris falls straight down. You need both.
- Drop cloths and plastic protection: Joint compound dust gets everywhere, especially in furnished rooms.
- Utility knife and drywall saw: For cutting clean edges around damaged material.
- Drill or driver: Needed when a patch has to be screwed into backing.
- Putty knives in different widths: A smaller knife is useful for tight areas. A wider knife helps blend.
- Sanding sponge or sanding pole: Good for smoothing without gouging the patch.
- Work light: Side lighting shows ridges, low spots, and poor feathering fast.
- Step ladder or stable platform: Ceiling work from an unstable stool usually ends badly.
Most failed DIY ceiling patches don't fail because of compound. They fail because the cutout was poor, the backing was weak, or the installer couldn't see the surface clearly while finishing.
Materials that need to match the ceiling
Many homeowners create extra work for themselves.
- Matching drywall thickness: If the ceiling is thicker than the patch piece, you'll fight the surface the whole time.
- Drywall screws: Necessary for supported patches. The patch has to be mechanically fastened, not just glued into place.
- Tape for seams: Use it wherever joints are created.
- Joint compound: Needed for bedding tape, building coats, and final skimming.
- Primer: The repaired area should be primed before finish paint so the sheen and absorption stay more even.
- Paint that matches the existing finish: Ceiling white is not one universal color.
- Texture materials if needed: Skip-trowel, orange peel, and other textures need their own blend approach.
For bathroom ceilings or areas with a moisture history, material choice matters more. If the original ceiling failed because of humidity or a leak, replacing it with mismatched or inappropriate board can set up another failure later.
If you're lining up help for a larger patch, repaint, or related interior scope, CS1 Real Interiors handles drywall repair along with painting, insulation, and metal stud framing for residential and small commercial interiors in the Portland metro.
Step-by-Step Guide to Ceiling Repairs
A safe ceiling repair starts with one question. Is the damage only on the surface, or is the ceiling still moving, wet, or losing strength?
That distinction saves homeowners a lot of trouble. A small ding, a single screw pop, or a short hairline crack can often be repaired with basic tools and patience. Sagging drywall, recurring cracks, soft board, or stains that keep growing point to a bigger issue. In those cases, opening the ceiling before you understand the cause can make the repair larger, messier, and more expensive.
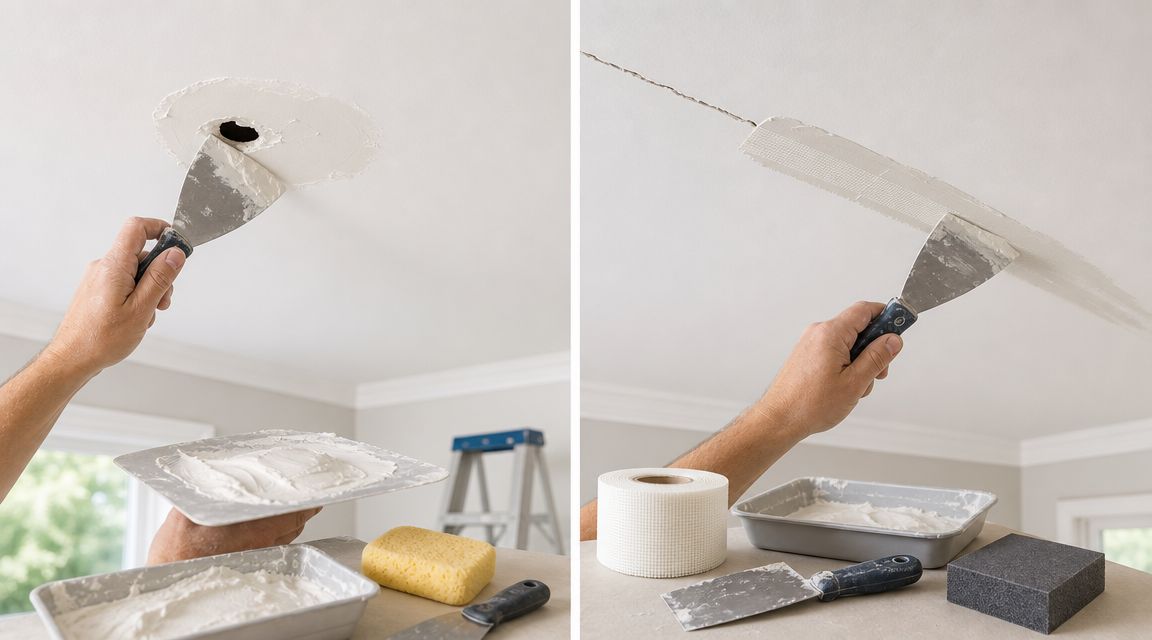
The repair itself should match the failure.
For larger openings, the workflow stays pretty consistent. Fix the cause first, cut back to sound material, add solid support where needed, and patch with a properly fastened piece. Skim coating over damp, swollen, or crumbly board rarely holds. It usually traps a bad substrate under a fresh finish, and the ceiling tells on it later.
Small holes and nail pops
These are the repairs homeowners handle most successfully.
For a small hole, start by scraping away any loose paint, torn paper, or soft filler from an earlier attempt. Fill lightly, let it dry fully, sand it flat, and add a second pass only if the surface still dips. Heavy fills are hard to hide on a ceiling because side light catches every bump.
For a nail or screw pop, deal with movement first. If the fastener backed out because the board shifted, press on the area and see if the drywall still flexes. If it does, set a new screw into solid framing nearby, then remove or reset the loose fastener before patching the surface.
A simple sequence works well:
- Remove loose material
- Check for movement
- Secure the drywall if needed
- Apply a light fill
- Sand smooth
- Prime and paint
Stress cracks and seam repairs
A crack at a seam needs a little diagnosis before you reach for compound.
If the crack is short, stable, and has not widened, you may be dealing with a finish failure. If the seam has dropped, the tape is loose, or the crack keeps returning in the same line, the joint itself has failed. That calls for removing weak material, re-taping the seam, and rebuilding it in thin coats. Surface filler alone usually flashes the line right back through.
Patience matters here. Trying to bury a seam in one heavy pass leaves a ridge that is hard to sand out overhead.
If the crack comes back quickly, stop treating it as cosmetic. Look for framing movement, moisture, or poor fastening.
Water-damaged ceiling sections
This is the point where homeowners need to be honest about risk.
A brown stain on firm drywall is one thing. A ceiling that feels soft, sags between joists, sheds paper, or has mold concerns is another. If the source of water is not fixed, the repair is temporary. If the board has lost strength, keeping it in place just to avoid cutting dust is the wrong trade.
For larger damaged areas, the repair usually follows this order:
- Fix the source first: roof leak, plumbing leak, venting problem, or condensation issue
- Confirm the area is dry enough to repair: damp cavities and wet insulation need attention before new board goes in
- Cut back to solid drywall: square cuts are easier to patch cleanly
- Add backing or framing support: patch edges need firm attachment
- Install matching drywall: screw it off so the patch does not shift
- Tape and coat the seams: build it back in stages, not one thick pass
- Sand, prime, and paint
If water damage covers a wide area, crosses multiple joist bays, or includes sagging texture overhead, that is often where DIY stops making sense. Overhead demo is awkward, messy, and harder to do safely than wall repair.
Here's a visual walkthrough that helps show the pacing and handwork involved:
The Art of a Flawless Finish and Texture Match
A ceiling patch is only half done when the board is installed. The finish is what determines whether people notice the repair every time they walk in the room.
Why ceiling finishing exposes weak workmanship
Large ceiling patches are usually finished in stages. The standard approach is to tape the seams, apply multiple increasingly wide coats of joint compound, and feather them before paint. A common method uses a 6-inch knife for the first coat and a 12-inch knife for the final skim coat so the repair blends more gradually into the surrounding ceiling. The same guidance also points to two common failure points: insufficient drying between coats and texture mismatch, as shown in this ceiling patch finishing demonstration.

That staged widening matters because a narrow repair leaves a hump. On a wall, furniture and shadows can distract from that. On a ceiling, light tends to reveal it.
A better finish usually comes from thinner coats, not thicker ones. Let each coat cure. Sand lightly. Check the surface with side light. Then prime before finish paint so the patched area doesn't flash differently.
Field note: If you can see the repair before paint under a work light, you'll usually still see it after paint.
Texture matching is often the hard part
Smooth ceilings are unforgiving. Textured ceilings are tricky in a different way. The patch may be flat and solid, but the eye will still catch a mismatch in pattern, density, or sheen.
In Portland-area homes, common ceiling situations include older textured finishes, patchy repaint histories, and newer remodels aiming for smooth Level 4 or Level 5-style appearance. The trade-off is simple. A localized texture blend is less invasive, but it may remain slightly visible. A broader skim or refinishing of the full ceiling plane can look cleaner, but it takes more labor and creates more disruption.
When texture is involved, keep expectations realistic:
- Orange peel: Easier to approximate than to invisibly match.
- Skip-trowel: Hand texture variation makes spot blends stand out.
- Smooth ceilings: Every ridge, lap mark, and paint sheen issue shows.
- Older patched ceilings: Even a good repair can reveal earlier bad work nearby.
Experienced finishing work proves its worth. Not because the patch is impossible, but because making it disappear often requires more judgment than the basic repair itself.
DIY Repair vs Hiring a Portland Pro
A lot of homeowners are capable of patching a ceiling. The better question is whether the ceiling is asking for a patch, or warning you about movement, moisture, or failing fasteners.
That call matters more than the repair itself.
If the damage is dry, localized, and clearly cosmetic, DIY can make sense. If you see sagging, repeated cracking, staining, soft drywall, or screws backing out across a wider area, stop and get the cause sorted out first. I've seen plenty of ceilings turn into bigger projects because someone treated a symptom like a surface flaw.
Where the cost usually comes from
Ceiling work costs more than a wall patch for practical reasons. You are working overhead, protecting floors and furniture, controlling dust, blending the repair into a broad flat plane, and often repainting more than the patch itself so it does not stand out.
The final bill usually moves based on four things: how big the damaged area is, whether the cause has been fixed, how visible the ceiling is, and how close to invisible you want the finish. A small patch in a spare room is one thing. A water-damaged repair in a bright kitchen with a smooth ceiling is another.
Labor drives most of the cost. The board may be cheap. The time is not.
Ceiling Repair Decision Matrix DIY vs. Pro
| Damage Type | Typical DIY Time | Recommended for DIY? | When to Call a Pro |
|---|---|---|---|
| Small nail pop or tiny hole | A short repair plus drying time | Yes, if the area is dry and stable | If the board moves, the finish keeps cracking, or the ceiling is textured in a visible room |
| Hairline cosmetic crack | Manageable if truly stable | Sometimes | If it comes back, shows staining, or follows broader movement patterns |
| Medium seam failure | Longer and more technique-sensitive | Maybe, for experienced DIYers | If the joint is loose, visible, or in a main living area |
| Water-damaged patch | Usually more involved than expected | Rarely the best DIY choice | If there is any softness, sagging, staining history, or uncertainty about the leak source |
| Large ceiling section replacement | Multi-stage project | No, in most occupied homes | Call a pro for support, patching, finish blending, and repaint coordination |
The pattern is simple. DIY is usually reasonable when the repair is small, dry, stable, and easy to reach. A pro makes more sense when the damage suggests an underlying problem or the finish needs to disappear cleanly under normal room lighting.
A simple hiring checklist
If you decide to bring in a contractor in Portland, Beaverton, Tigard, or Vancouver WA, ask direct questions.
- Ask about diagnosis first: They should want to know why the ceiling failed, not just how big the patch is.
- Ask how they handle containment: Ceiling dust travels farther than homeowners expect.
- Ask what finish level you should expect: Smooth ceilings, patched textures, and paint-ready surfaces are not the same thing.
- Ask what gets primed and painted: A good patch can still show if the paint plan is too narrow.
- Ask about related work: Leak repair, insulation replacement, framing correction, and repainting often need to be coordinated.
If your project is in Washington County, this local Beaverton service area page is a helpful place to confirm coverage before scheduling.
Good timing helps. Bringing in a pro before the drywall breaks down further usually costs less than repairing a bad patch, repainting the room, and then opening the ceiling again to address the original issue.
If your ceiling has a stain, recurring crack, sagging drywall, or a patch that needs to disappear cleanly, CS1 Real Interiors can help. Request a free estimate for drywall ceiling repair and interior work to get clear next steps for your Portland-area home or small commercial property.