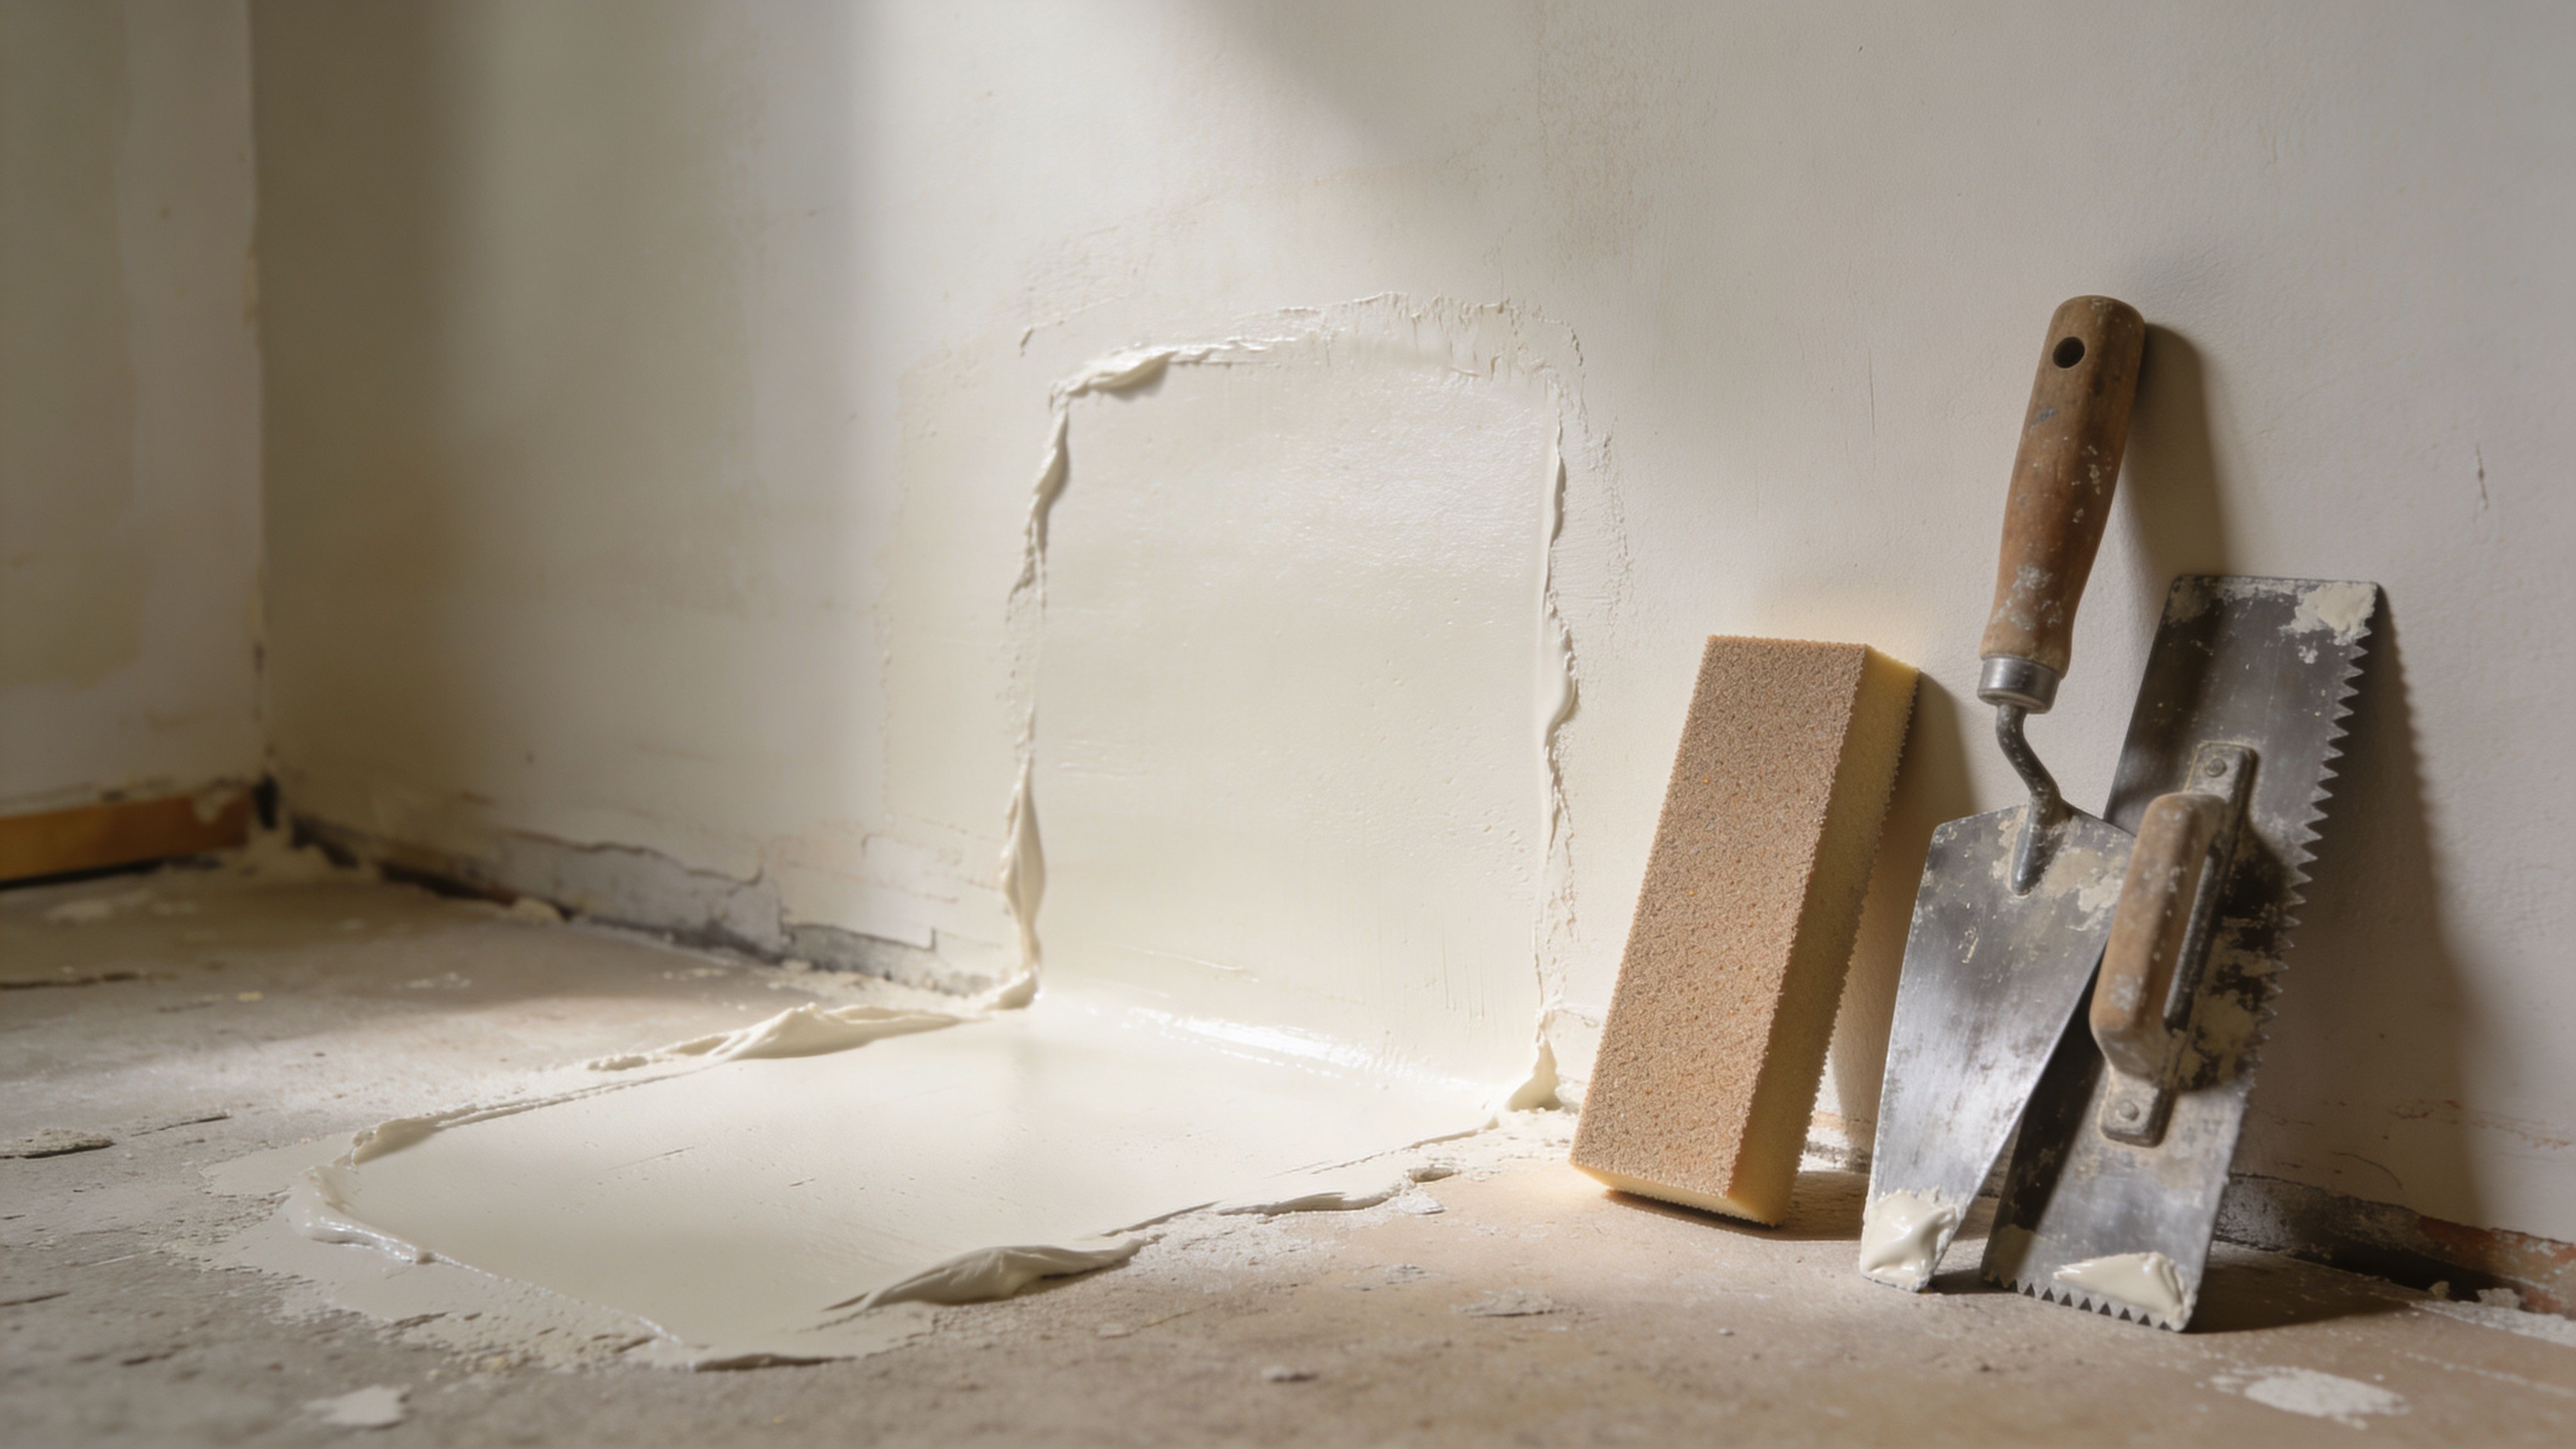
You patched the hole. You sanded it smooth. You stepped back, expecting relief, and instead saw a flat spot glaring at you from the middle of a textured wall.
That’s how most orange peel repairs go the first time.
In Portland, Beaverton, Hillsboro, and the rest of the metro area, a lot of walls have some version of sprayed texture. It hides minor drywall imperfections well, but it also makes repairs harder to disappear. A smooth patch in the middle of orange peel catches light differently, takes paint differently, and keeps pulling your eye back to the same spot.
Matching that texture is part technique, part timing, and part restraint. The biggest mistake isn’t usually bad effort. It’s assuming texture comes out right just because a spray can says “orange peel” on the label. It doesn’t work that way. The repair has to be prepped correctly, sprayed correctly, and blended correctly, or it will still show after paint.
Table of Contents
- That Smooth Patch The Unwanted Sign of a DIY Repair
- Diagnosing Your Texture and Gathering Supplies
- Prepping the Repair Area for a Seamless Blend
- Is This a DIY Job? A Mid-Project Reality Check
- The Art of Applying Orange Peel Texture
- Feathering and Finishing for an Invisible Repair
- When Your Match Is Not a Match What to Do Next
That Smooth Patch The Unwanted Sign of a DIY Repair
Orange peel texture looks simple until you have to match it.
On an untouched wall, it reads as background. After a repair, it becomes the whole job. The patch may be structurally fine, but if the texture, edge blend, or paint absorption is off, the repair still looks unfinished. That’s why homeowners often fix the damage itself and still feel like the wall looks worse than before.
In older remodels and newer production homes alike, orange peel is common because it softens minor finishing flaws and gives painted walls a consistent look. The trouble starts when a patch cuts a smooth island into that texture. Under daylight, ceiling lights, or hallway side light, that island stands out.
A good drywall repair disappears in two ways. It has to be flat, and it has to catch light like the surrounding wall.
There’s also a difference between “close enough” and a repair that vanishes. In a closet, laundry room, or low-visibility corner, close enough may be fine. In an entry, living room, stairwell, or wall you pass every day, even a small mismatch can bother you for years.
Effective orange peel texture matching isn’t just about the final spray. It starts with reading the wall, building the patch properly, and knowing when to stop adding material. Most DIY failures happen because someone rushes to texture before the repair surface is ready.
Diagnosing Your Texture and Gathering Supplies
A lot of orange peel repairs go sideways before the can is even shaken. The mistake starts with misreading the wall.
Portland homes make this harder than people expect. You’ll see light builder-grade orange peel in newer subdivisions, heavier spray in some 90s remodels, and patched-over texture in older houses where one room doesn’t quite match the next. If you treat all orange peel like one standard pattern, your patch will stand out even if the repair itself is solid.
How to read the wall before you buy anything
Use a flashlight or work light from the side, not straight on. Low-angle light shows the actual profile of the texture. You’re looking for droplet size, spacing, and how raised the pattern sits off the wall.
Start with three simple questions:
- Are the specks fine or chunky?
- Is the texture tight together or spread out?
- Does the wall have a light orange peel, a medium field texture, or a heavier spatter that borders on knockdown territory?
That last part matters. Plenty of DIY repairs fail because the wall gets labeled “orange peel” when it’s really a heavier regional variation or an older patch blend. In practice, close categories still spray differently, and the wrong setting usually leaves one of two problems. The texture lands too fine and looks like overspray dust, or it lands too heavy and builds little craters that catch light.
Check more than one spot on the wall. Near windows, corners, and previous repairs, the pattern often changes.
What to buy for a realistic match
A small repair usually needs simple materials. The trick is buying for control, not just convenience. Homeowners tend to focus on the texture can, but the better results usually come from the less exciting items: sanding tools, patching mud, masking, light, and primer.
| Item | Purpose | Pro Tip |
|---|---|---|
| Drywall sanding sponge or sandpaper | Feathers patch edges and removes ridges | Use a light touch so you taper the repair instead of flattening the surrounding wall texture |
| Joint compound | Fills low spots and smooths the patch | Keep coats thin. Extra mud creates a hump that texture will not hide |
| Fast-setting mud | Tightens up small repairs before texture | Good for small patch corrections when waiting on regular mud slows the job down |
| Sponge float | Softens and blends skim areas | Helpful when the patch edge needs subtle shaping instead of more knife work |
| Aerosol orange peel texture | Recreates the pattern on smaller repairs | Best on localized patches where full spray setup would be overkill |
| Cardboard scrap | Test surface for spray pattern | Adjust flow, distance, and droplet size here first |
| Painter’s plastic and tape | Protects trim, floors, and adjacent surfaces | Overspray drifts farther than it looks like it will |
| Primer | Seals the patched area before paint | Unprimed patches absorb paint differently and show through |
| Matching wall paint | Brings the repair back into the field of the wall | Wrong sheen gives away even a decent texture match |
| Work light or flashlight | Helps inspect the pattern before and after spray | Side lighting shows mistakes fast |
For larger patches, vaulted walls, and high-visibility areas, aerosol texture becomes less forgiving. The can may be convenient, but consistency drops off as the repair area grows. This is a common realization many DIYers run into halfway through the job. What worked on a test board can look uneven across a wide wall, especially in entryways, hallways, and rooms with strong side light.
Buy enough to test. Do not plan to nail the match on the first pass.
The wall decides the tool, not the other way around.
That’s how pros approach it. We diagnose first, then choose the material and application method that fit the existing texture. That extra step is usually the difference between a patch that blends in and one that keeps catching your eye every time you walk past it.
Prepping the Repair Area for a Seamless Blend
A bad prep job can’t be saved with good texture. If the patch is proud of the wall, hollow at the edges, dusty, or poorly feathered, the finished repair will telegraph through no matter how carefully you spray.
Why smooth repairs still fail after paint
Homeowners often think the patch needs to be flat and smooth, then the texture can hide everything else. It won’t. If the edge of the patch stops abruptly, the eye sees that perimeter after paint. If the repaired area absorbs primer and paint differently from the surrounding wall, you get a halo.
That’s why prep is more than filling the hole. You’re building a transition zone. The wall around the patch matters almost as much as the patch itself.
For broad repairs, damaged seams, or issues caused by leaks, it’s usually smarter to start with professional drywall repair services in Portland instead of trying to rescue a failing patch after the fact.
How to build a patch that blends
The cleanest approach is to widen the finish area beyond the repair itself. Sand the patch edges so they taper into the surrounding wall instead of ending sharply. Then apply a thin skim coat over the repair and out into the existing painted surface.
A proven blending method is pre-texture skim coating with 5-minute setting mud, feathered with a sponge float, which can eliminate up to 90% of transition lines between the smooth patch and the textured wall, shown in this drywall texture repair demonstration.
Use this sequence:
- Clean the area. Dust, loose paint, and old debris will ruin adhesion.
- Sand the perimeter until the edge of the patch feels gradual by hand.
- Skim the transition with a thin coat, not a heavy build.
- Feather outward so the repair dissolves into the surrounding plane.
- Let it set and sand lightly until there are no obvious tool lines.
- Prime before texture so the surface takes spray more evenly.
If you can still feel the patch edge with your fingertips, you’ll usually still see it after texture and paint.
That primer step matters more than often realized. New mud, old paint, and raw paper don’t absorb the same way. Primer levels that out and gives the texture something more consistent to grab onto.
Is This a DIY Job? A Mid-Project Reality Check
You usually know the answer right about here. The patch looks flat, the can is in your hand, and the room is one bad spray pattern away from looking worse than the original damage.
Orange peel is where a basic repair turns into finish work. Getting mud on the wall is one skill. Making a repair disappear under Portland lighting, on walls that have years of paint buildup and a texture pattern that was never perfectly uniform to begin with, is another. That gap catches a lot of DIY repairs.
I see the same trouble spots over and over in older Portland homes, newer subdivision walls, and remodeled rooms where one surface has been patched more than once. The texture may be called orange peel, but the actual pattern on the wall can be lighter, tighter, flatter, or built up from repainting. That means the can, nozzle setting, distance, and wall moisture all matter. So does your timing. A patch can look close while it is wet and still dry noticeably wrong.
Before you spray, judge the repair the way a finisher would:
- Will people see it at eye level every day in a hallway, living room, stairwell, or entry?
- Will side light hit it from a window, can light, or lamp and show every ridge and halo?
- Does the room need to look clean for resale, tenants, or a final walkthrough where small flaws stand out?
- Are you prepared to sand it back and do it twice if the first pass flashes, spits, or dries heavier than the surrounding wall?
One yes puts the repair in the caution category. Two or more usually means the smart move is to stop before texture and hand it to someone who does this all the time.
That is the DIY checkpoint. If the wall is in a low-stakes spot, and you can live with a repair that is close but not invisible, it may be worth trying. If the patch is in a prominent room, the standard changes. "Pretty close" still reads as a patch.
A garage wall can tolerate that. A Lake Oswego dining room, a Tigard stairwell, or a clean modern living room usually will not.
If you want a second opinion before spraying, request a free estimate from CS1 Real Interiors. It is a lot cheaper to get the match right than to scrape back a failed texture job after paint.
The Art of Applying Orange Peel Texture
When people ask how to match orange peel texture, they usually mean the spray step. Fair enough. At this stage, the wall either starts to come together or starts to unravel.
The first rule is simple. Don’t let the wall be your test panel.
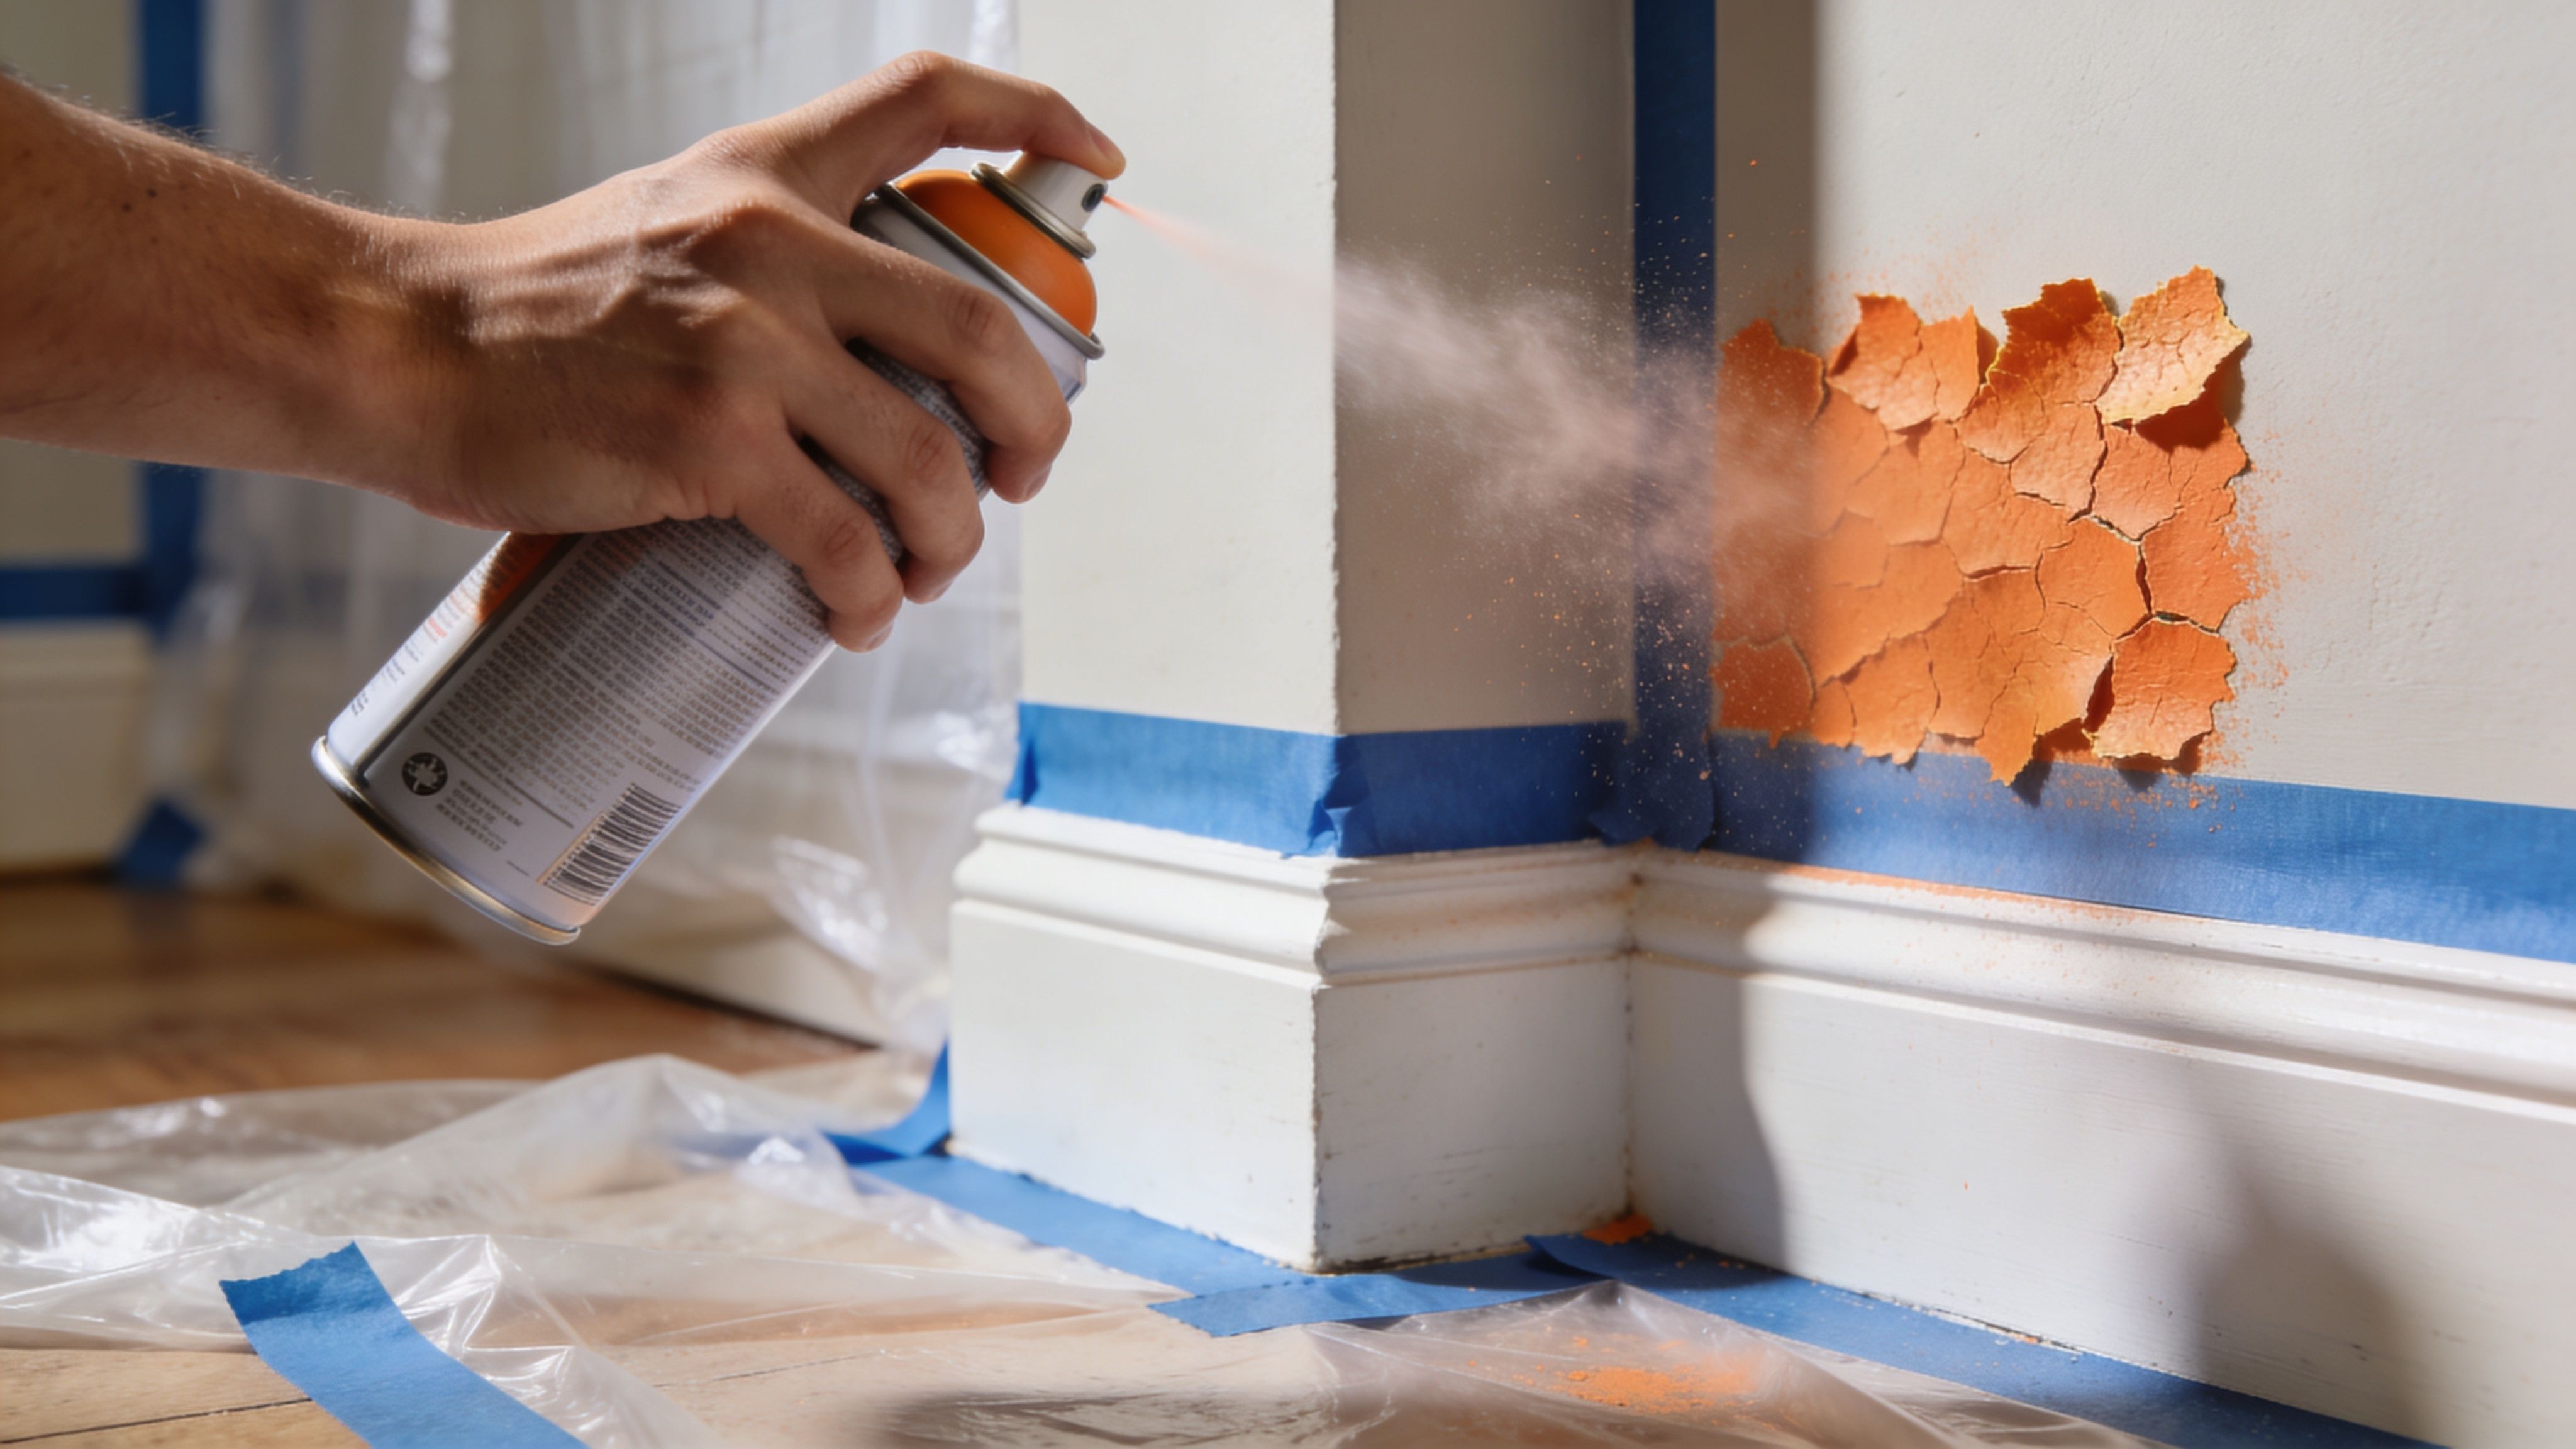
Start with testing not spraying
Mask off nearby surfaces before you do anything else. Texture mist travels. Floors, trim, outlet covers, and adjacent walls all need protection.
Then prep the can exactly the way you’d want any spray material prepped. One spray analysis notes that the nozzle setting matters a lot. Setting an aerosol nozzle to the correct density, fine, medium, or heavy, can achieve up to 80 to 90% visual matching accuracy on light orange peel patterns, which are common in over 60% of homes in the Portland metro area, according to this orange peel spray technique reference.
Shake the can for a full minute. Not a quick rattle. A full minute.
Then spray cardboard and compare the pattern to the wall. Adjust. Spray again. Compare again. If the wall has a light pattern, start fine. If the texture is heavier, open it up gradually. Small adjustments matter.
What good spray technique looks like
Most bad results come from trying to finish in one pass. That’s the wrong move.
Use light passes and let the pattern build. Keep the can moving. Hold a steady distance. Overlap your passes so the texture lands evenly instead of forming isolated heavy spots. A smooth, controlled sweep works better than short bursts and random circles.
A few practical rules help:
- Start lighter than you think. You can add more. Removing excess is harder.
- Keep your hand moving. Pausing in one spot creates blobs.
- Overlap consistently so the pattern doesn’t look striped.
- Watch the edges because that’s where repairs usually show first.
For a visual reference on the kind of hand motion and spray control that produces better results, this quick video is useful:
One of the oldest texture-matching lessons still holds up. The first spray is only information. It tells you whether your setting, distance, and speed are close. The second pass is where restraint matters. Don’t chase perfection while the material is still landing wet.
Spray texture rewards patience and punishes confidence.
Feathering and Finishing for an Invisible Repair
Fresh texture rarely looks perfect the second it lands. It often needs a little shaping once it begins to set. This is the step that separates a passable repair from one that blends into the room.
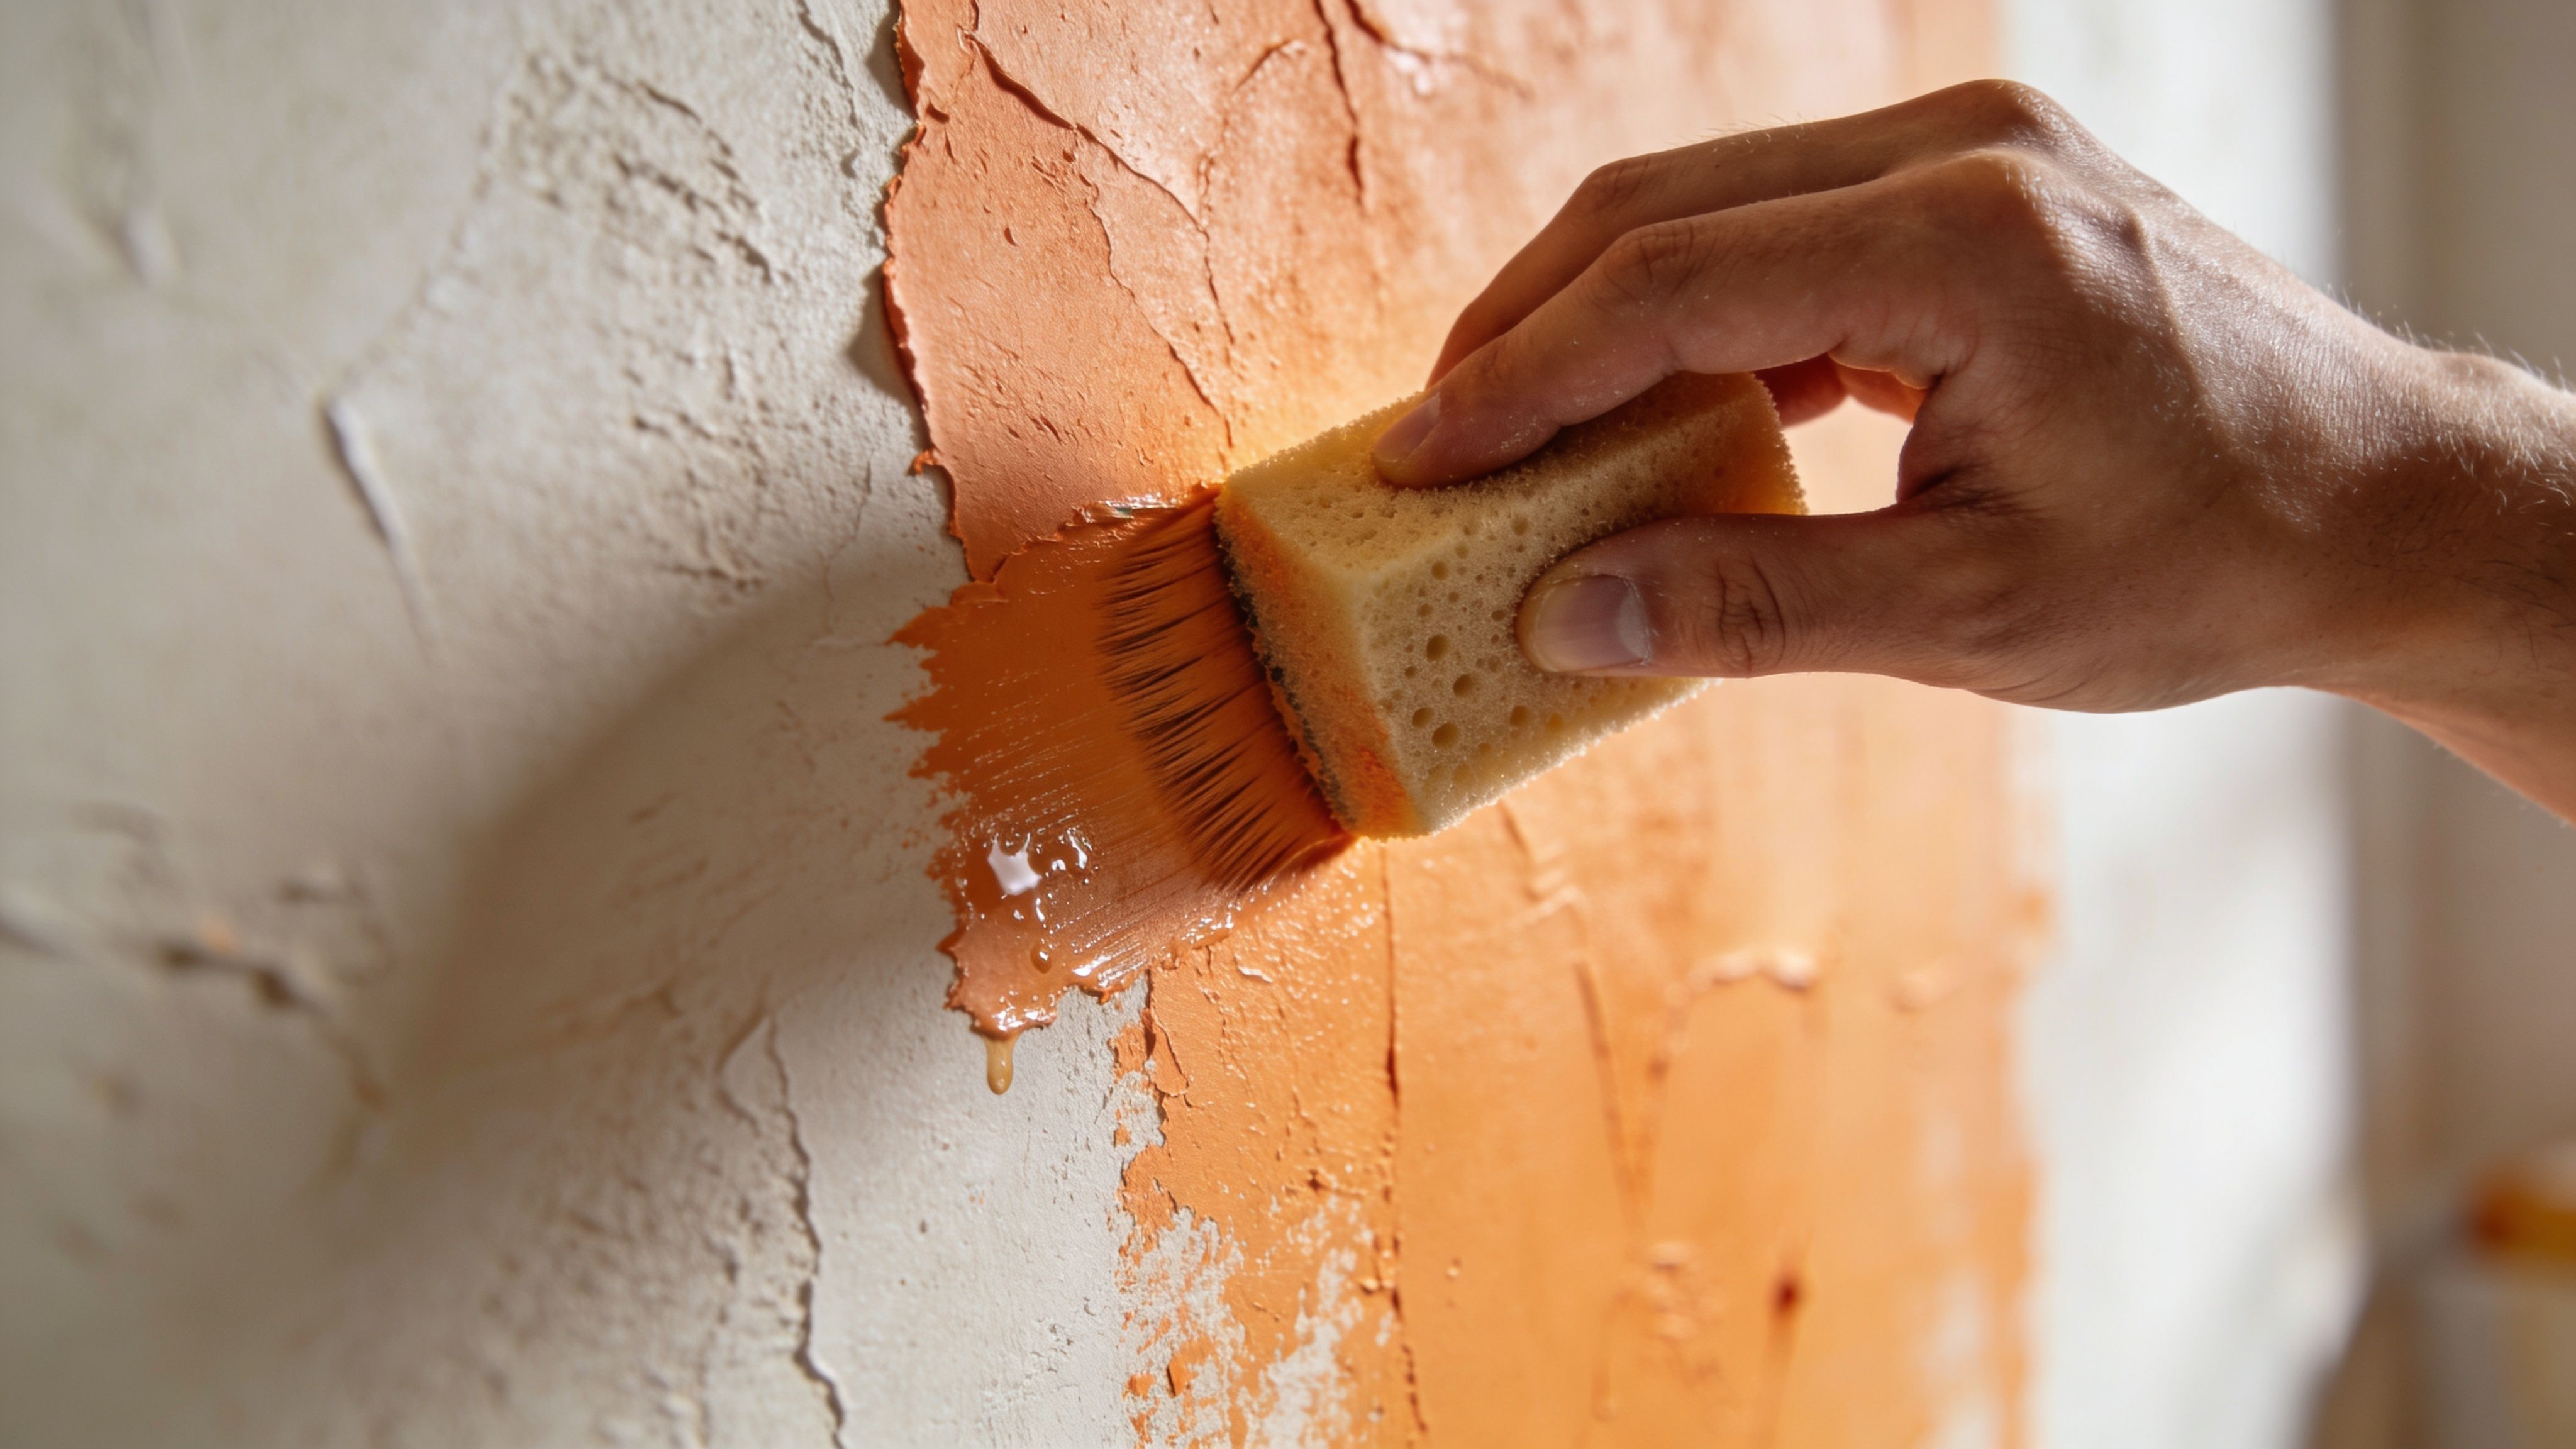
Catch the texture at the right moment
If you touch it too early, you smear it. If you wait too long, it hardens and stops cooperating. The sweet spot is when the spray has set enough to hold shape but still has a little give.
At that stage, lightly soften the highest peaks. Some finishers use a broad drywall knife held very flat and barely graze the surface. Others prefer a damp sponge around the perimeter to blur the transition. Either method can work if the touch is light.
The wrong move is pressing down to “fix” everything. That flattens the pattern and creates a patch that looks compressed compared to the original wall.
Look from the side, then from the opposite side. Rotate your light source if needed. A repair that looks decent straight on can still show badly under raking light.
Prime and paint like the repair matters
Once the texture is dry, prime the repaired area thoroughly. Don’t assume paint alone will unify the surface. Primer helps lock down porosity differences between old and new material.
After primer, apply your finish paint carefully and extend it enough to blend sheen and color into the surrounding wall. If you only dab color right over the patch, the paint edge may show even when the texture is decent.
A few finish reminders:
- Use the same sheen as the existing wall. Texture can match and still look wrong if the sheen doesn’t.
- Check the repair in daylight and artificial light. Different lighting reveals different flaws.
- Don’t rush touch-ups. Let each layer tell you what still needs adjustment.
The last ten percent of the work decides whether the repair looks professional or patched.
For homeowners updating a room at the same time, pairing drywall work with interior painting often makes the final result more uniform, especially on walls with previous touch-up history or fading.
When Your Match Is Not a Match What to Do Next
Sometimes the patch dries, the paint goes on, and the repair still jumps out from across the room. That is the point where a lot of DIY jobs go sideways. People keep adding texture, keep sanding, keep touching up paint, and the repair area gets wider every round.
The first job is to call the failure correctly. A heavy, pebbly patch usually means too much material went on or the spray pattern was wrong for the wall. A patch that looks smooth in the middle but rough at the edges usually points to poor control during application. A visible ring after paint often has less to do with texture than with flashing, uneven primer coverage, or a sheen difference that shows up under side light.
Here is the practical read on what you are seeing:
- Too heavy and lumpy usually needs to be knocked down, skimmed again, sanded flat, and retextured.
- Too light and flat can sometimes take another pass, but only if the first layer is still shallow enough that you are not building a raised patch.
- A visible halo usually means the repair was not blended far enough, or the surface absorbed primer and paint differently than the surrounding wall.
- A repair that looks right up close but wrong from across the room often comes down to pattern scale. The droplets may be similar, but they are not distributed like the original wall.
That last problem catches people all the time in Portland homes. Older interiors around Portland can have a lighter hand-applied look, while newer repairs often come out too uniform from a can. On paper it is all "orange peel." On the wall, those small differences stand out.
Stop before the patch turns into a full wall correction.
If two correction attempts have made the area larger, the smart move is usually to scrape back to a clean edge and reassess, not keep layering product. I have seen plenty of small repairs become half-wall repaints because the texture was close, but not close enough, and every extra pass made the light hit it differently.
That is the pro-level reality check. Matching orange peel is not just about getting bumps on the wall. It is about matching droplet size, density, spread, edge fade, primer absorption, and final sheen so the repair disappears in normal room lighting and under raking light. That is why a repair can look acceptable wet, decent dry, and still fail after paint.
Homeowners around Portland see this most often after a "small" patch turns into a weekend project with mixed results. At that stage, professional correction is usually faster, cleaner, and cheaper than redoing the same spot a third time.