You notice the stain on a wall or ceiling when the light hits it just right. Maybe the paint is bubbling. Maybe the drywall feels soft when you press it. In Portland, Beaverton, Hillsboro, and the rest of the metro area, that moment usually comes with the same question: is this a simple patch, or is there a bigger problem behind the wall?
Water damaged drywall makes people anxious for good reason. If you move too slowly, moisture can turn into mold. If you move too fast, you can trap moisture inside the cavity and create a much more expensive repair later. That’s the part many rushed DIY jobs get wrong, especially in a damp climate like ours.
Knowing how to fix water damaged drywall starts with a calm process. Find the source. Assess the damage. Dry everything fully. Then repair it in a way that won’t crack, sag, or flash through the paint later. The repair itself isn't always the hardest part. Drying and finish matching usually are.
Table of Contents
- That Sinking Feeling Discovering a Water Stain
- How to Assess the Damage and Ensure Safety
- The Critical Drying Process and Mold Prevention
- Cutting Patches and Installing New Drywall
- Taping Mudding and Matching Wall Texture
- When to Call a Professional Drywall Contractor
That Sinking Feeling Discovering a Water Stain
A lot of homeowners first spot water damage during ordinary moments. A rainy morning in Portland. A bathroom fan running upstairs in Tigard. A tenant calling about a ceiling spot in a rental in Gresham. The stain itself may look minor, but drywall doesn't usually stain without a reason.
In older homes around Beaverton and Portland, I often see slow plumbing leaks that have been hiding for a while. In newer homes and remodels, the issue is sometimes around a shower, toilet supply line, roof penetration, or a poorly sealed window. On second-floor ceilings, the stain may be directly below the leak, or it may be several feet away because water followed a joist bay before it showed itself.
What matters most in that first moment is not cosmetics. It’s urgency. Mold growth on water-damaged drywall can begin in as little as 48 hours after exposure to moisture, which is why fast assessment and drying matter so much in the Portland area’s wet conditions, as noted in this guidance on wet drywall response.
Practical rule: A stain is not the problem. A stain is evidence of the problem.
What to do right away
- Stop the source if you can: Shut off the fixture, place a bucket, turn off the water supply, or temporarily protect the roof leak area until a permanent repair can be made.
- Protect the room below: Move furniture, rugs, electronics, and artwork out of the splash or drip zone.
- Watch for sagging ceilings: If the drywall is bulging, don’t stand under it. Wet ceiling board can let go without much warning.
- Avoid sealing it up too soon: Primer and paint don't solve a moisture problem. They only hide it for a little while.
Homeowners often want reassurance that the repair is manageable. Usually, it is. But the right repair starts with accepting that drywall is only one part of the problem. The leak, the moisture in the cavity, the insulation behind the panel, and the final texture match all matter if you want a repair that disappears and stays sound.
How to Assess the Damage and Ensure Safety
Before you cut anything, make the area safe. If water has affected a wall or ceiling near outlets, switches, or light fixtures, shut off power to that area. If the ceiling is sagging badly, keep people out from under it until you know what’s going on.

Start with the source, not the stain
The visible mark is only where the moisture announced itself. You still need to trace it back.
Look above the damage first. If it’s on a wall, inspect the bathroom, kitchen, window, roofline, or plumbing route above or behind that section. If it’s on a ceiling, think in layers. Bathroom leak, tub overflow, roof issue, attic condensation, and HVAC drainage are common suspects depending on the home.
Use your senses:
- Look for swelling: Raised seams, popped tape, bubbled paint, and rounded corners on what used to be a flat panel.
- Touch for softness: Drywall that feels spongy or crumbly has likely lost integrity.
- Smell the area: A musty odor often tells you moisture has been sitting longer than you hoped.
- Check behind the board if needed: A careful test cut can reveal wet insulation or darker framing inside the cavity.
If you can't identify where the water came from, the drywall repair is premature. You'll just be repairing the same spot twice.
Decide whether you are patching or replacing
There’s a useful rule here. Full replacement is generally recommended over patching when water damage exceeds 30% of a drywall panel, because that’s the point where structural integrity and hidden mold risk become harder to trust, according to this drywall repair guide.
That doesn’t mean every stain requires a full sheet. It means you need to be honest about the size and condition of the damage.
| Condition | Better choice | Why |
|---|---|---|
| Small stain, panel still firm | Spot repair may work | Damage may be surface-level only |
| Soft, swollen, or sagging drywall | Replace damaged section | The board has likely lost strength |
| Damage spreads across a large area | Replace more broadly | Cleaner, stronger, more reliable result |
| Wet insulation behind the board | Open the cavity and replace affected materials | Hidden moisture won't fix itself |
A safe assessment usually points you toward one of two paths. Either you have a contained repair with stable drywall around it, or you have a moisture event that requires removal, drying, and rebuilding. The second one is more common than many homeowners expect.
The Critical Drying Process and Mold Prevention
A common Portland repair story goes like this. The stain gets cut out on Saturday, a new patch goes in on Sunday, and by the first stretch of cold wet weather the room starts to smell off. The finish looked fine at first. The wall cavity was not dry.
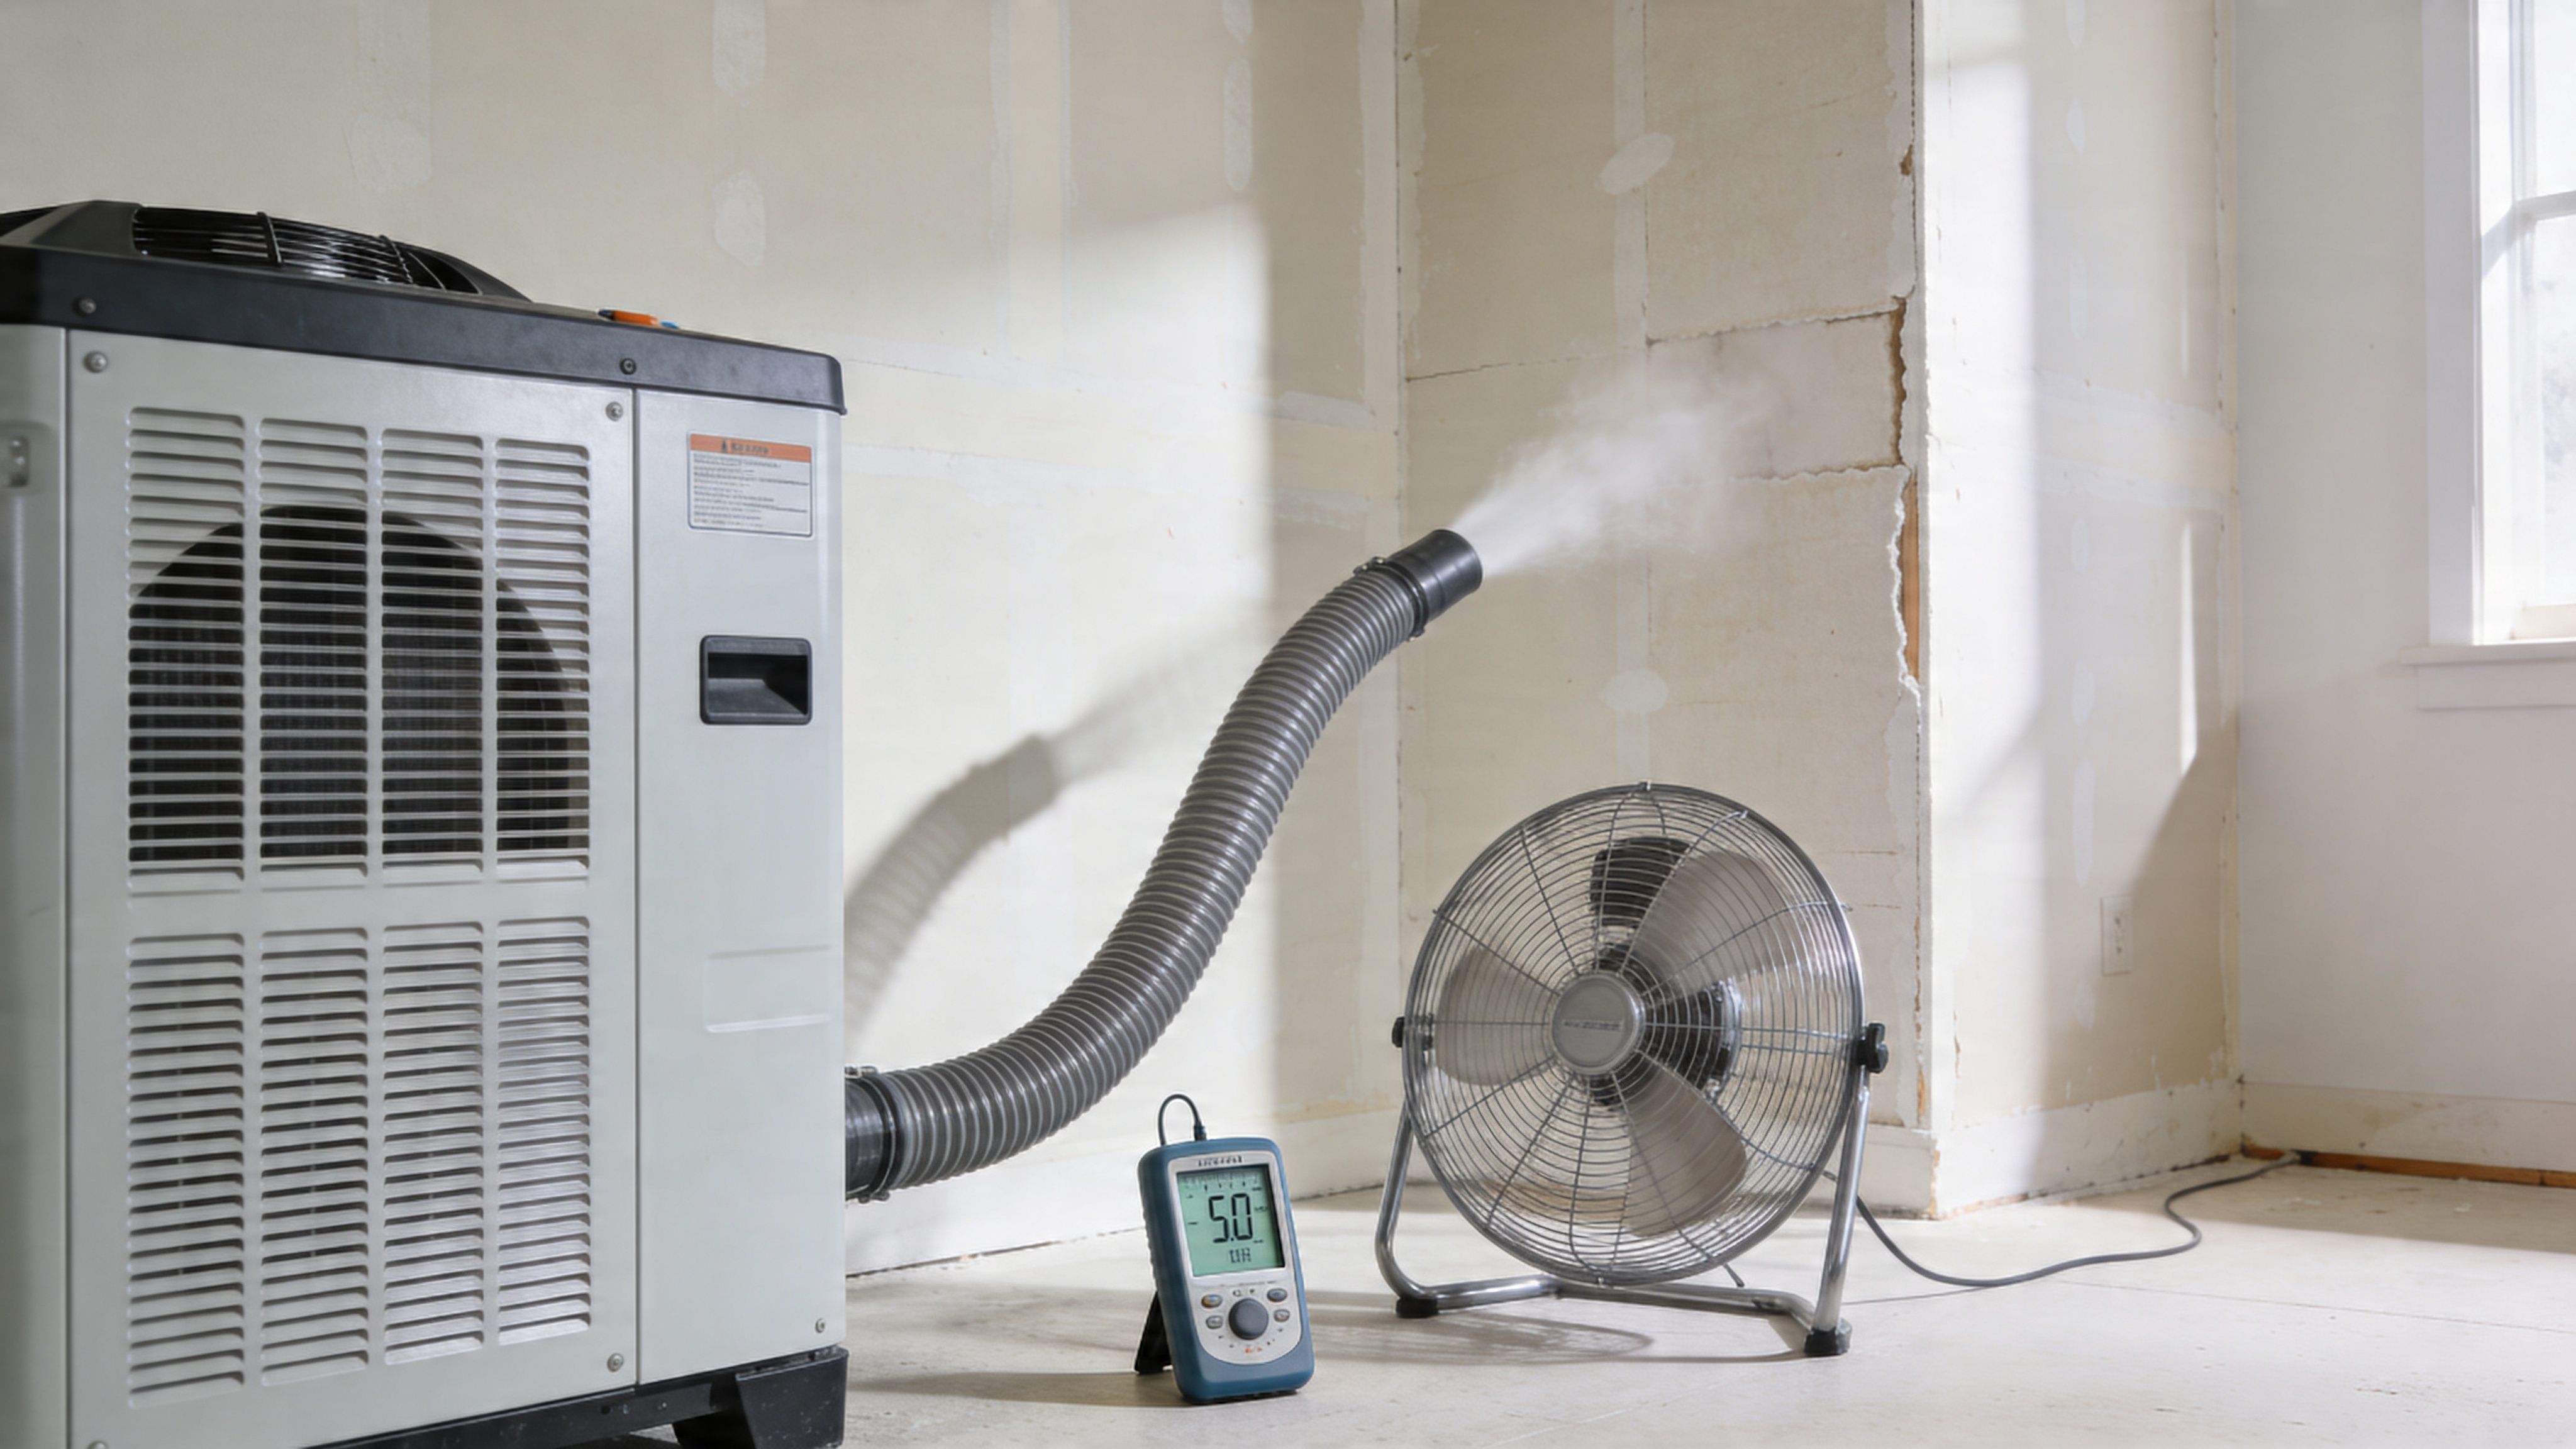
In this climate, drying is the part that protects your house value. A fast patch can trap moisture in studs, insulation, and the back of the remaining drywall. Then the repair turns into a much bigger problem. You may end up paying for mold cleanup, repainting, and opening the same wall a second time.
Surface dry is not dry enough.
Dry the cavity, not just the face of the wall
If water damaged drywall was soft enough to remove, treat the cavity behind it as wet until you prove otherwise. Painted surfaces can feel dry while insulation stays damp and framing still holds moisture, especially on exterior walls and in older Portland homes with limited airflow in the cavity.
Use a practical sequence:
- Stop the water source first: Roof leak, plumbing leak, window intrusion, whatever caused it.
- Open enough of the wall: Small holes are not always enough. You need room for air movement and a clear view of what is wet.
- Remove wet insulation: Insulation that is holding water usually needs to go. Leaving it in place slows drying and keeps moisture against the framing.
- Run fans and dehumidification together: Fans move air. Dehumidifiers pull moisture out of that air. You often need both.
- Check for real dryness before closing: Do not rely on touch or appearance alone.
I have seen homeowners do every visible part of the repair well, then lose the finish because they closed the wall too early. Tape starts to bubble. Texture flashes under paint. A faint odor shows up on damp mornings. Those are expensive signs of a drying problem, not a finishing problem.
Watch for mold conditions, not just visible mold
Mold does not need a dramatic black patch to become a real issue. A repeated leak, damp insulation, or moisture trapped in cool wall cavities can create the conditions for growth behind a clean-looking patch.
Pause the repair and bring in a professional if you find any of these:
- Musty odor that stays after the wall is opened
- Wet insulation or framing that is drying very slowly
- Staining from more than one water event
- Visible growth on framing, backing, or the back of the drywall
- Ceiling damage above finished living areas
- Any uncertainty about whether the cavity is dry
A wall that looks repaired can still be carrying enough hidden moisture to fail later.
That is the trade-off homeowners need to understand. Waiting an extra day or two for proper drying feels slow. Reopening a finished wall, matching texture again, and dealing with mold concerns is much slower and far more expensive.
If the damage is widespread, the leak source is unclear, or you are not confident the cavity is dry, bring in a qualified drywall contractor before you close the wall. CS1 Real Interiors provides professional water damage repair and mold prevention for homes across the Portland area. Request your free estimate today.
Cutting Patches and Installing New Drywall
Once the area is dry, clean, and stable, the repair becomes straightforward. This is the repair aspect commonly considered when addressing water damaged drywall. The goal isn't just filling a hole. It's creating a patch that stays flat, holds tight, and gives you a fair chance of hiding the repair.
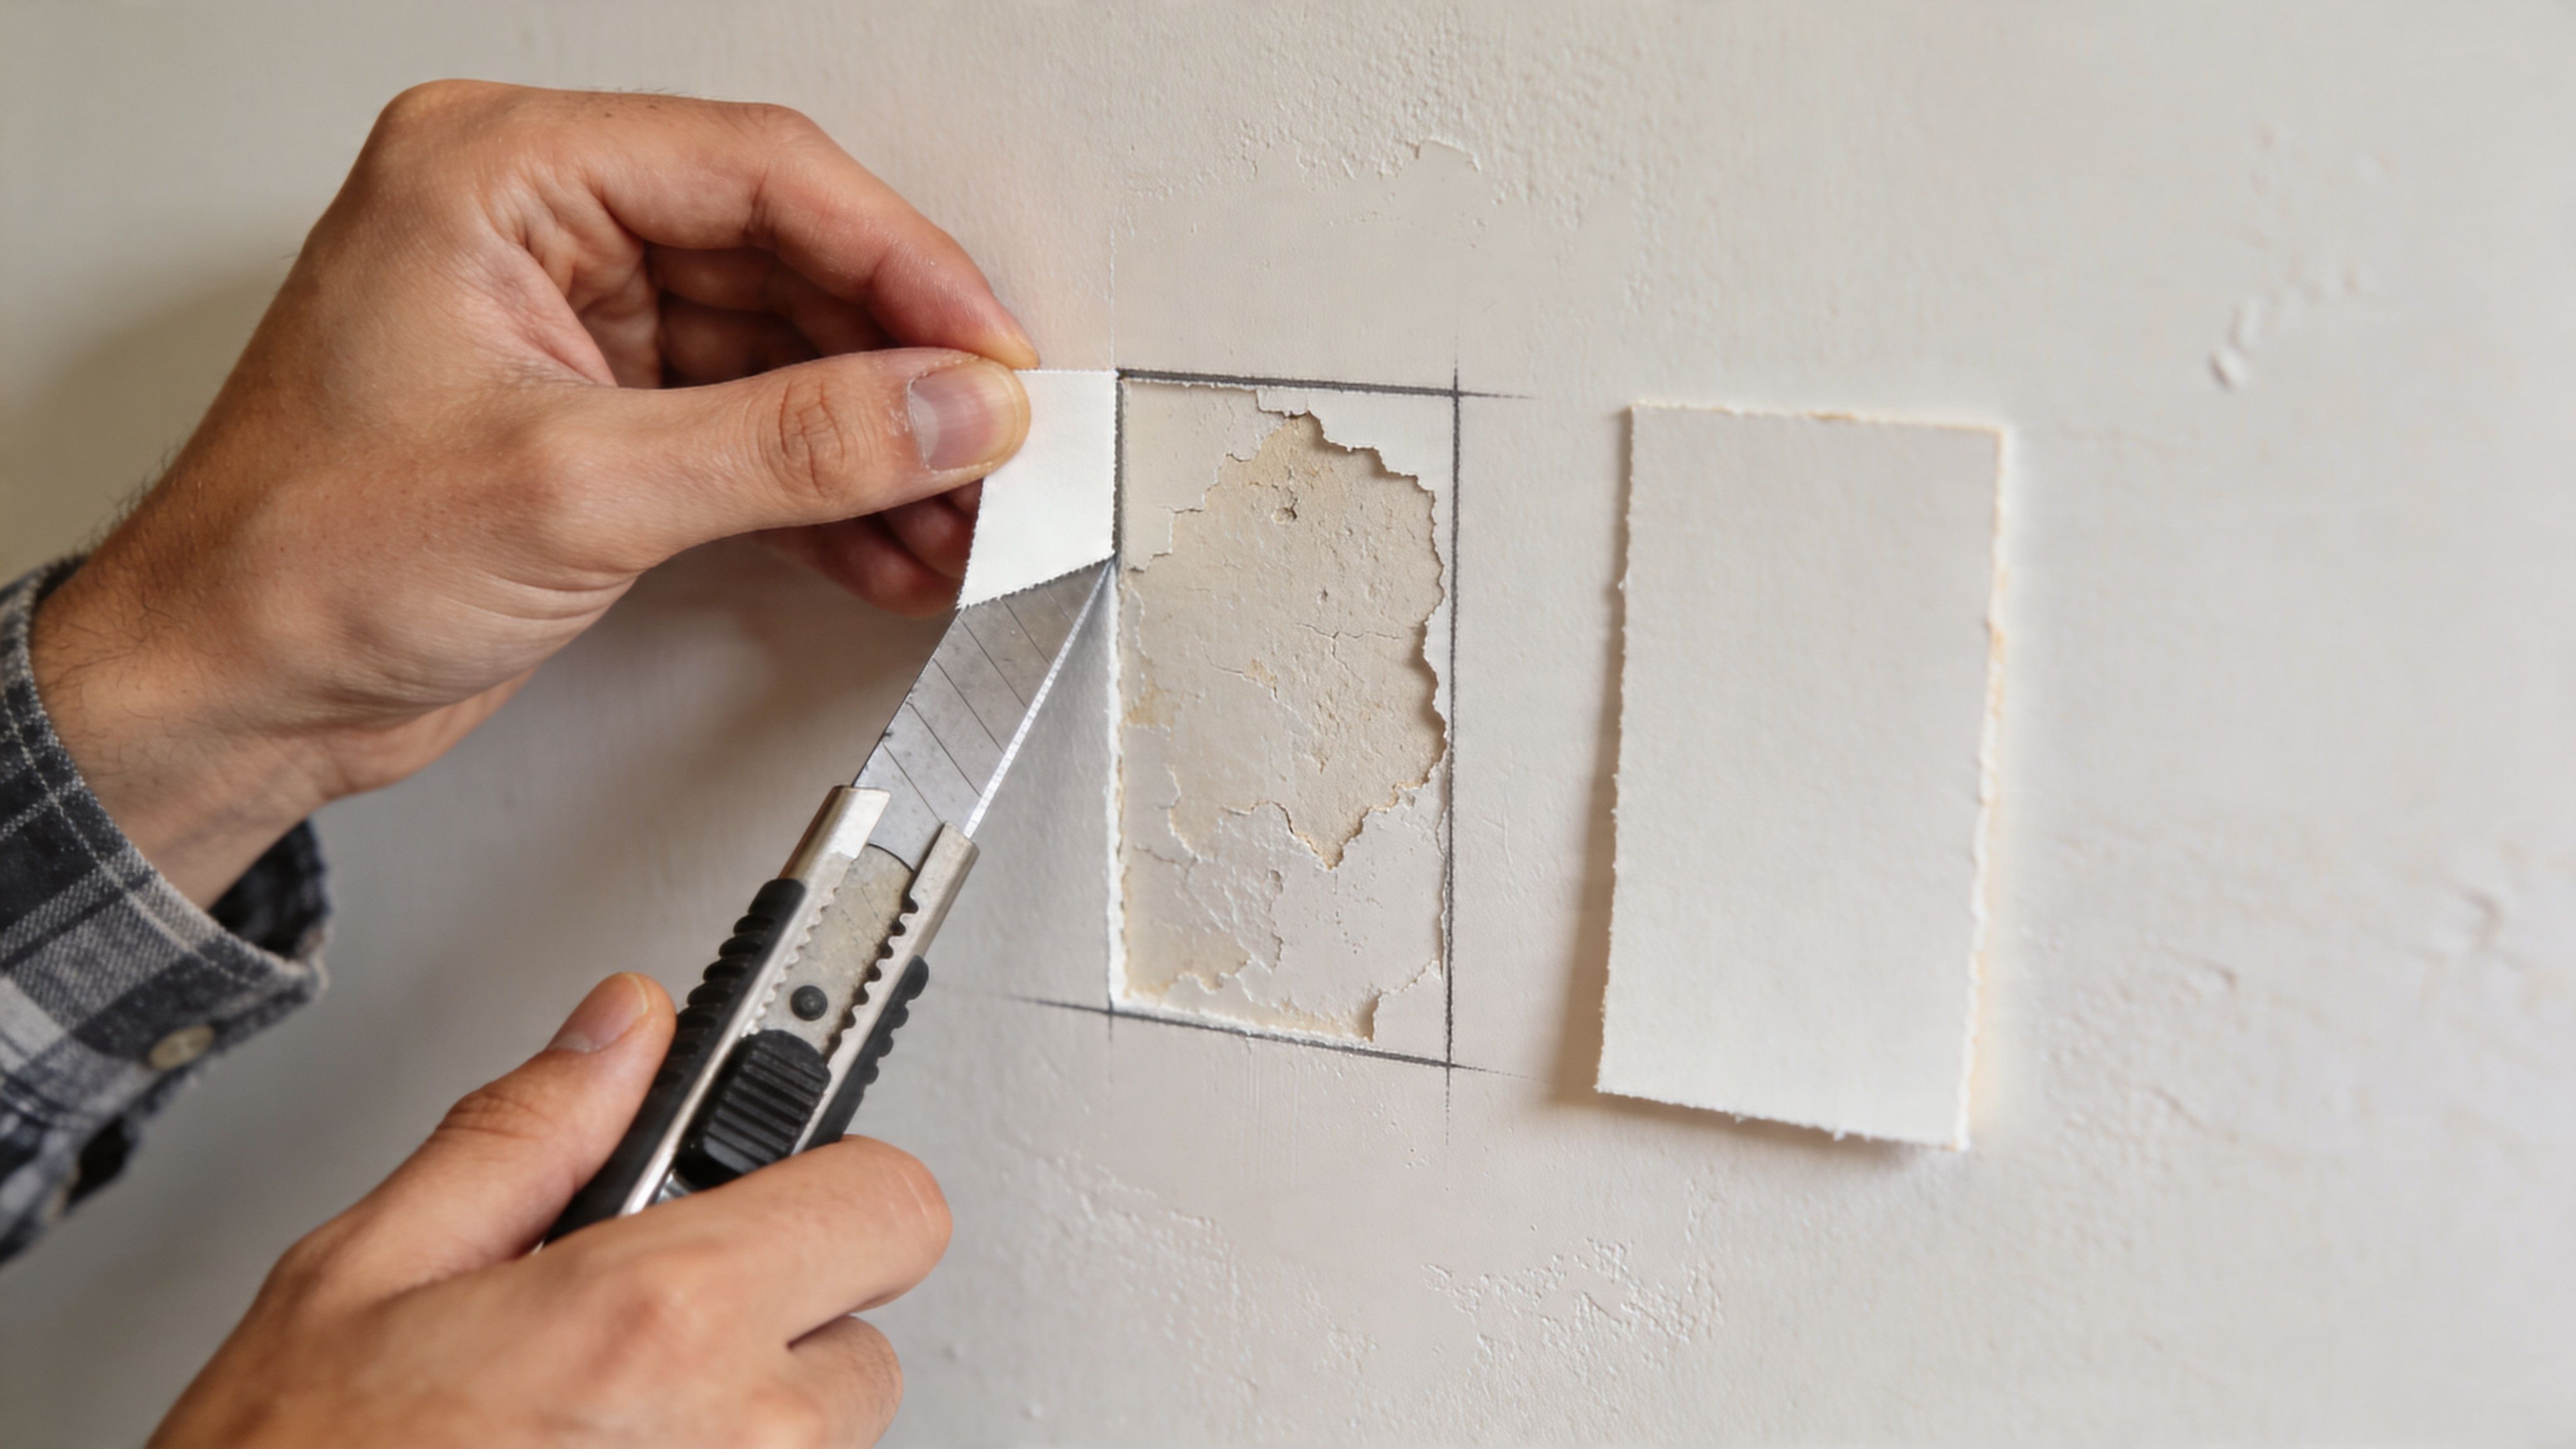
Cut clean and create solid backing
Start by marking a neat square or rectangle around the damaged area. Straight cuts are easier to patch and finish than irregular shapes. If possible, extend the cut so the new piece can land on framing. A patch tied into studs is stronger and less likely to move.
If the opening falls between studs, install wood backers or furring strips behind the edges so the patch has something solid to fasten to. For a structurally sound repair, secure the patch to backer boards or furring strips with 1-1/4 inch drywall screws placed every 8 inches, as described in this drywall patching method.
A few habits make a big difference:
- Cut back to sound material: Don’t leave soft gypsum or torn paper at the edges.
- Keep corners square: Crooked cuts create wider gaps and more finish work.
- Set screws properly: The screw head should sit just below the paper face without tearing through it.
- Check the cavity before closing: Make sure no wet insulation or debris remains.
Fit the patch before you fasten it
Measure carefully and cut the replacement piece for a snug fit. You want a patch that drops in cleanly without forcing it. If it’s too tight, it can chip the surrounding edge. If it’s too loose, the finish work becomes harder and more visible.
Ceilings need extra care because gravity works against you. On overhead repairs, poor backing or loose fastening shows up later as cracks or a shallow dip around the perimeter. That’s one reason ceiling patches often look simple at first and disappointing after paint.
This walkthrough helps show the patching sequence visually:
A simple field checklist
Before moving on to tape and mud, confirm these basics:
- The leak is repaired: No active moisture source remains
- Framing is dry and solid: No dampness, rot, or lingering odor
- Insulation has been addressed: Wet material is out
- Patch sits flush: Not proud, not recessed
- Fastening is consistent: The board doesn’t flex when pressed
Clean backing and a flush patch matter more than speed. If the board moves now, the finish will fail later.
This phase rewards patience. Homeowners often rush to the mud because it feels like progress, but the best-looking repairs are usually built on careful cutting, firm backing, and a patch that fits right the first time.
Taping Mudding and Matching Wall Texture
A water damage repair isn’t done when the new drywall is in. It’s done when you can’t tell where the damage used to be. That’s where many repairs separate into two categories. Structurally acceptable, and visually invisible.
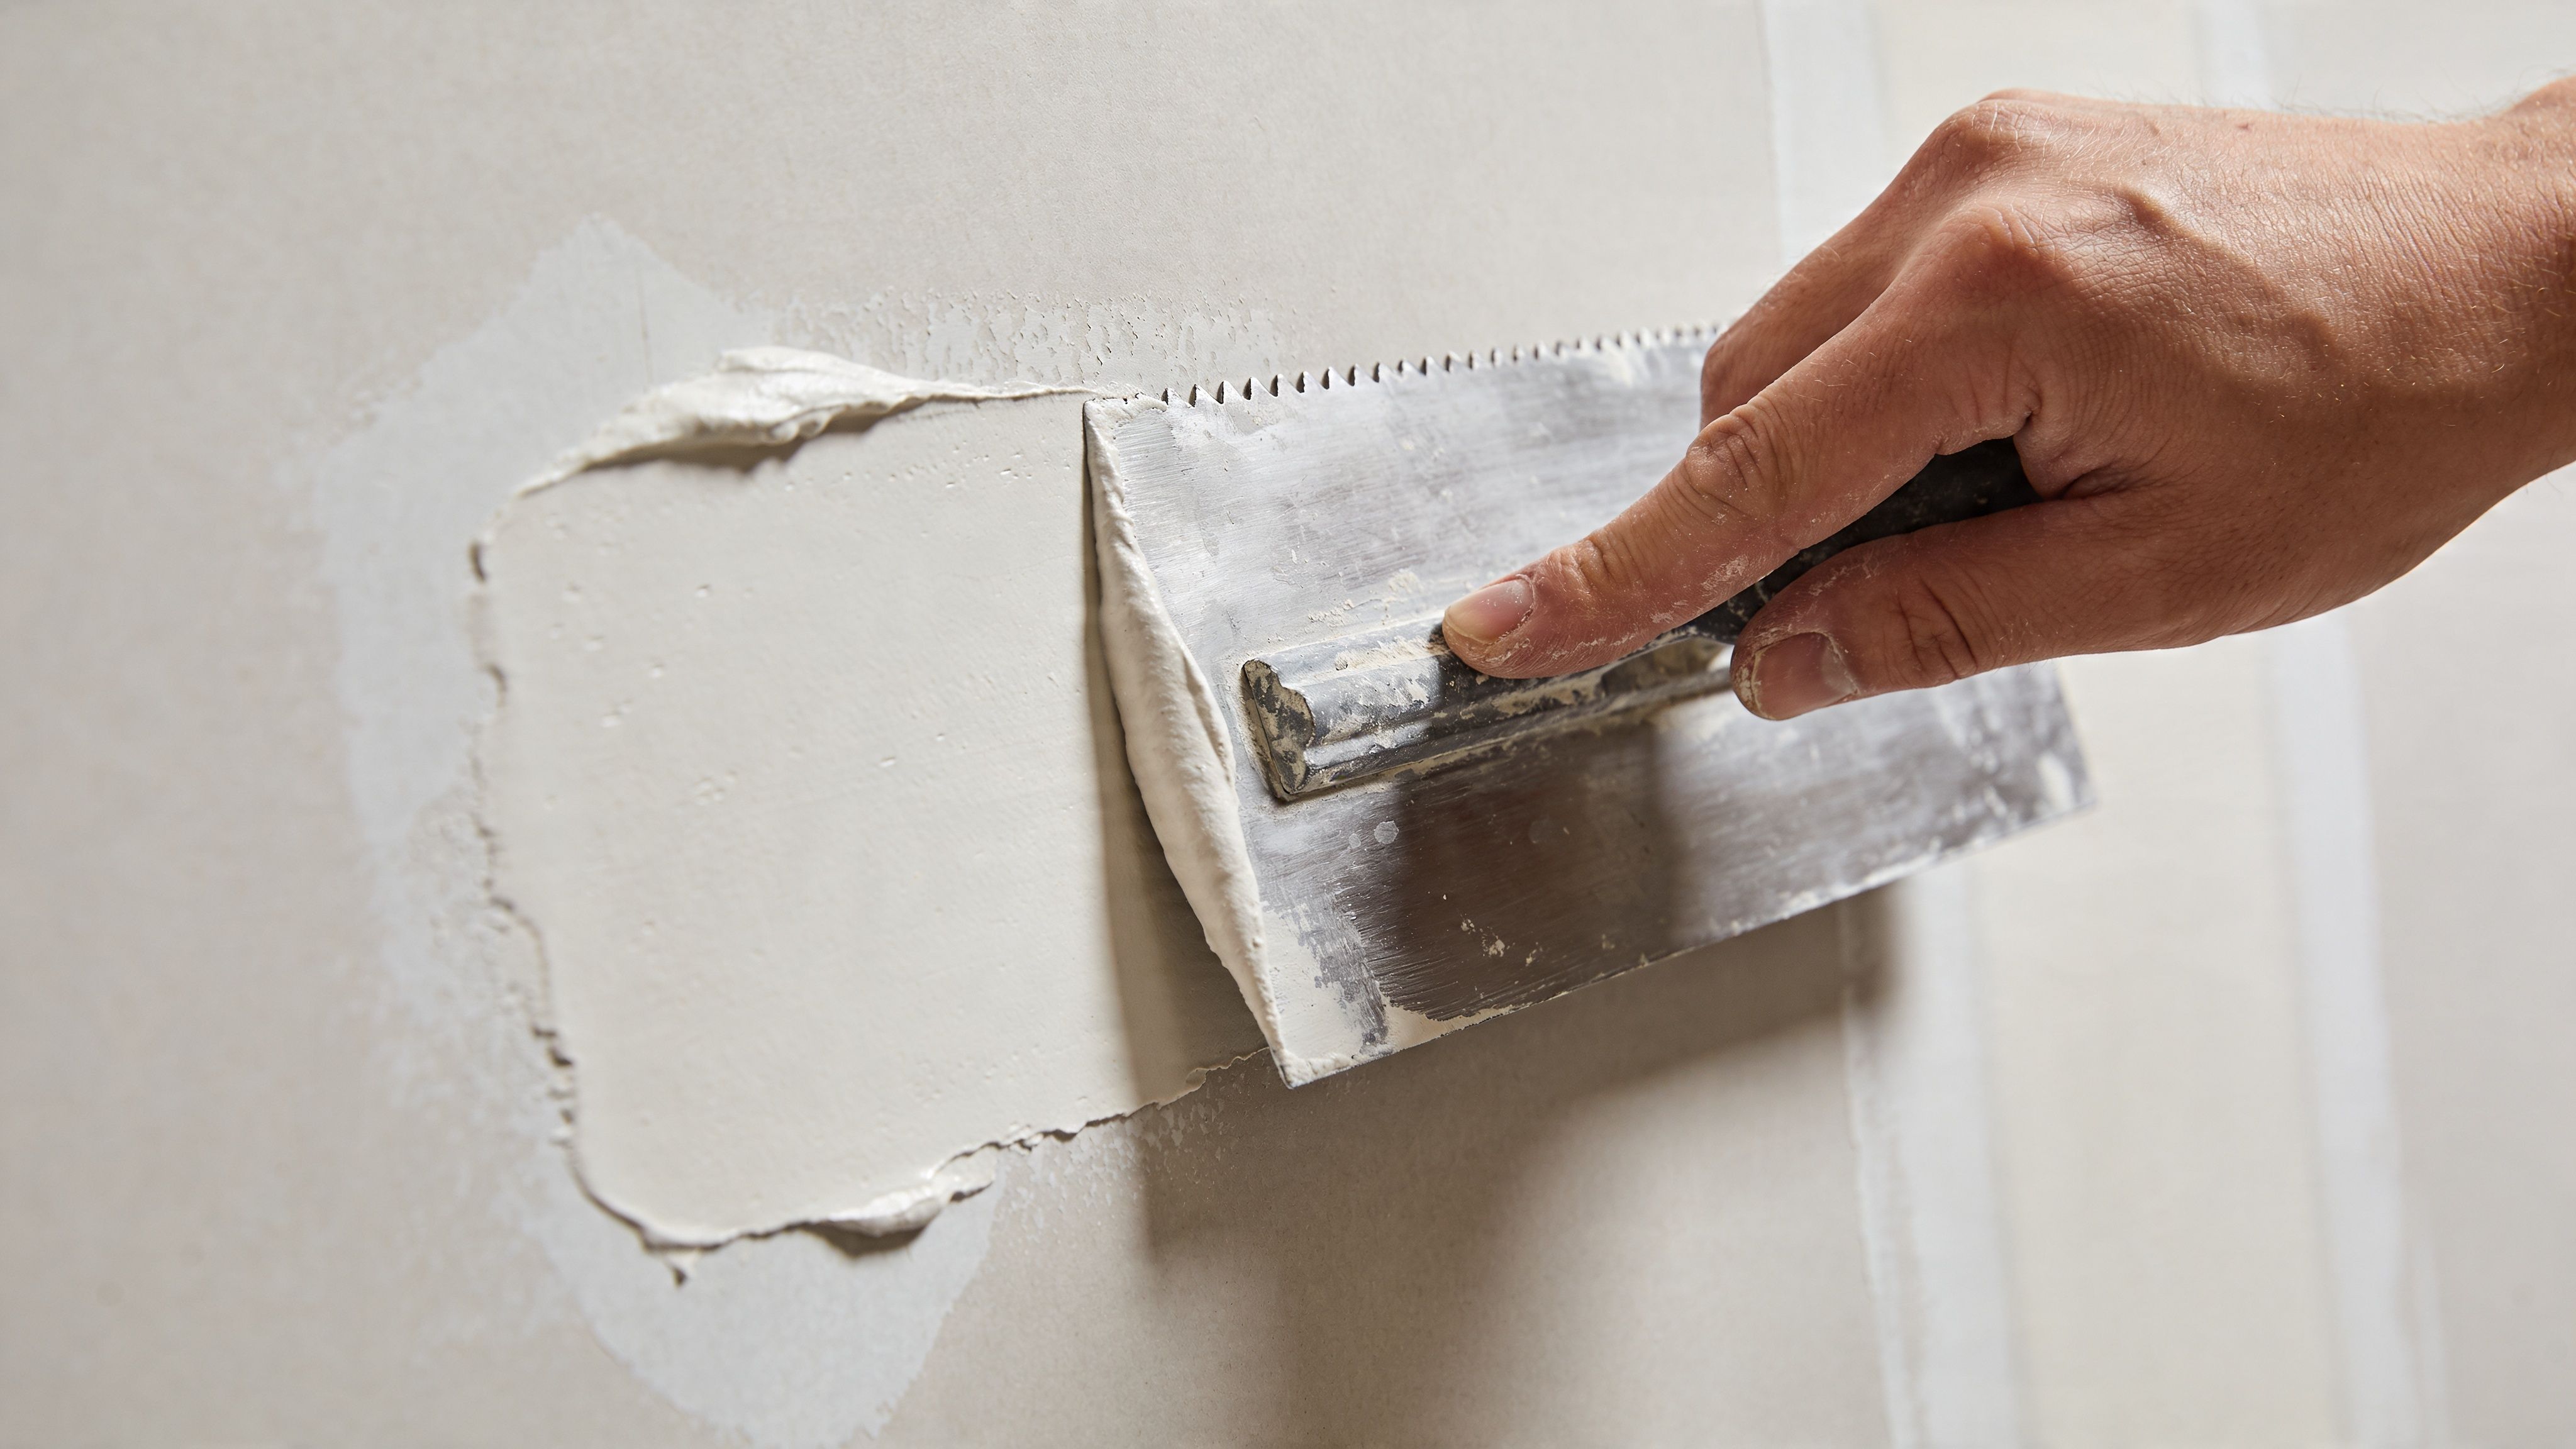
Thin coats beat thick coats every time
Tape the seams, embed them cleanly, and build the repair with multiple thin coats of joint compound. Thick mud shrinks more, dries unevenly, and leaves you with more sanding and more edge visibility. Thin coats take longer, but they produce flatter work.
A practical approach looks like this:
- Bed the tape first: Press it firmly into compound so there are no bubbles or dry spots.
- Feather wider with each coat: The goal is to spread the transition, not stack a hump over the seam.
- Let each coat dry fully: Sanding damp mud tears the surface and wastes time.
- Prime before paint: Primer helps reveal defects before the finish coat goes on.
On smooth walls, even small imperfections show. On walls with light texture, the patch can hide a little easier. But “easier” doesn’t mean easy. If the edge telegraphs through the paint or the sanding scratches catch side light, people notice it right away.
Texture matching is where repairs get obvious
Texture matching is usually the hardest part for homeowners. Orange peel, hand texture, skip-trowel, and custom finishes all reflect light differently. A repair can be solid, flat, and painted, yet still stand out because the surrounding texture wasn’t recreated well.
That problem becomes much more visible on vaulted or second-story ceilings. The complexity of texture matching is magnified on those surfaces because light reflection exposes imperfections, and access and overhead working conditions make blending more difficult, as explained in this ceiling repair discussion.
In Portland-area homes, that matters more than people think. A ceiling repair in a Lake Oswego great room or a stairwell wall in a custom home doesn’t get viewed straight-on. It gets viewed from below, from across the room, and under changing daylight. Every ridge, flash, and mismatch becomes easier to see.
Smooth repairs are technical. Invisible repairs are craftsmanship.
When finish quality affects value
If you’re getting a home ready to sell, or if you manage a rental turnover in Hillsboro, Vancouver, or Tigard, finish quality has a direct effect on how people judge the space. Buyers and tenants may not know why a patch looks wrong, but they know when a wall or ceiling feels repaired instead of finished.
That’s also where professional drywall finishing, interior painting services, and full-surface blending can save frustration. On high-visibility areas, repainting only the patch often isn’t enough. The surrounding plane may need broader prep and paint work so the repair doesn’t flash through under daylight or lamp light.
When to Call a Professional Drywall Contractor
A lot of homeowners call after trying to keep a water repair small. They cut out the stain, patch the opening, paint it, and hope they caught it in time. In Portland’s damp climate, that gamble can get expensive. If moisture is still trapped in the cavity, or if the texture patch catches light from the wrong angle, the repair often has to be opened again. In the worst cases, a simple drywall job turns into mold cleanup, repainting, and a disclosure concern when the home goes on the market.
A professional is the right call when the repair has real risk attached to it, not just because the patch looks inconvenient.
Call a professional if any of these apply:
- The damage is in a ceiling: Wet ceiling drywall can soften, sag, or fail, and working overhead raises the risk.
- There’s mold, staining that keeps returning, or a musty smell: That usually points to hidden moisture or a leak that was never fully resolved.
- The affected area goes beyond a small, contained patch: Larger repairs need better drying control, cleaner cut lines, and more finish work to keep the wall or ceiling flat.
- The texture is specialized or the area is highly visible: Tall walls, stairwells, entryways, and vaulted ceilings show every mismatch.
- You’re getting ready to sell or turn over a rental: Buyers and tenants notice patchy texture, flashing paint, and repairs that look rushed.
- Several trades may be involved: Water damage can overlap with insulation, framing, and paint, and the repair needs to be handled in the right order.
I see this often in Portland-area homes after roof leaks, bathroom overflows, and slow plumbing drips around upstairs tubs. The drywall repair itself is only part of the job. The key is knowing the area was opened enough, dried long enough, and finished well enough that you do not end up paying for the same repair twice.
For homeowners in Portland and nearby cities, a professional drywall repair service gives you a repair that is properly opened, dried, rebuilt, and finished. That matters whether you’re dealing with a bathroom leak in Beaverton, a ceiling repair in Hillsboro, or prep work before listing a home in Lake Oswego.
If you need a repair plan you can trust, contact CS1 Real Interiors for a free, no-obligation estimate.
If you need help fixing water damaged drywall in Portland, Beaverton, Hillsboro, Tigard, Lake Oswego, Gresham, or Vancouver, WA, CS1 Real Interiors provides professional drywall repair, drywall installation, interior painting, insulation, and metal stud framing for residential and small commercial spaces. Request a free estimate through the online contact form and get a repair plan that protects your home, your finish quality, and your timeline.